Thursday, December 5, 2013
Adding Tables to an Existing GoldenGate Configuration with Transaction Integrity
There is always something new to learn every day. For me, today was one of those days, where I learnt a new way to add new tables to an existing Extract, Pump, and Replicat setup.
The current configuration consists of a single Extract and Replicat running OGG 11.2.1.0.13 on OEL 6.4 64bit. Both databases are on the same host.

From the source database, we capture DDL for all tables from the DAY and NIGHT schema and replicate them to the RIVER and WATER schemas on the target respectively.

If you noticed, I’m not using a Pump. The two databases reside on the same server, therefore there’s no need for one.
Onward!
The goal here is to add two more tables STONE and GREYSTREET to the Extract and Pump while GoldenGate is replicating data.

1. Log into the source database via GGSCI
[oracle@blue ggate]$ ggsci

Oracle GoldenGate Command Interpreter for Oracle
Version 11.2.1.0.13 17435036 OGGCORE_11.2.1.0.0OGGBP_PLATFORMS_131002.1206_FBO
Linux, x64, 64bit (optimized), Oracle 11g on Oct  3 2013 02:39:46

Copyright (C) 1995, 2013, Oracle and/or its affiliates. All rights reserved.


GGSCI (blue.color) 2> dblogin userid ggate, password ggate
Successfully logged into database.
2. Add trandata for the new table(s).
GGSCI (blue.color) 3> add trandata song.stone

2013-12-05 15:17:07  WARNING OGG-00869  No unique key is defined for table 'STONE'. All viable columns will be used to represent the key, but may not guarantee uniqueness.  KEYCOLS may be used to define the key.

Logging of supplemental redo data enabled for table SONG.STONE.

GGSCI (blue.color) 4> add trandata song.greystreet

2013-12-05 15:17:15  WARNING OGG-00869  No unique key is defined for table 'GREYSTREET'. All viable columns will be used to represent the key, but may not guarantee uniqueness.  KEYCOLS may be used to define the key.

Logging of supplemental redo data enabled for table SONG.GREYSTREET.
3. Add the two tables in the Extract Parameter file
GGSCI (blue.color) 5> edit params e_gg
...
TABLE song.stone;
TABLE song.greystreet;
...
4. Restart the Extract e_gg
GGSCI (blue.color) 2> stop e_gg

Sending STOP request to EXTRACT E_GG ...
Request processed.


GGSCI (blue.color) 3> start e_gg

Sending START request to MANAGER ...
EXTRACT E_GG starting
5. At this point, capture the Current SCN from the database. Do not lose this number, we need it later!
[oracle@blue ggate]$ sqlplus / as sysdba

SQL*Plus: Release 11.2.0.3.0 Production on Thu Dec 5 15:28:31 2013

Copyright (c) 1982, 2011, Oracle.  All rights reserved.


Connected to:
Oracle Database 11g Enterprise Edition Release 11.2.0.3.0 - 64bit Production
With the Partitioning, OLAP, Data Mining and Real Application Testing options

SQL> select current_scn from v$database;

CURRENT_SCN
-----------
    1113396

SQL> exit
Disconnected from Oracle Database 11g Enterprise Edition Release 11.2.0.3.0 - 64bit Production
With the Partitioning, OLAP, Data Mining and Real Application Testing options
6. Take a Data Pump export of the two tables. Please note the use of FLASHBACK_SCN.
[oracle@blue ggate]$ expdp system/oracle directory=data_pump_dir dumpfile=additional_tables.dmp flashback_scn=1113396 tables=song.stone,song.greystreet

Export: Release 11.2.0.3.0 - Production on Thu Dec 5 15:32:04 2013

Copyright (c) 1982, 2011, Oracle and/or its affiliates.  All rights reserved.

Connected to: Oracle Database 11g Enterprise Edition Release 11.2.0.3.0 - 64bit Production
With the Partitioning, OLAP, Data Mining and Real Application Testing options
Starting "SYSTEM"."SYS_EXPORT_TABLE_01":  system/******** directory=data_pump_dir dumpfile=additional_tables.dmp flashback_scn=1113396 tables=song.stone,song.greystreet
Estimate in progress using BLOCKS method...
Processing object type TABLE_EXPORT/TABLE/TABLE_DATA
Total estimation using BLOCKS method: 128 KB
Processing object type TABLE_EXPORT/TABLE/TABLE
Processing object type TABLE_EXPORT/TABLE/CONSTRAINT/CONSTRAINT
. . exported "SONG"."GREYSTREET"                         5.882 KB     100 rows
. . exported "SONG"."STONE"                              5.679 KB     100 rows
Master table "SYSTEM"."SYS_EXPORT_TABLE_01" successfully loaded/unloaded
******************************************************************************
Dump file set for SYSTEM.SYS_EXPORT_TABLE_01 is:
  /u01/app/oracle/admin/sky/dpdump/additional_tables.dmp
Job "SYSTEM"."SYS_EXPORT_TABLE_01" successfully completed at 15:32:14
7. Run the import on the Target database.
[oracle@blue ggate]$ impdp system/oracle directory=data_pump_dir dumpfile=additional_tables.dmp remap_schema=song:river

Import: Release 11.2.0.3.0 - Production on Thu Dec 5 15:45:29 2013

Copyright (c) 1982, 2011, Oracle and/or its affiliates.  All rights reserved.

Connected to: Oracle Database 11g Enterprise Edition Release 11.2.0.3.0 - 64bit Production
With the Partitioning, OLAP, Data Mining and Real Application Testing options
Master table "SYSTEM"."SYS_IMPORT_FULL_01" successfully loaded/unloaded
Starting "SYSTEM"."SYS_IMPORT_FULL_01":  system/******** directory=data_pump_dir dumpfile=additional_tables.dmp remap_schema=song:river
Processing object type TABLE_EXPORT/TABLE/TABLE
Processing object type TABLE_EXPORT/TABLE/TABLE_DATA
. . imported "RIVER"."GREYSTREET"                        5.882 KB     100 rows
. . imported "RIVER"."STONE"                             5.679 KB     100 rows
Processing object type TABLE_EXPORT/TABLE/CONSTRAINT/CONSTRAINT
Job "SYSTEM"."SYS_IMPORT_FULL_01" successfully completed at 15:45:31
8. Here’s the important step, you need to edit the replicat’s parameter file and include the following string in the map statement.
GGSCI (blue.color) 2> edit params r_gg
...
MAP song.stone, TARGET river.stone , FILTER ( @GETENV("TRANSACTION", "CSN") > 1113396);
MAP song.greystreet, TARGET river.greystreet, FILTER ( @GETENV("TRANSACTION", "CSN") > 1113396);
...
9. Recycle the replicat.
GGSCI (blue.color) 4>  stop r_gg

Sending STOP request to REPLICAT R_GG ...
start Request processed.


GGSCI (blue.color) 5> start r_gg

Sending START request to MANAGER ...
REPLICAT R_GG starting

GGSCI (blue.color) 6> info all

Program     Status      Group       Lag at Chkpt  Time Since Chkpt

MANAGER     RUNNING
EXTRACT     RUNNING     E_GG        00:00:00      00:00:09
REPLICAT    RUNNING     R_GG        00:00:00      00:00:03
10.Check the counts on both systems.
10.1. On the Source
SQL> select name from v$database;

NAME
---------
SKY

SQL> select count(1) from song.stone;

  COUNT(1)
----------
       100
10.2. On the Target
SQL> select name from v$database;

NAME
---------
WATER

SQL> select count(1) from river.stone;

  COUNT(1)
----------
       100
10.3. Insert data on the source.
SQL> INSERT INTO song.stone
SELECT dbms_random.string('A', 2) RNDMSTR
  FROM all_objects
 WHERE ROWNUM;

100 rows created.

SQL> commit;

Commit complete.

SQL> select count(1) from song.stone;

  COUNT(1)
----------
       200
10.4. Check the counts on the target table.
SQL> select count(1) from river.stone;

  COUNT(1)
----------
       200
10.5. Check lag on the replicat.
GGSCI (blue.color) 1> info all

Program     Status      Group       Lag at Chkpt  Time Since Chkpt

MANAGER     RUNNING
EXTRACT     RUNNING     E_GG        00:00:00      00:00:02
REPLICAT    RUNNING     R_GG        00:00:00      00:00:08
11. Once the table is caught up, remove the FILTER parameters from the replicat.
GGSCI (blue.color) 2> edit params r_gg
...
MAP song.stone, TARGET river.stone;
MAP song.greystreet, TARGET river.greystreet;
...
12. Restart the replicat and we’re done!
GGSCI (blue.color) 4>  stop r_gg

Sending STOP request to REPLICAT R_GG ...
start Request processed.


GGSCI (blue.color) 5> start r_gg

Sending START request to MANAGER ...
REPLICAT R_GG starting

GGSCI (blue.color) 6> info all

Program     Status      Group       Lag at Chkpt  Time Since Chkpt

MANAGER     RUNNING
EXTRACT     RUNNING     E_GG        00:00:00      00:00:06
REPLICAT    RUNNING     R_GG        00:00:00      00:00:02
According to the MOS note I’ve found to accomplish this task, this only works when DDL Replication is enabled. I’ve yet to try the steps without the former enabled, and on databases other than Oracle.
MOS Note: OGG How to Resync Tables / Schemas on Different SCN s in a Single Replicat (Doc ID 1339317.1)
Update Dec 15, 2013: I had shared this note with an Engineer @ Oracle who actually converted this into a MOS Note! I'm excited!!
How to add tables to an Existing GoldenGate Configuration with Transaction Integrity? (Doc ID 1607591.1)
Update Dec 15, 2013: I had shared this note with an Engineer @ Oracle who actually converted this into a MOS Note! I'm excited!!
How to add tables to an Existing GoldenGate Configuration with Transaction Integrity? (Doc ID 1607591.1)
GoldenGate 12.1.2.0 Install/Upgrade on OEL 6.4 x86-64
It was about time that I started working with the new release. I’ve had to upgrade my current 11g install, and since I’m on a documentation high these days, I put something together to help anyone else who wants to go through the install.
My current install is OGG 11.2.1.0.13 on Linux 64bit running against an 11.2.0.3 databases.
My current install is OGG 11.2.1.0.13 on Linux 64bit running against an 11.2.0.3 databases.
Vamanos!
Installation
1. Make a copy of your existing GoldenGate install folder after stopping all processes.
[oracle@blue gg12c]$ ls -lhtr
total 578M
-rwxrwx--- 1 root vboxsf 326M Dec  5 15:03 121200_fbo_ggs_Linux_x64_shiphome.zip
-rwxrwx--- 1 root vboxsf 253M Dec  5 18:13 ggate.1121013.tgz
[oracle@blue gg12c]$ unzip 121200_fbo_ggs_Linux_x64_shiphome.zip
[oracle@blue gg12c]$ ls -lhtr
total 579M
drwxrwx--- 1 root vboxsf  102 Sep 25 05:59 fbo_ggs_Linux_x64_shiphome
-rwxrwx--- 1 root vboxsf 276K Oct  6 18:04 OGG_WinUnix_Rel_Notes_12.1.2.0.0.pdf
-rwxrwx--- 1 root vboxsf  92K Oct  6 18:04 Oracle-GoldenGate-12.1.2.0-README.doc
-rwxrwx--- 1 root vboxsf 141K Oct  6 18:04 OGG_WinUnix_Rel_Notes_12.1.2.0.0.doc
-rwxrwx--- 1 root vboxsf  23K Oct  6 18:04 Oracle-GoldenGate-12.1.2.0-README.txt
-rwxrwx--- 1 root vboxsf 326M Dec  5 15:03 121200_fbo_ggs_Linux_x64_shiphome.zip
-rwxrwx--- 1 root vboxsf 253M Dec  5 18:13 ggate.1121013.tgz
[oracle@blue gg12c]$ cd fbo_ggs_Linux_x64_shiphome/
[oracle@blue fbo_ggs_Linux_x64_shiphome]$ ls -lhtr
total 0
drwxrwx--- 1 root vboxsf 204 Sep 25 05:59 Disk1
[oracle@blue fbo_ggs_Linux_x64_shiphome]$ cd Disk1/
[oracle@blue Disk1]$ ls -lhtr
total 4.0K
drwxrwx--- 1 root vboxsf 374 Sep 25 05:59 install
drwxrwx--- 1 root vboxsf 714 Sep 25 05:59 stage
-rwxrwx--- 1 root vboxsf 918 Sep 25 05:59 runInstaller
drwxrwx--- 1 root vboxsf 102 Sep 25 05:59 response
2. Invoke the installer, and lets get started!
[oracle@blue Disk1]$ ./runInstaller
Starting Oracle Universal Installer...

Checking Temp space: must be greater than 120 MB.   Actual 74181 MB    Passed
Checking swap space: must be greater than 150 MB.   Actual 8015 MB    Passed
Checking monitor: must be configured to display at least 256 colors.    Actual 16777216    Passed
Preparing to launch Oracle Universal Installer from /tmp/OraInstall2013-12-05_06-14-19PM. Please wait ...
To start, I’ll only install the GoldenGate with DB11g since thats the only instance I have installed on this server at the moment.

3. Pick your installation directories. I’ve entered the same location for the software install as my existing GG11g directory to perform an upgrade.

4. Click “yes” on this prompt. I think I know what I am doing!
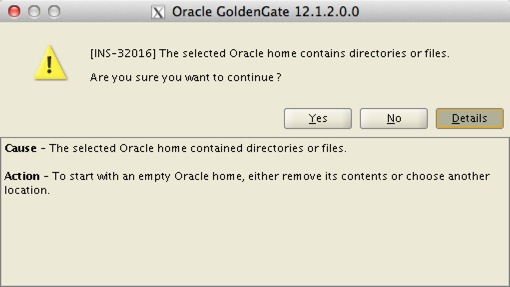
4. Click “yes” on this prompt. I think I know what I am doing!
5. Review changes and click “Install”.

6. Progress is good! If you are prompted whether the directory is not empty, simply select “yes” and proceed.

7. Awesome!

Upgrade
Upgrade
8. Review the installation, and validate the binaries startup successfully.
[oracle@blue]$ pwd
/u01/app/ggate
[oracle@blue ggate]$ ./ggsci

Oracle GoldenGate Command Interpreter for Oracle
Version 12.1.2.0.0 17185003 OGGCORE_12.1.2.0.0_PLATFORMS_130924.1316_FBO
Linux, x64, 64bit (optimized), Oracle 11g on Sep 25 2013 00:31:13
Operating system character set identified as UTF-8.

Copyright (C) 1995, 2013, Oracle and/or its affiliates. All rights reserved.

GGSCI (blue.color) 1> info all

Program     Status      Group       Lag at Chkpt  Time Since Chkpt

MANAGER     RUNNING
EXTRACT     STOPPED     E_GG        00:00:00      00:37:10
REPLICAT    STOPPED     R_GG        00:00:00      00:37:10
9. Upgrade the Checkpointtable. This needs to be done on both source and target databases!
GGSCI (blue.color) 2> dblogin userid ggate, password ggate
Successfully logged into database.

GGSCI (blue.color) 5> upgrade checkpointtable

No checkpoint table specified. Using GLOBALS specification (ggate.checkpoint)...

Successfully upgraded checkpoint table ggate.checkpoint.
10. Start the Extract
GGSCI (blue.color) 2> start e_gg

Sending START request to MANAGER ...
EXTRACT E_GG starting

GGSCI (blue.color) 3> info all

Program     Status      Group       Lag at Chkpt  Time Since Chkpt

MANAGER     RUNNING
EXTRACT     ABENDED     E_GG        00:00:00      00:38:40
REPLICAT    STOPPED     R_GG        00:00:00      00:38:40
2013-12-05 21:40:13 ERROR OGG-01416 File ./dirdat/lt000005, with format RELEASE 11.2, does not match current format specification of RELEASE 12.1. Modify the parameter file to specify format RELEASE 11.2 or issue ETROLLOVER prior to restart.
12. Ok, my mistake :)
Modify the parameter file to specify format RELEASE 11.2 or issue ETROLLOVER prior to restart.
12.1. Option #1: Let’s make the correct parameter change and try again. Add the following to the EXTTRAIL ./dirdat/lt in the extracts parameter file.
Modify the parameter file to specify format RELEASE 11.2 or issue ETROLLOVER prior to restart.
12.1. Option #1: Let’s make the correct parameter change and try again. Add the following to the EXTTRAIL ./dirdat/lt in the extracts parameter file.
EXTTRAIL ./dirdat/lt, FORMAT RELEASE 11.2
12.2. Option #2: Start a new trail sequence by issuing a roll-over command.
GGSCI> alter extract e_gg etrollover12.2.1. Starting it again!
GGSCI (blue.color) 6> start e_gg

Sending START request to MANAGER ...
EXTRACT E_GG starting

GGSCI (blue.color) 7> info all

Program     Status      Group       Lag at Chkpt  Time Since Chkpt

MANAGER     RUNNING
EXTRACT     RUNNING     E_GG        00:00:00      00:00:04
REPLICAT    STOPPED     R_GG        00:00:00      00:54:46
12.3. Great, now we can make the same change to the replicat’s parameter file and start it.
GGSCI (blue.color) 13> start r_gg

Sending START request to MANAGER ...
REPLICAT R_GG starting

GGSCI (blue.color) 14> info all

Program     Status      Group       Lag at Chkpt  Time Since Chkpt

MANAGER     RUNNING
EXTRACT     RUNNING     E_GG        00:00:00      00:00:04
REPLICAT    RUNNING     R_GG        00:00:00      00:00:01
13. Excellent!! Now we are done with the installation of 12c and upgrade of 11g to 12c!
Hopefully this has been educational for you. I hope to dive further into some of the new features in 12c.
Cheers!
Cheers!
GoldenGate Veridata 11.2.1 Agent Installation
With my previous post, I completed the Server component install and moving ahead I’d like to proceed with the agent installs. The Veridata server communicates with the hosts (that are running on each target and source servers) via the Veridata Agents. There are basically two types of agents; Java based and the C-Agent. The latter is designed for NonStop SQL/MP and Enscribe databases running on the NonStop platform.
Components:
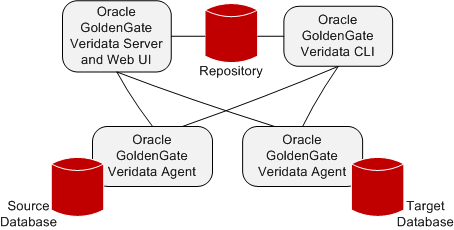
For this example, I will install the Java based agent.
Installation
1. Create the Tablespace, User, and Grant Privileges.
SQL> create tablespace ggate_data datafile '/u003/oradata/gvddvs01/ggate_ata.dbf' size 500m autoextend on;
Tablespace created.
SQL> create role veridata_role;
Role created.
SQL> grant create session to veridata_role;
Grant succeeded.
SQL> grant create table to veridata_role;
Grant succeeded.
SQL> grant create view to veridata_role;
Grant succeeded.
SQL> grant create procedure to veridata_Role;
SQL> grant create synonym to veridata_role;
Grant succeeded.
SQL> create user ggate identified by ggate default tablespace ggate_data;
User created.
SQL> grant veridata_role to ggate;
Grant succeeded.
SQL> grant unlimited tablespace to veridata_role;
Grant succeeded.
2. Create directories
greed101:(oracle) [green] $ echo $ORACLE_HOME
/u001/app/oracle/product/11.2.0
greed101:(oracle) [green] $ mkdir /u001/app/oracle/product/veridata_agent
greed101:(oracle) [green] $ mv V35569-01.zip /u001/app/oracle/product/veridata_agent
greed101:(oracle) [green] $ cd /u001/app/oracle/product/veridata_agent/
3. Unzip Binaries
greed101:(oracle) [green] $ ls -ltr
total 15664
-rw-rw-r-- 1 oracle dba 8018466 Oct 30 16:04 V35569-01.zip
drwxr-xr-x 6 oracle dba 256 Nov 7 11:16 ../
drwxr-xr-x 2 oracle dba 256 Nov 7 11:16 ./
greed101:(oracle) [green] $ unzip V35569-01.zip
Archive: V35569-01.zip
creating: agent/
creating: agent/classes/
creating: agent/drivers/
creating: agent/lib/
creating: agent/licenses/
inflating: agent/JavaAgent.jar
inflating: agent/agent.bat
inflating: agent/agent.properties.sample
inflating: agent/classes/log4j.properties
inflating: agent/drivers/gvdb2.jar
inflating: agent/drivers/gvsybase.jar
inflating: agent/drivers/ojdbc6.jar
inflating: agent/drivers/sqljdbc.jar
inflating: agent/lib/commons-dbcp-1.2.2.jar
inflating: agent/lib/commons-pool-1.3.jar
inflating: agent/lib/log4j-1.2.12.jar
inflating: agent/lib/ucp.jar
inflating: agent/licenses/Apache-LICENSE-2.0.txt
inflating: agent/licenses/notices.txt
inflating: agent/agent.sh
inflating: ogg-veridata-readme-11.2.1.0.0.doc
inflating: ogg-veridata-readme-11.2.1.0.0.txt
inflating: ogg_veridata_relnotes_11.2.1.0.0.doc
inflating: ogg_veridata_relnotes_11.2.1.0.0.pdf
greed101:(oracle) [green] $ ls -ltr
total 16416
drwxr-xr-x 6 oracle dba 4096 Nov 8 2012 agent/
-rw-r--r-- 1 oracle dba 220968 Dec 4 2012 ogg_veridata_relnotes_11.2.1.0.0.pdf
-rw-r--r-- 1 oracle dba 97280 Dec 4 2012 ogg_veridata_relnotes_11.2.1.0.0.doc
-rw-r--r-- 1 oracle dba 39424 Dec 4 2012 ogg-veridata-readme-11.2.1.0.0.doc
-rw-r--r-- 1 oracle dba 14661 Dec 4 2012 ogg-veridata-readme-11.2.1.0.0.txt
-rw-rw-r-- 1 oracle dba 8018466 Oct 30 16:04 V35569-01.zip
drwxr-xr-x 6 oracle dba 256 Nov 7 11:16 ../
drwxr-xr-x 3 oracle dba 4096 Nov 7 11:17 ./
4. Create a copy of the agent.properties.sample file as agent.properties and edit the files highlighted.
# Copyright (c) 2011, 2012, Oracle and/or its affiliates. All rights reserved.
# The server.port property is the port where the Veridata agent listens
# for connection requests.
server.port=8500
# The database.url specifies the JDBC connection URL for the database.
# Samples for all supported databases are shown below.
database.url=jdbc:oracle:thin:@greed101:1521:green
# DB2 z/OS sample database connection URL
#database.url=jdbc:veridata:db2://localhost:447;LocationName=DB2
# DB2 LUW sample database connection URL
#database.url=jdbc:veridata:db2://localhost:50000;DatabaseName=sample
# Oracle sample database connection URL
#database.url=jdbc:oracle:thin:@localhost:1521:orcl
# Uncomment the following line to change the timeout for idle connections
# in the Oracle connection pool. The value is in seconds. The default
# value in the Veridata Agent is 600 seconds.
#oracle.connection.cache.InactivityTimeout=600
# Uncomment the following line to change the time between checks for
# timeout outs in the Oracle connection pool. The value is is seconds.
# The default value in the Veridata agent is 300 seconds.
#oracle.connection.cache.PropertyCheckInterval=300
# Oracle OCI bequeath database connection URL
# The OCI libraries must available and the JDBC
# driver must match the OCI libraries.
#database.url=jdbc:oracle:oci:@
# SQL Server database connection URL
#database.url=jdbc:sqlserver://localhost:1433
# Teradata database connection URL
#database.url=jdbc:teradata://localhost/DBS_PORT=1025,CHARSET=UTF8
# Sybase database connection URL
#database.url=jdbc:veridata:sybase://localhost:5000;ApplicationName=VeriAgent;MaxPooledStatements=20
# The server.driversLocation property is the directory
# containing the JDBC driver jar file(s).
# The path is relative to the Veridata agent
# installation directory.
server.driversLocation = drivers
# The server.jdbcDriver property specifies the list of
# JDBC driver jar files. Sample lists for the
# supported databases are shown below.
#server.jdbcDriver=<server.jdbcDriver>
#For DB2 uncomment the following line:
#server.jdbcDriver=gvdb2.jar
# For Oracle uncomment the following line:
server.jdbcDriver=ojdbc6.jar
# For SQL Server uncomment the following line:
#server.jdbcDriver=sqljdbc.jar
# For Teradata uncomment the following line:
#server.jdbcDriver=terajdbc4.jar tdgssconfig.jar
#For Sybase uncomment the following line:
#server.jdbcDriver=gvsybase.jar
# The database.transaction.isolation property controls the
# transaction isolation level used during initial compare.
# The default value for Sybase, DB2, SQL Server and Teradata is
# READ_UNCOMMITTED. The only value supported for Oracle
# is READ_COMMITTED. SQL Server versions 2005 above also support
# the value SNAPSHOT which requires that ALLOW_SNAPSHOT_ISOLATION is
# enabled in the database.
#
# Confirm out of sync always uses the READ_COMMITTED
# transaction isolation level.
#database.transaction.isolation=READ_UNCOMMITTED
5. Set the JRE_HOME or JAVA_HOME parameter, and start the agent.
greed101:(oracle) [green] $ ./agent.sh start
6. Check the agent run log
greed101:(oracle) [green] $ ./agent.sh run
[VERIAGT-BOOT] INFO Looking for home directory.
[VERIAGT-BOOT] INFO Found bootstrap class in file:/u001/app/oracle/product/veridata/agent/JavaAgent.jar!/com/goldengate/veridata/agent/Bootstrap.class.
[VERIAGT-BOOT] INFO Home directory: /u001/app/oracle/product/veridata/agent
[VERIAGT-BOOT] INFO Preparing classpath.
[VERIAGT-BOOT] INFO Searching library directory /u001/app/oracle/product/veridata/agent/lib.
[VERIAGT-BOOT] INFO Driver location: /u001/app/oracle/product/veridata/agent/drivers
[VERIAGT-BOOT] INFO Drivers to load: ojdbc6.jar
[VERIAGT-BOOT] INFO Classpath:
[VERIAGT-BOOT] INFO /u001/app/oracle/product/veridata/agent/JavaAgent.jar
[VERIAGT-BOOT] INFO /u001/app/oracle/product/veridata/agent/lib/commons-dbcp-1.2.2.jar
[VERIAGT-BOOT] INFO /u001/app/oracle/product/veridata/agent/lib/commons-pool-1.3.jar
[VERIAGT-BOOT] INFO /u001/app/oracle/product/veridata/agent/lib/log4j-1.2.12.jar
[VERIAGT-BOOT] INFO /u001/app/oracle/product/veridata/agent/lib/ucp.jar
[VERIAGT-BOOT] INFO /u001/app/oracle/product/veridata/agent/classes
[VERIAGT-BOOT] INFO /u001/app/oracle/product/veridata/agent/drivers/ojdbc6.jar
[VERIAGT-BOOT] INFO Initializing.
[VERIAGT-BOOT] INFO Invoking startup method: public static void com.goldengate.veridata.agent.VeridataAgent.main(java.lang.String[])
Setting up agent log
Agent log redirected to /u001/app/oracle/product/veridata/agent/veridata-agent.log
7. Check the log for messages
greed101:(oracle) [green] $ cat /u001/app/oracle/product/veridata/agent/veridata-agent.log
INFO:2013-11-07 11:31:35,727 (main) - Veridata Agent Version 11.2.1.0 OGGVDT_11.2.1.0.0_PLATFORMS_121108.1625 built on Thu, 8 Nov 2012 21:21:26 -0800 [VeriAgentVersion:logVersion, line 33]
WARN:2013-11-07 11:31:35,734 (main) - The specified transaction isolation level, 'READ_UNCOMMITTED', is not support for Oracle databases [Context:init, line 222]
INFO:2013-11-07 11:31:35,881 (main) - Veridata Agent starting on greed101 port 16000 [VeridataAgent:serve, line 141]
INFO:2013-11-07 11:31:40,913 (main) - Veridata Agent Version 11.2.1.0 OGGVDT_11.2.1.0.0_PLATFORMS_121108.1625 built on Thu, 8 Nov 2012 21:21:26 -0800 [VeriAgentVersion:logVersion, line 33]
WARN:2013-11-07 11:31:40,921 (main) - The specified transaction isolation level, 'READ_UNCOMMITTED', is not support for Oracle databases [Context:init, line 222]
ERROR:2013-11-07 11:31:40,950 (main) - Veridata Agent shutting down on port 16000 due to error: Address already in use [VeridataAgent:serve, line 169]
INFO:2013-11-07 11:31:40,951 (main) - Veridata Agent stopped on port -1 [VeridataAgent:serve, line 175]
INFO:2013-11-07 11:33:23,132 (main) - Veridata Agent Version 11.2.1.0 OGGVDT_11.2.1.0.0_PLATFORMS_121108.1625 built on Thu, 8 Nov 2012 21:21:26 -0800 [VeriAgentVersion:logVersion, line 33]
INFO:2013-11-07 11:33:23,176 (main) - Veridata Agent starting on greed101 port 8500 [VeridataAgent:serve, line 141]
Tuesday, November 26, 2013
GoldenGate Veridata 11.2.1 Server Installation
Today, I’d like to share my experience with a tool that I’ve used infrequently with GoldenGate.
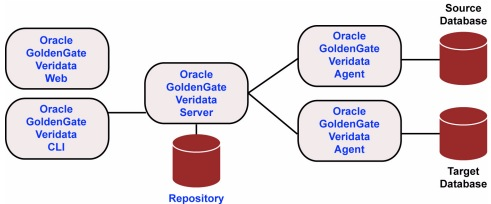
Veridata is Oracle’s answer to Data Validation for environments where a replication technology is utilized. In other words, the tool is agnostic (but partial) to a set Database vendors. You can install it on a variety of platforms, and a few database types.
Components:
Installation
1. Download and unzip the media from eDelivery.
2. Invoke the bash script to start the installer.
3. Click “Next”.
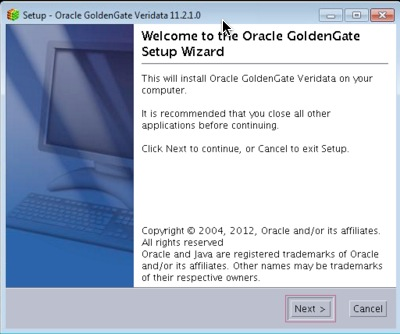
4. Pick your installation directory and click “Next”.
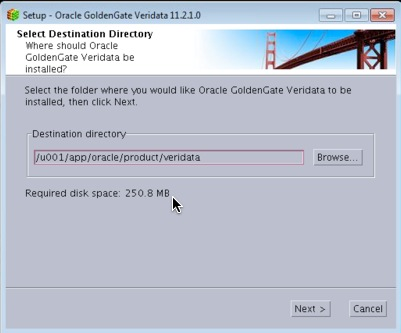
5. On the ports section, click “Next”.
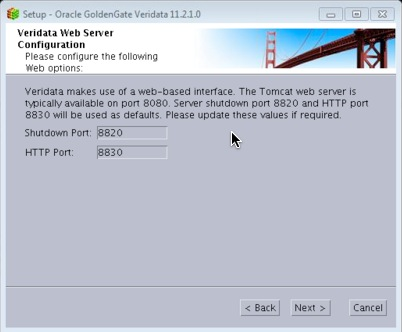
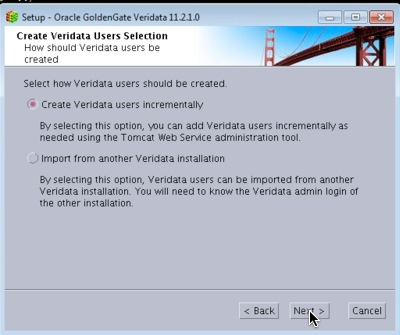
6. Leave the defaults and click “Next”.
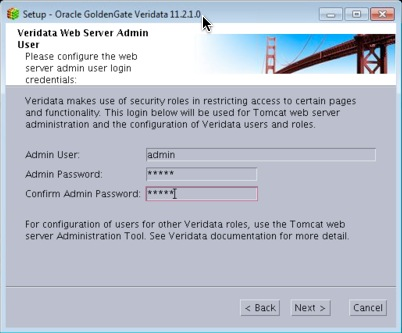
7. Enter at the account username and password. This will be used to install the tables in the repository database.
8. Of course we will chose “Oracle” :)
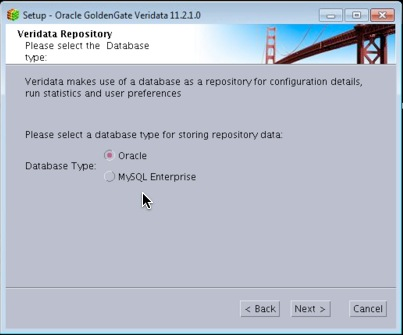
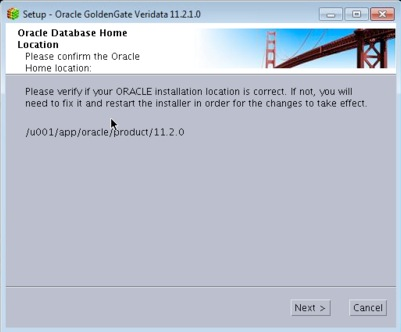
9. Confirm the Oracle Home (Veridata Home) location.
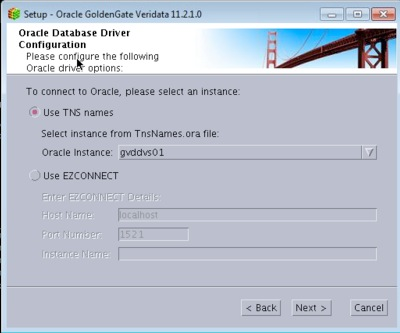
10. Select and Instance and click Continue. This article assumes that the Veridata installation is on the same server as its intended repository.
11. I will let the installer create a new user for me.
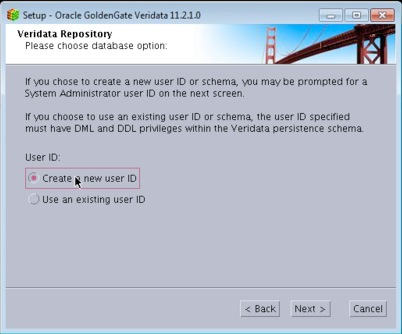
12. Enter the DBA
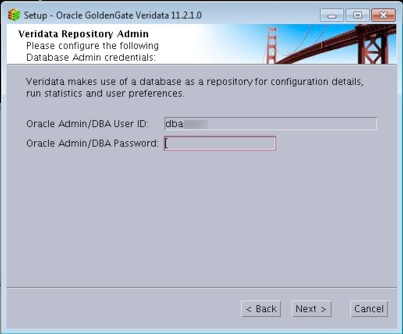
13. On the next screen, enter the oracle database user where the Veridata objects will be installed.
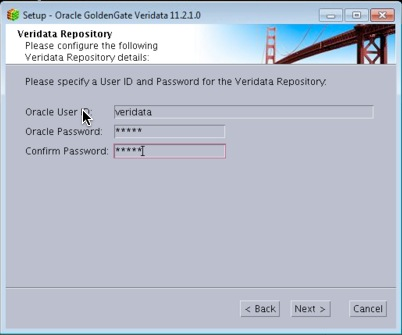
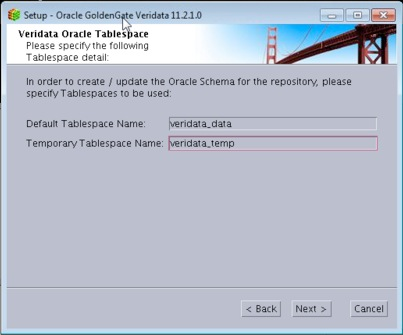
14. Enter the default, and temp tablespace for the above user.
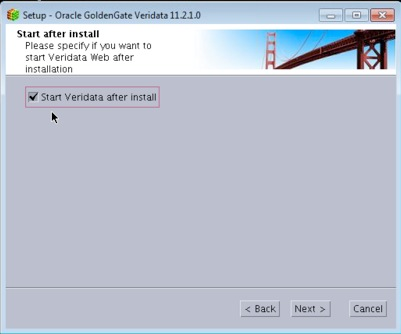
15. Check the box if you want it to start Veridata after the installation.
16. Review the settings and click “Next”.
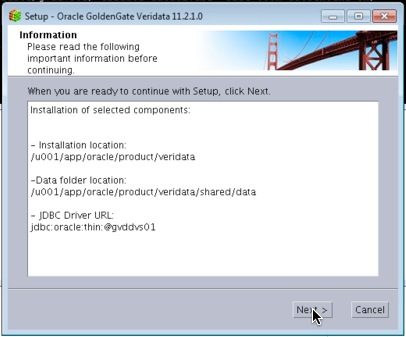
17. Progress is always good.
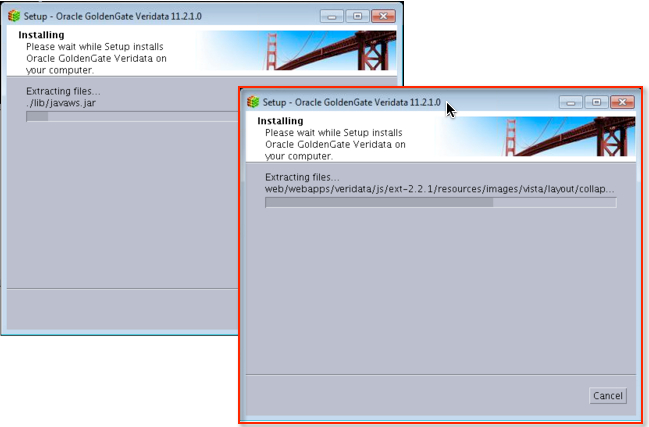
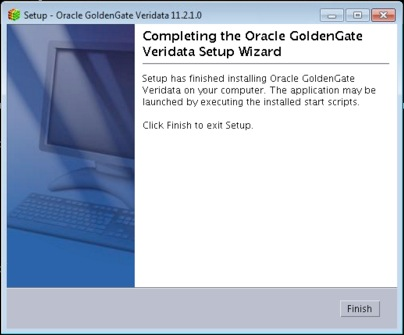
18. Awesome! All done.
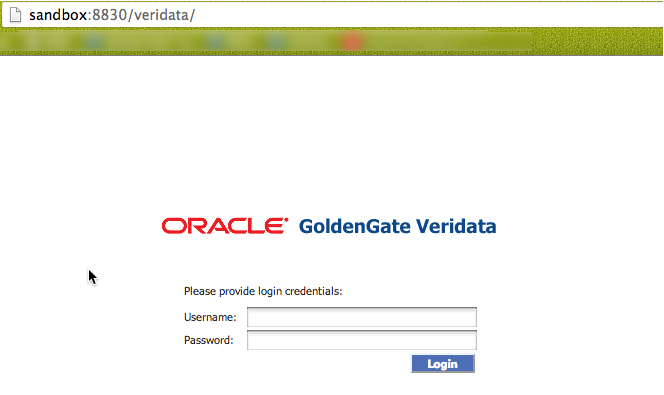
At this point, we can log into the Veridata Server successfully!
In subsequent posts, I will discuss the other aspects such as the Veridata Agent install, Configuration, etc.
Cheers!
Veridata is Oracle’s answer to Data Validation for environments where a replication technology is utilized. In other words, the tool is agnostic (but partial) to a set Database vendors. You can install it on a variety of platforms, and a few database types.
Components:
Installation
1. Download and unzip the media from eDelivery.
[oracle@as-sandbox-n1 installs]$ cd veridata/
[oracle@as-sandbox-n1 veridata]$ ls -lhtr
total 147M
-rwxr-xr-x 1 oracle oinstall 145M Nov 8 2012 GoldenGate_Veridata_redhatAS40_x64.sh
-rw-r--r-- 1 oracle oinstall 216K Dec 4 2012 ogg_veridata_relnotes_11.2.1.0.0.pdf
-rw-r--r-- 1 oracle oinstall 95K Dec 4 2012 ogg_veridata_relnotes_11.2.1.0.0.doc
-rw-r--r-- 1 oracle oinstall 39K Dec 4 2012 ogg-veridata-readme-11.2.1.0.0.doc
-rw-r--r-- 1 oracle oinstall 15K Dec 4 2012 ogg-veridata-readme-11.2.1.0.0.txt
-rw-r--r-- 1 oracle oinstall 1.3M Oct 24 14:26 veridata-install.log
2. Invoke the bash script to start the installer.
[oracle@as-sandbox-n1 veridata]$ ./GoldenGate_Veridata_redhatAS40_x64.sh
Unpacking JRE ...
Starting Installer ...
3. Click “Next”.
4. Pick your installation directory and click “Next”.
5. On the ports section, click “Next”.
6. Leave the defaults and click “Next”.
7. Enter at the account username and password. This will be used to install the tables in the repository database.
8. Of course we will chose “Oracle” :)
9. Confirm the Oracle Home (Veridata Home) location.
10. Select and Instance and click Continue. This article assumes that the Veridata installation is on the same server as its intended repository.
11. I will let the installer create a new user for me.
12. Enter the DBA
13. On the next screen, enter the oracle database user where the Veridata objects will be installed.
14. Enter the default, and temp tablespace for the above user.
15. Check the box if you want it to start Veridata after the installation.
16. Review the settings and click “Next”.
17. Progress is always good.
18. Awesome! All done.
At this point, we can log into the Veridata Server successfully!
In subsequent posts, I will discuss the other aspects such as the Veridata Agent install, Configuration, etc.
Cheers!
Friday, November 22, 2013
Patch and Provision with EM12c: #4 Software Library - Create a Component From Oracle Home Clone
To continue with the previous series, I want to illustrate another useful feature with the Patching & Provisioning functionality within EM12c. Using the provisioning functionality, one can create software components which contain compressed installation binaries. This feature is not limited to only Oracle software, but to illustrate an example, I’d like to show you how to clone an Oracle Database Home to create a software library component.
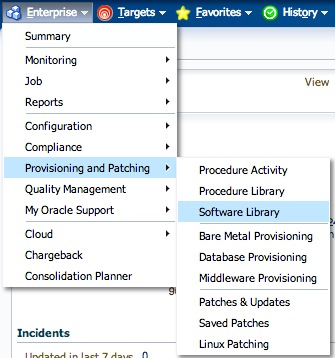
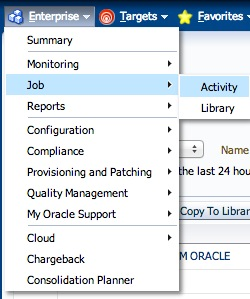
1. Navigate to the “Software Library” home from the Enterprise Menu.
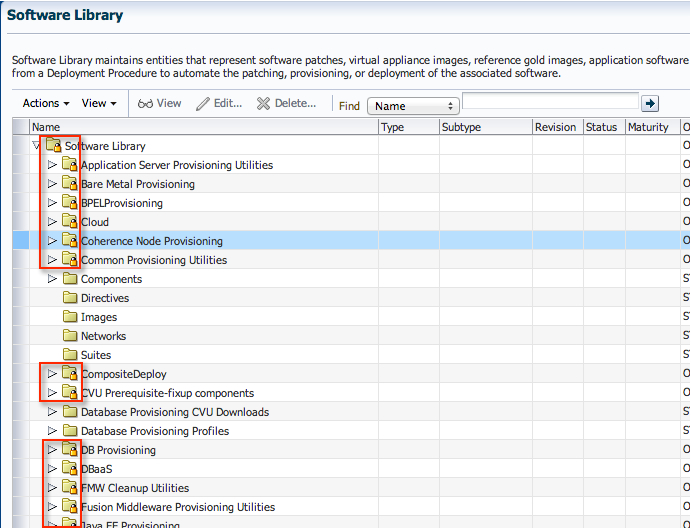
2. On the “Software Library” home page, you will see several folders. The ones with a “Lock” icon are not editable, so we will focus on, either creating a new one, or use an existing one.
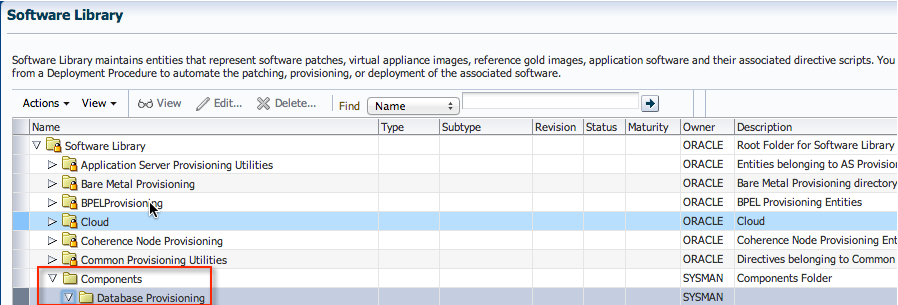
3. To keep the set up consistent, I’d like to use the “Component” folder since that is precisely what we are creating. Expand the tree structure, to show the folders underneath.
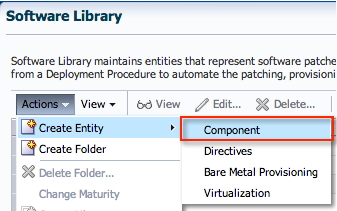
4. Click on “Actions”->”Create Entity”->”Component"
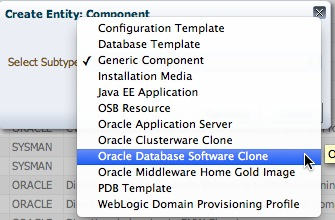
5. Select “Oracle Database Software Clone” from the list, and click “Continue”.
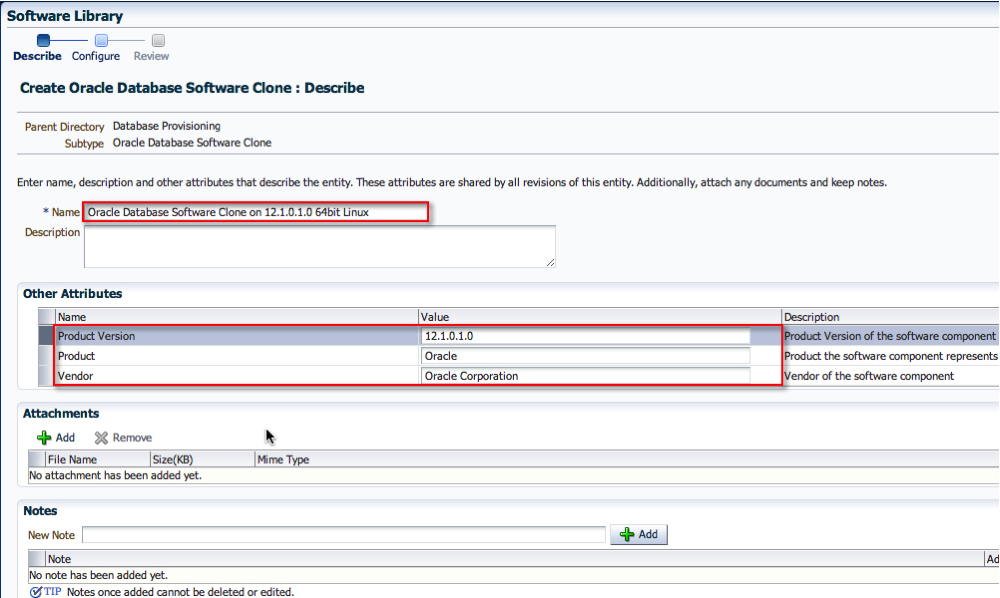
6. Enter an appropriate name and attributes for the component. Click “Next”.
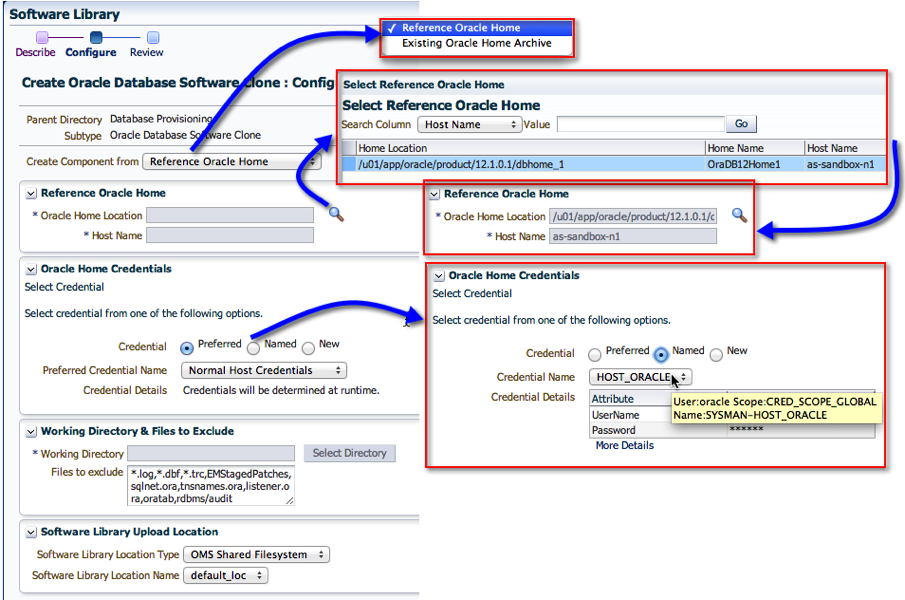
7. On the Configuration screen, select the appropriate “Create Component from” location. In my case, it was a Reference Oracle Home. Then, search for the Reference Oracle Home. In addition, pick the correct credential set. Click “Next”.
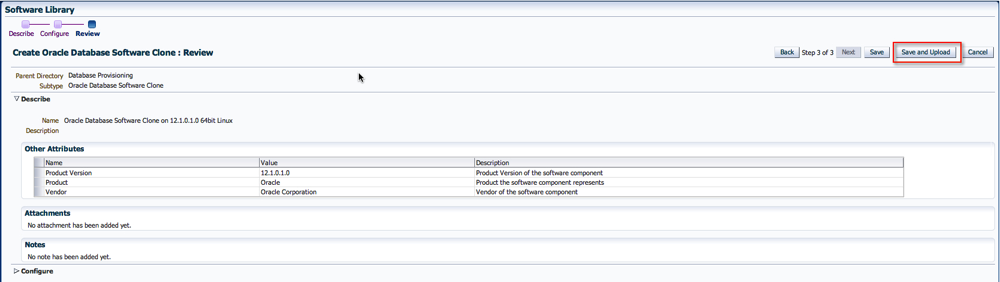
8. On the last page, click “Save and Upload”. If you happen to click on “Save” only, then the binaries will not be uploaded. I’ll talk about that in a separate thread later.
9. Easy enough. On the next screen, you’ll see the option to view the job that gets submitted.
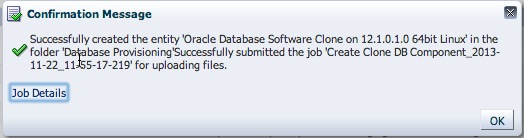
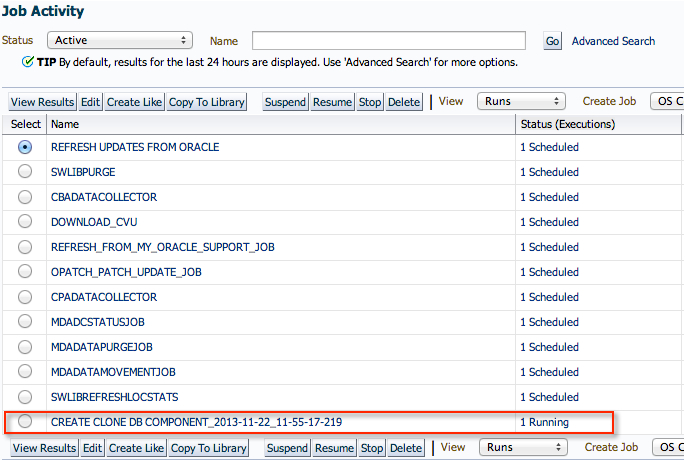
10. If you didn’t click on the “Job Details” page, and wanted to view the status, don’t worry. Go to the “Jobs Activity” page, and find the appropriate job name.
11. Click on the Job Name to view its details.
12. And just wait for the job to complete.
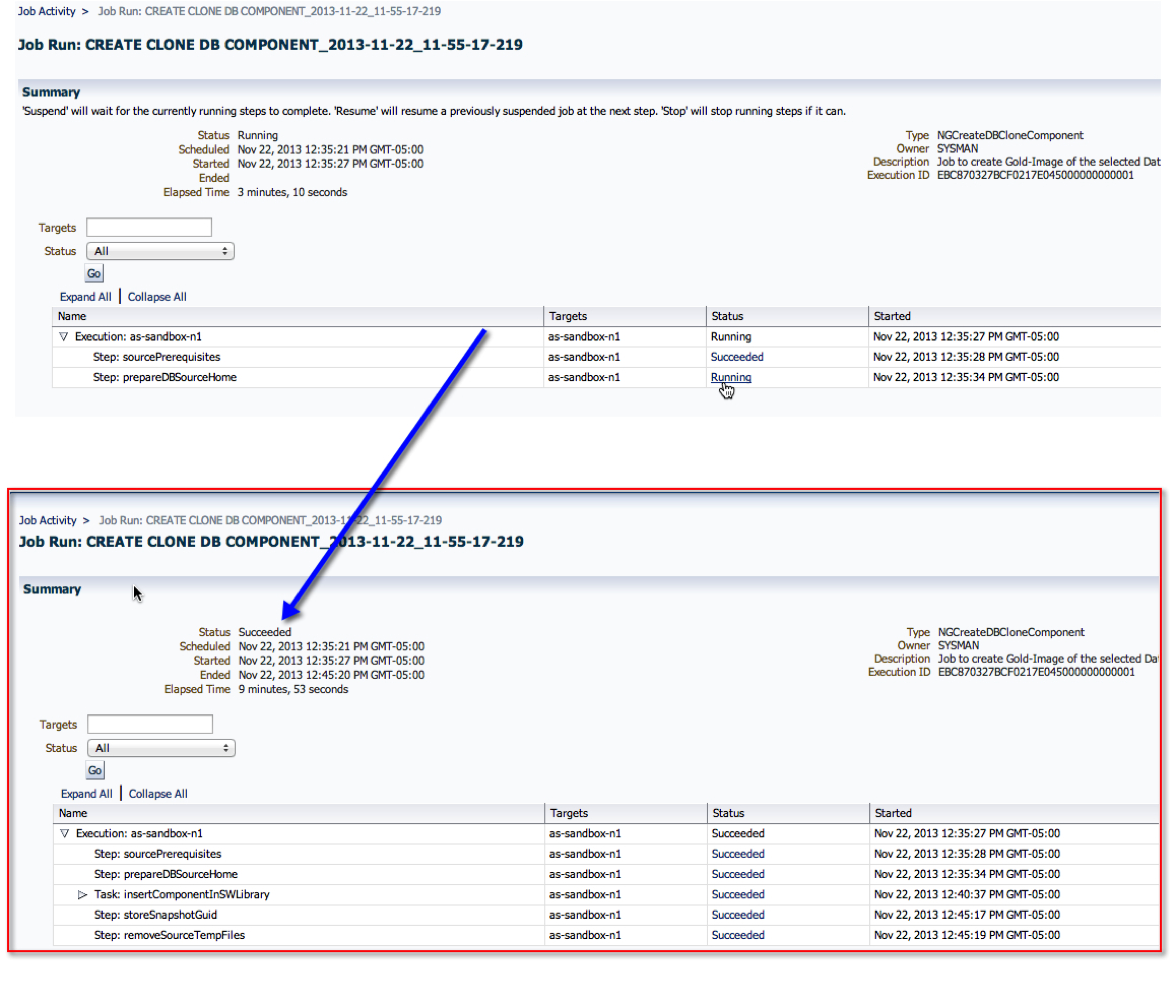
13. Now, back to the Software Library page, we can see that the component is now ready!
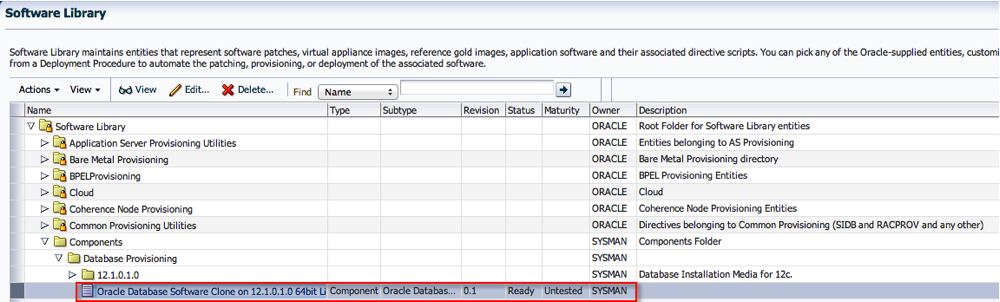
Summary:
In short, once a software component is created, one can use it for provisioning with the profiles and deployment procedures. For example, in one of my earlier posts on Provisioning a Database, step 4.4 has a screenshot of the software component used with the deployment. That is where the one we just created can be used instead.
I hope you found this moderately helpful :)
Cheers!
1. Navigate to the “Software Library” home from the Enterprise Menu.
2. On the “Software Library” home page, you will see several folders. The ones with a “Lock” icon are not editable, so we will focus on, either creating a new one, or use an existing one.
3. To keep the set up consistent, I’d like to use the “Component” folder since that is precisely what we are creating. Expand the tree structure, to show the folders underneath.
4. Click on “Actions”->”Create Entity”->”Component"
5. Select “Oracle Database Software Clone” from the list, and click “Continue”.
6. Enter an appropriate name and attributes for the component. Click “Next”.
7. On the Configuration screen, select the appropriate “Create Component from” location. In my case, it was a Reference Oracle Home. Then, search for the Reference Oracle Home. In addition, pick the correct credential set. Click “Next”.
8. On the last page, click “Save and Upload”. If you happen to click on “Save” only, then the binaries will not be uploaded. I’ll talk about that in a separate thread later.
9. Easy enough. On the next screen, you’ll see the option to view the job that gets submitted.
10. If you didn’t click on the “Job Details” page, and wanted to view the status, don’t worry. Go to the “Jobs Activity” page, and find the appropriate job name.
11. Click on the Job Name to view its details.
12. And just wait for the job to complete.
13. Now, back to the Software Library page, we can see that the component is now ready!
Summary:
In short, once a software component is created, one can use it for provisioning with the profiles and deployment procedures. For example, in one of my earlier posts on Provisioning a Database, step 4.4 has a screenshot of the software component used with the deployment. That is where the one we just created can be used instead.
I hope you found this moderately helpful :)
Cheers!
Friday, November 1, 2013
11gR1 to 11gR2 RAC - An Upgrade Experience on Solaris
I’ve recently gone through an experience (see title), that I thought would be a good one to share.
As of late, I’ve started documenting the life out of any project/task, and this is one of in the long line of many.
Basically, the goal here was to upgrade an existing 11gR1 RAC configuration to 11gR2 RAC. To supplement the pretty picture, the following tasks were involved:

Thanks to my friend Osama Mustafa (@osamaoracle) for reviewing it!! I would cherish any comments, or feedback from my readers with their experiences.
Cheers
As of late, I’ve started documenting the life out of any project/task, and this is one of in the long line of many.
Basically, the goal here was to upgrade an existing 11gR1 RAC configuration to 11gR2 RAC. To supplement the pretty picture, the following tasks were involved:
- Upgrade 11gR1 CRS+ASM to 11gR2 Grid Infrastructure
- Upgrade 11gR1 RDBMS to 11gR2 RDBMS
- Upgrade 11gR2 Instances to 11gR2
Thanks to my friend Osama Mustafa (@osamaoracle) for reviewing it!! I would cherish any comments, or feedback from my readers with their experiences.
Cheers
Wednesday, October 30, 2013
SRVCTL: Add Preferred Instances
Dedicated to an old friend and colleague.
1.
Add the service. Please take note, the instance
names are in UPPER case.
[oowner@gxtbdb01 ~]$ srvctl status
service -d utldb
[oowner@gxtbdb01 ~]$ srvctl add
service -d utldb -s test -r UTLDB1
2.
Start it
[oowner@gxtbdb01 ~]$ srvctl status
service -d utldb
Service test is not running.
[oowner@gxtbdb01 ~]$ srvctl start
service -d utldb -s test
[oowner@gxtbdb01 ~]$ srvctl status
service -d utldb
Service test is running on
instance(s) UTLDB1
3.
Modify it to add a new instance to the preferred
list
[oowner@gxtbdb01 ~]$ srvctl modify
service -d utldb -s test -n -i UTLDB1,UTLDB2
[oowner@gxtbdb01 ~]$ srvctl status
service -d utldb
Service test is running on
instance(s) UTLDB1
4.
Service has to be restarted for the changes to
take into effect
[oowner@gxtbdb01 ~]$ srvctl stop
service -d utldb -s test
[oowner@gxtbdb01 ~]$ srvctl start
service -d utldb -s test
[oowner@gxtbdb01 ~]$ srvctl status
service -d utldb
Service test is running on
instance(s) UTLDB1,UTLDB2
Cheers!
Sunday, October 20, 2013
Oracle Golden Gate 12.1.2
I've only just caught up on the new OGG release news! Stepping through just the documentation, I'm excited about trying it out in the next few weeks.
Edited December 19, 2013: It took me a while to get around it, but I did write a post on installation/upgrade to this version here.

http://docs.oracle.com/goldengate/1212/gg-winux/index.html
http://docs.oracle.com/goldengate/1212/gg-winux/index.html
Cheers!
Tuesday, October 15, 2013
How to Resume an RMAN Duplicate on Failure - Just Re-Run it!
If you find yourself at the with an error message like below during an RMAN Duplicate, don’t worry about it. As I found out from dumb luck, it’s quite easy!
RMAN-03002: failure of recover command at 10/07/2013 15:11:47
RMAN-06054: media recovery requesting unknown archived log for thread 1 with sequence 53302 and starting SCN of 143193979270
The requirement was to clone production, without causing additional load on it, to a new environment that I would use for Golden Gate replication.
Database: 11.1.0.7.0 64bit
Server: Solaris 5.10 x86 64bit
Backup Location: Data Domain
Let me show the duplicate script first:
RUN
{
        ALLOCATE auxiliary CHANNEL CH01 TYPE 'SBT_TAPE' parms "ENV=(NB_ORA_POLICY=ORACLE_RAC01_PRD1_FULL,NB_ORA_CLIENT=RAC01,NB_ORA_SCHED=Default-Application-Backup)";
        ALLOCATE auxiliary CHANNEL CH02 TYPE 'SBT_TAPE' parms "ENV=(NB_ORA_POLICY=ORACLE_RAC01_PRD1_FULL,NB_ORA_CLIENT=RAC01,NB_ORA_SCHED=Default-Application-Backup)";
        ALLOCATE auxiliary CHANNEL CH03 TYPE 'SBT_TAPE' parms "ENV=(NB_ORA_POLICY=ORACLE_RAC01_PRD1_FULL,NB_ORA_CLIENT=RAC01,NB_ORA_SCHED=Default-Application-Backup)";
        ALLOCATE auxiliary CHANNEL CH04 TYPE 'SBT_TAPE' parms "ENV=(NB_ORA_POLICY=ORACLE_RAC01_PRD1_FULL,NB_ORA_CLIENT=RAC01,NB_ORA_SCHED=Default-Application-Backup)";
        ALLOCATE auxiliary CHANNEL CH05 TYPE 'SBT_TAPE' parms "ENV=(NB_ORA_POLICY=ORACLE_RAC01_PRD1_FULL,NB_ORA_CLIENT=RAC01,NB_ORA_SCHED=Default-Application-Backup)";
        ALLOCATE auxiliary CHANNEL CH06 TYPE 'SBT_TAPE' parms "ENV=(NB_ORA_POLICY=ORACLE_RAC01_PRD1_FULL,NB_ORA_CLIENT=RAC01,NB_ORA_SCHED=Default-Application-Backup)";

        SET NEWNAME FOR DATAFILE 54 TO '/u03/oradata/RPTPRD/data_01.365.668441285';
        SET NEWNAME FOR DATAFILE 54 TO '/u03/oradata/RPTPRD/data_01.365.668441285';
        . . .
        . . .
        SET NEWNAME FOR DATAFILE 54 TO '/u03/oradata/RPTPRD/data_01.365.668441285';

        DUPLICATE TARGET DATABASE TO RPTPRD
                UNTIL SCN 143197743846
                LOGFILE GROUP 1 ('/r01/oradata/RPTPRD/redo01a.log',
                                '/r02/oradata/RPTPRD/redo01b.log') SIZE 500M REUSE,
                        GROUP 2 ('/r01/oradata/RPTPRD/redo02a.log',
                                '/r02/oradata/RPTPRD/redo02b.log') SIZE 500M REUSE,
                        GROUP 3 ('/r01/oradata/RPTPRD/redo03a.log',
                                '/r02/oradata/RPTPRD/redo03b.log') SIZE 500M REUSE
                NOFILENAMECHECK
                SPFILE
                PARAMETER_VALUE_CONVERT 'PRD','RPTPRD'
                SET CONTROL_FILES='/u01/oradata/RPTPRD/control01.ctl','/u02/oradata/RPTPRD/control02.ctl','/u03/oradata/RPTPRD/control03.ctl'
                SET DB_CREATE_FILE_DEST='/u03/oradata/RPTPRD'
                SET AUDIT_FILE_DEST='/u01/app/oracle/admin/RPTPRD/adump'
                SET DB_RECOVERY_FILE_DEST='/a01/flash_recovery_area'
                set DIAGNOSTIC_DEST='/u01/app/oracle/'
                SET DB_RECOVERY_FILE_DEST_SIZE='20G'
                SET local_listener='(address=(protocol=TCP)(host=apvmrdb01)(port=1529))'
                SET FAL_CLIENT=''
                SET FAL_SERVER=''
                SET log_archive_dest_2=''
                SET dg_broker_start='FALSE'
                SET CLUSTER_DATABASE='FALSE'
                SET log_archive_dest_1='LOCATION=/a01/flash_recovery_area'
                SET db_create_online_log_dest_2='/r02/oradata/RPTPRD'
                SET db_create_online_log_dest_1='/r01/oradata/RPTPRD'
                SET standby_archive_dest='';
}
The actual run error is below.
Starting recover at 07-OCT-13

starting media recovery

unable to find archived log
archived log thread=1 sequence=53302
Oracle Error:
ORA-01547: warning: RECOVER succeeded but OPEN RESETLOGS would get error below
ORA-01194: file 1 needs more recovery to be consistent
ORA-01110: data file 1: '/u03/oradata/RPTPRD/system.326.665261191'

released channel: CH01
released channel: CH02
released channel: CH03
released channel: CH04
released channel: CH05
released channel: CH06
RMAN-00571: ===========================================================
RMAN-00569: =============== ERROR MESSAGE STACK FOLLOWS ===============
RMAN-00571: ===========================================================
RMAN-03002: failure of recover command at 10/07/2013 15:11:47
RMAN-06054: media recovery requesting unknown archived log for thread 1 with sequence 53302 and starting SCN of 143193979270
I knew that Data Domain had the backups, so it couldn’t be a case of missing pieces. By the way, the failure actually happened because my log_archive_dest_1 parameter was set to a location that didn’t exist on my auxiliary server.
So what now? I thought maybe I should drop the database and start from scratch. But, curiosity sometimes works in my favor. I simply restarted the script and bingo! It worked!!
Relevant excerpt from duplicate log:
contents of Memory Script:
{
   set until scn  143197743846;
   recover
   clone database
    delete archivelog
   ;
}
executing Memory Script

executing command: SET until clause

Starting recover at 07-OCT-13

starting media recovery

channel CH01: starting archived log restore to default destination
channel CH01: restoring archived log
archived log thread=1 sequence=53302
channel CH01: reading from backup piece al_180608_1_828139086
channel CH02: starting archived log restore to default destination
channel CH02: restoring archived log
archived log thread=2 sequence=46813
channel CH02: restoring archived log
archived log thread=1 sequence=53303
channel CH02: reading from backup piece al_180607_1_828139086
channel CH03: starting archived log restore to default destination
channel CH03: restoring archived log
archived log thread=2 sequence=46814
channel CH03: restoring archived log
archived log thread=2 sequence=46815
channel CH03: reading from backup piece al_180609_1_828139086
channel CH04: starting archived log restore to default destination
channel CH04: restoring archived log
archived log thread=1 sequence=53304
channel CH04: reading from backup piece al_180612_1_828145845
channel CH05: starting archived log restore to default destination
channel CH05: restoring archived log
archived log thread=2 sequence=46816
channel CH05: reading from backup piece al_180611_1_828145845
channel CH06: starting archived log restore to default destination
channel CH06: restoring archived log
archived log thread=1 sequence=53305
channel CH06: reading from backup piece al_180614_1_828153049
channel CH01: piece handle=al_180608_1_828139086 tag=TAG20131006T223805
channel CH01: restored backup piece 1
channel CH01: restore complete, elapsed time: 00:00:25
archived log file name=/a01/flash_recovery_area/1_53302_663959504.dbf thread=1 sequence=53302
channel CH01: starting archived log restore to default destination
channel CH01: restoring archived log
archived log thread=2 sequence=46817
channel CH01: reading from backup piece al_180616_1_828153049
channel CH03: piece handle=al_180609_1_828139086 tag=TAG20131006T223805
channel CH03: restored backup piece 1
channel CH03: restore complete, elapsed time: 00:00:25
channel CH02: piece handle=al_180607_1_828139086 tag=TAG20131006T223805
channel CH02: restored backup piece 1
channel CH02: restore complete, elapsed time: 00:00:40
archived log file name=/a01/flash_recovery_area/2_46813_663959504.dbf thread=2 sequence=0
channel clone_default: deleting archived log(s)
archived log file name=/a01/flash_recovery_area/2_46813_663959504.dbf RECID=7 STAMP=828199660
archived log file name=/a01/flash_recovery_area/2_46814_663959504.dbf thread=2 sequence=46814
channel clone_default: deleting archived log(s)
archived log file name=/a01/flash_recovery_area/2_46814_663959504.dbf RECID=4 STAMP=828199644
archived log file name=/a01/flash_recovery_area/2_46815_663959504.dbf thread=2 sequence=46815
channel clone_default: deleting archived log(s)
archived log file name=/a01/flash_recovery_area/1_53302_663959504.dbf RECID=3 STAMP=828199644
archived log file name=/a01/flash_recovery_area/1_53303_663959504.dbf thread=1 sequence=53303
channel clone_default: deleting archived log(s)
archived log file name=/a01/flash_recovery_area/1_53303_663959504.dbf RECID=2 STAMP=828199643
channel CH04: piece handle=al_180612_1_828145845 tag=TAG20131007T003044
channel CH04: restored backup piece 1
channel CH04: restore complete, elapsed time: 00:01:00
archived log file name=/a01/flash_recovery_area/1_53304_663959504.dbf thread=1 sequence=53304
channel clone_default: deleting archived log(s)
archived log file name=/a01/flash_recovery_area/2_46815_663959504.dbf RECID=1 STAMP=828199642
channel CH05: piece handle=al_180611_1_828145845 tag=TAG20131007T003044
channel CH05: restored backup piece 1
channel CH05: restore complete, elapsed time: 00:01:00
archived log file name=/a01/flash_recovery_area/2_46816_663959504.dbf thread=2 sequence=46816
channel clone_default: deleting archived log(s)
archived log file name=/a01/flash_recovery_area/1_53304_663959504.dbf RECID=5 STAMP=828199657
channel CH01: piece handle=al_180616_1_828153049 tag=TAG20131007T023048
channel CH01: restored backup piece 1
channel CH01: restore complete, elapsed time: 00:01:03
channel CH06: piece handle=al_180614_1_828153049 tag=TAG20131007T023048
channel CH06: restored backup piece 1
channel CH06: restore complete, elapsed time: 00:01:28
archived log file name=/a01/flash_recovery_area/1_53305_663959504.dbf thread=1 sequence=53305
channel clone_default: deleting archived log(s)
archived log file name=/a01/flash_recovery_area/2_46816_663959504.dbf RECID=6 STAMP=828199659
archived log file name=/a01/flash_recovery_area/2_46817_663959504.dbf thread=2 sequence=46817
channel clone_default: deleting archived log(s)
archived log file name=/a01/flash_recovery_area/1_53305_663959504.dbf RECID=8 STAMP=828199666
channel clone_default: deleting archived log(s)
archived log file name=/a01/flash_recovery_area/2_46817_663959504.dbf RECID=9 STAMP=828199670
media recovery complete, elapsed time: 00:00:08
Finished recover at 07-OCT-13
I’m a big fan of crediting others work, after I a re-ran the duplicate command, I google’d for “resume rman duplicate” and found April C. Sim’s blog on it!
Hope this helps.
Cheers!
Subscribe to:
Posts
(
Atom
)