Wednesday, April 9, 2014
Metric Extensions in EM12c #1: Monitor a Useful Target such as a GoldenGate Instance
Back in August of 2013, I wrote a post on “Alternative Method to monitor GoldenGate from EM12c outside the GoldenGate 12.1.0.1.0 Plugin” and then back in December of 2013 I wrote another one a Metric Extension to Monitor Unsupported Database Versions. As it turns out, the first post has been quite useful in many customer sites but what it lacks is the process to actually build the Metric Extension (ME).
Note: If you are interested in more ways to monitor GoldenGate, be sure to check out my older posts, Bobby Curtis’ posts (1 & 2), and his upcoming presentation at Collaborate 14. Coincidentally, he is sitting with me on the plane ride over to #C14LV at the moment :-)
It’s important for me to share my experience and reason for not using the metrics provided with the EM12c GoldenGate plugin; I have found it to be a little inconsistent due to several reasons. Starting from the Berkley DB Datastore corruptions, to JAgent hangs, to inaccurate results on the GoldenGate homepage in EM12c, and lastly I’ve experienced unreliable alerting. The JAgent architecture was inherited from the GoldenGate Monitor days and can be roughly described by the illustration below (if this is inaccurate, I’d be more than happy to adjust the diagram below). The parts in green describe the components involved with collecting the data from the GoldenGate instance, as well as, the EM12c side. The process, at certain times, and on certain platforms (Windows) has broken from my experience and after working with Oracle Support for a while until the fixes were released with subsequent patches (11.2.1.0.X), but I still found the incident management and subsequent notifications to work unreliably.
The data flow, as illustrated below described the JAgent which connects to and stores information from the GG Objects periodically in its Datastore (dibdb directory). When the EMAgent polls for updates via the JMX port, it will do so by checking the datastore. Once the raw metric is collected within the repository, it is the EM12c incident management framework which triggers notifications.

With that being said, I’d like to pick up where I left off way back in August of last year.
I already have the output from the monitor_gg.pl script which I will invoke from my new Metric Extension. Let’s begin with a refresher on the lifecycle of an ME:

This post assumes that:
1. You have already downloaded the monitor_gg.pl script onto your host where Golden Gate instances are running.
2. You have tested the script from command line by invoking it, i.e. $ perl monitor_gg.pl and receive the output mentioned in my previous post.
Steps
1. Make your way to the Metric Extensions home page.

2. Click on “Create”, and enter the relevant details such as “Name”, and “Display Name”. Make sure you select the Adapter as “OS Command - Multiple Columns”. The rest you can leave at default values, or change as per your desired check frequency.

3. On the next page, enter the full path of the script in the “Command” section. Alternatively, you could also leave the “Command” section with the %perlBin%/perl and enter the absolute path of the script in the “Script” section.

4. On the next page, you need to specify the columns returned by the status check. The process is similar to what I mentioned in my previous post Metric Extension to Monitor Unsupported Database Versions, so I will quickly skim through the important bits.

It is important to note that I specified this and the following column as Key Columns. This is because the result set in the ME framework requires unique identifiers.

5. The next column represents the actual program name, i.e. Extract, Replicat, Manager etc.

6. Status is an important column because we can use it to trigger state alerts. Note, that I have specified the Warning and Critical thresholds, alert and clear messages. Its quite cool how customizable the framework can be.
7. Next, we have the Lag at Checkpoint, a column which we will use for Alerting. Note, that I have specified the Warning and Critical thresholds, alert and clear messages.
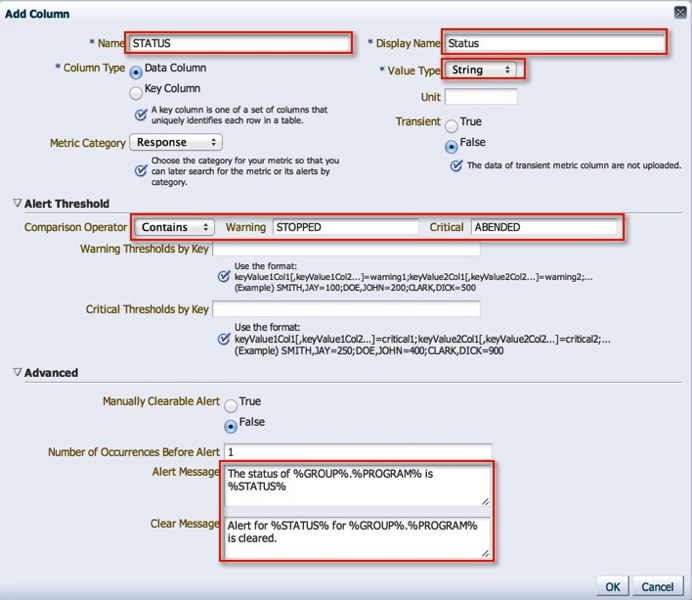
7. Time Since Last Checkpoint is set up in the same manner as the previous column.

8. With that, we are done with the column configuration.

9. I leave the default monitoring credentials in place, however if you are running GoldenGate as user other than the “oracle” user, you will have to either a) create a new monitoring credential set or b) grant the oracle user execute on the monitoring script.

10. We’re coming to the end now. On the next screen, we can actually see this metric in action by running it against a target.

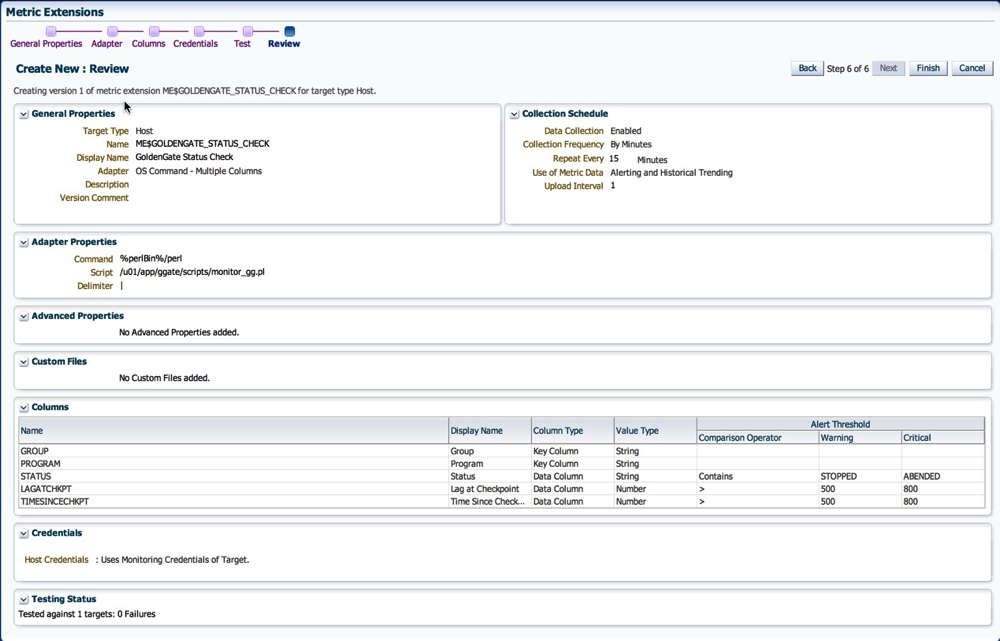
11. Next, we review our settings and save the Metric Extension.
12. Now, back on the ME home page, the metric is in Editable Stage.
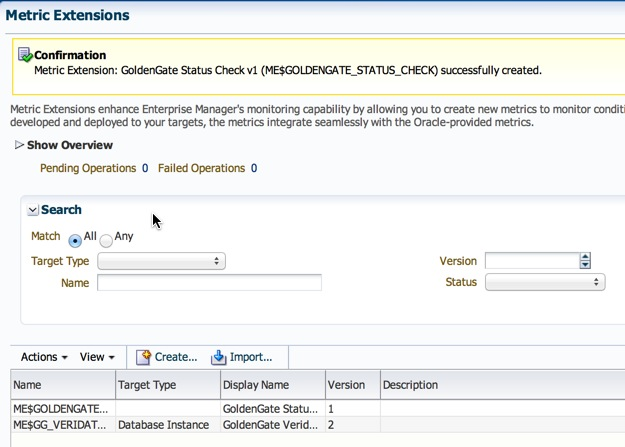
13. We simply need to save it as a “Deployable Draft” or a “Published” extension. The former state allows for deployments to individual targets, where as the latter is required for deployments to Monitoring Templates.

14. Follow steps listed under section 10 on my post on creation of metric extensions to deploy the ME.
Once deployed, the metric is collected at the intervals specified in step 2. Depending on how your incident rule sets are configured, you will most likely start receiving alerting once the thresholds we defined above are crossed.
I do have some lessons learned to add to the above posts from an Incident Management perspective, but that will have to be a completely different post :-)
Hope this helps.
Cheers!
Tuesday, March 18, 2014
Create a Standby Database using EM12c
I wanted to make this a quick post, because a friend was mentioning a slight problem during a manual set up of Data Guard. I told him you could do it through EM, and then recalled that I had documented it a while back. After the tube light finally went on in my head, it occurred to me that this would a good post.
When leveraging EM to set up, monitor, and manage (Active) Data Guard, Data Guard Broker is configured by default. A quote from Oracle Docs:
"Oracle Data Guard ensures high availability, data protection, and disaster recovery for enterprise data. Data Guard provides a comprehensive set of services that create, maintain, manage, and monitor one or more standby databases to enable production Oracle databases to survive disasters and data corruptions. Data Guard maintains these standby databases as transactionally consistent copies of the primary database. If the primary database becomes unavailable because of a planned or an unplanned outage, Data Guard can switch any standby database to the production role, thus minimizing the downtime associated with the outage. Data Guard can be used with traditional backup, recovery, and cluster techniques, as well as the Flashback Database feature to provide a high level of data protection and data availability.”
Whether or not you chose to set up a different network/listener for the Data Guard traffic is entirely your choice (and a good one in my opinion). However, in this scenario, I simply used the default parameters to illustrate a point.
1. Navigate to the particular database’s home page.


2.On the database home page, click on “Avaliability”->”Add Standby Database”.

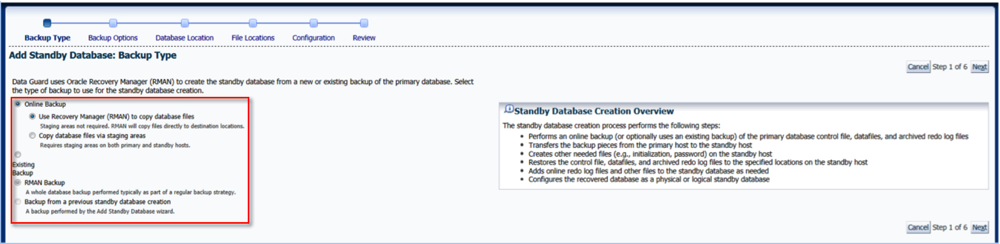
3. On the next screen, click the first radio button and “Continue”. We will create a new “Physical Standby” database.
I will explore this section further after Data Guard is setup.

4. We can leverage the Duplicate from Active Database feature in 11g, therefore, leave default values and click “Continue”.
5. Either create a new credential set or use an existing one.
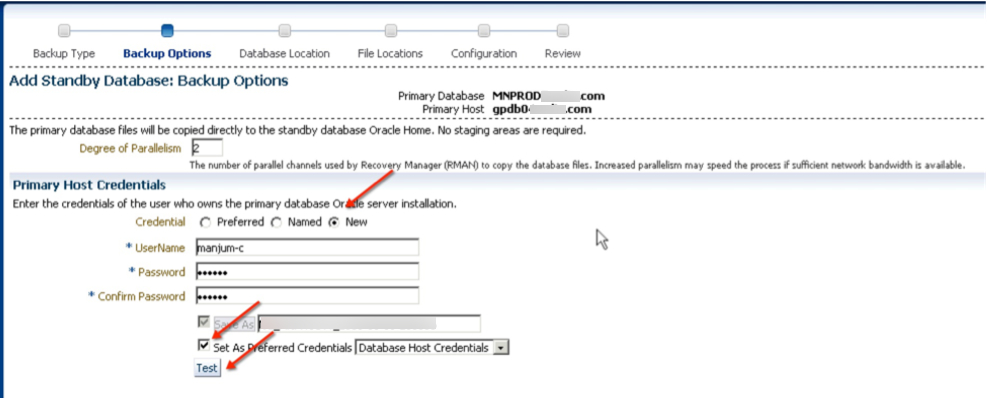
6. Next, we select which host the standby instance will be created on.

7. At this point, we can chose the relevant file locations. You have the option to change them compared to the primary database if needed.
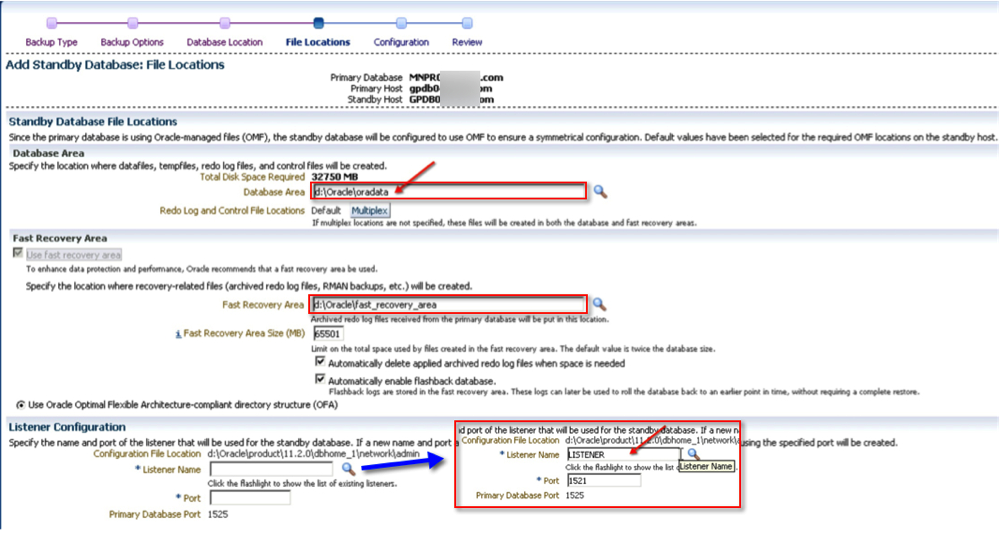
8. Time to give the new guy a name. You could optionally decide to monitor it as well (a good idea in my opinion). Should you also want to use a different connect net services identifier other than what EM uses, now is a good time to do that.

9. Finally, review your settings and click “Finish”.

10. As with most “tasks” in EM, a job is submitted which can be reviewed.

10.1 Job details.

One complete, the new standby database is configured and ready! In addition to EM, you can also verify the status via Data Guard Brokers interface. By the way, the output below is from a different system.
[oracle@server01 ~]$ dgmgrl /
DGMGRL for Linux: Version 11.2.0.3.0 - 64bit Production

Copyright (c) 2000, 2009, Oracle. All rights reserved.

Welcome to DGMGRL, type "help" for information.
Connected.
DGMGRL> show configuration

Configuration - prim_db.global.name

  Protection Mode: MaxPerformance
  Databases:
    prim_db   - Primary database
    stand_db - Physical standby database

Fast-Start Failover: DISABLED

Configuration Status:
SUCCESS

DGMGRL>
The funny thing about Data Guard, at least from my experience, is that there’s no two same configurations. For some reason or the other, usually related to network configuration, or one-off requirements which cause the difference. If you follow the steps above, then at the very least you will have a standardized way to deploy standby databases.
Hope this helps!
Cheers.
Monday, March 17, 2014
#em12c Metrics - Part 1: An Introduction
From the middle of 2013, I’d been busy in preparation for one of my presentations for IOUG’s Collaborate 14 Conference in Las Vegas. It is on Capacity Planning Enterprise Manager 12c’s Metrics (available on slideshare), one which I had the honor of presenting earlier at a Georgia Oracle User Group meeting in Atlanta, GA this past week. Metrics in any version of Enterprise Manager are collected (via the Enterprise Manager agents) and stored in its repository database, to be used for rendering historical viewing, but only at each targets respective home page. With EM12c, the list of monitored targets has grown to a staggering amount, especially with the advent of Extensibility Exchange and Metric Extensions (previously known as User Defined Metrics).
From Oracle Databases, multiple Unix Platforms, various types of Middleware products, Oracle VM, The Oracle Cloud, Engineered Systems such as Exadata, Exalogic, and the Big Data Appliance, and many other targets, this tool sure does cover a wide spectrum with an even wider range of metrics (or insights) into each managed target. In addition, using Plug-ins developed either by Oracle or by third party vendors, external hardware/software monitoring is also possible on technology such as VMware, NetApp, Cisco, Brocade, HP Storage, EMC Storage, F5 Load Balancers, and like wise many others. All of this monitored data is indeed stored somewhere, and as I have mentioned earlier, it is simply kept in the Enterprise Managers repository.
Starting with this post, I’d like to begin a series that discusses the various parts and pieces associated with Metrics in Enterprise Manager 12c.
I have already established that data is collected from managed/monitored targets, but have yet to explain the delicate intricacies of that collection. By default, once a target is discovered and promoted in EM12c, the collection of certain metrics that are enabled on a collection schedule. Both of which depend on the target type. As an example, lets take a look at an “Oracle Database”. Each time one is added to the EM inventory, we automatically assume that information regarding its configuration, status, etc will be displayed. That is precisely the kind of “default collection of metrics on a schedule” that I mentioned earlier.
So, how does the data get to the repository? One way to look at it, and some of depictions are straight out of my presentation, is that data from targets is collected by the EM Agents, and pulled into the Management Repository. This is a big shift from the previous releases of Enterprise Manager because they employed the push method (from agents) as opposed to a pull method from the Management Server.

The data lands in the em_metric_value table which contains the “raw” data. A quick look at this table’s structure and data reveals the rawness of the information that is collected.
desc em_metric_values
Name            Null     Type
--------------- -------- -----------------------
METRIC_ITEM_ID  NOT NULL NUMBER(38)
COLLECTION_TIME NOT NULL DATE
MET_VALUES      NOT NULL EM_METRIC_VALUE_ARRAY()
col metric_item_id format 9999999 heading "Metric Item ID"
col collection_time format a25 heading "Collection Time"
col met_values format a100 heading "Metric Values"

select metric_item_id
      ,collection_time
      ,met_values
  from em_metric_values
 where rownum < 11; -- Only used to restrict the data returned.

 Metric Item ID Collection Time           Metric Values
-------------- ------------------------- ----------------------------------------------------------------------------------------------------
       1561578 13-FEB-14 12.13.46 AM     SYSMAN.EM_METRIC_VALUE_ARRAY(null,null,0,0.209,null,0,72.899,null,null,16,0,null,0.018)
       1561578 13-FEB-14 12.28.46 AM     SYSMAN.EM_METRIC_VALUE_ARRAY(null,null,0,0.191,null,0,68.343,null,null,15,0,null,0.017)
       1561578 13-FEB-14 12.43.46 AM     SYSMAN.EM_METRIC_VALUE_ARRAY(null,null,0,3.604,null,0,651623.938,null,null,2310,0,null,2.57)
       1561578 13-FEB-14 12.58.46 AM     SYSMAN.EM_METRIC_VALUE_ARRAY(null,null,0,0.187,null,0,68.343,null,null,15,0,null,0.017)
       1561578 13-FEB-14 01.13.46 AM     SYSMAN.EM_METRIC_VALUE_ARRAY(null,null,0,0.206,null,0,68.343,null,null,15,0,null,0.017)
       1561578 13-FEB-14 01.28.46 AM     SYSMAN.EM_METRIC_VALUE_ARRAY(null,null,0,0.184,null,0,68.343,null,null,15,0,null,0.017)
       1561578 13-FEB-14 01.43.46 AM     SYSMAN.EM_METRIC_VALUE_ARRAY(null,null,0,4.53,null,0,958473.112,null,null,3347,0,null,3.723)
       1561578 13-FEB-14 01.58.46 AM     SYSMAN.EM_METRIC_VALUE_ARRAY(null,null,0,0.195,null,0,68.343,null,null,15,0,null,0.017)
       1561578 13-FEB-14 02.13.46 AM     SYSMAN.EM_METRIC_VALUE_ARRAY(null,null,0,0.191,null,0,72.899,null,null,16,0,null,0.018)
       1561578 13-FEB-14 02.28.46 AM     SYSMAN.EM_METRIC_VALUE_ARRAY(null,null,0,0.19,null,0,63.786,null,null,14,0,null,0.016)

 10 rows selected
At regular intervals, this table’s data is aggregated into hourly and daily metric values. The corresponding tables are em_metric_values_hourly and em_metric_values_daily.
To ensure adequate performance, all three tables are partitioned as per the chart below. More information regarding the partitioning strategy can be found in “12c Cloud Control Repository: How to Modify the Default Retention and Purging Policies for Metric Data? (Doc ID 1405036.1)”.

Now, I probably know what you are thinking. If I query the raw data, then what good is it to me in the above format. To understand and view the data coherently, the mgmt$metric_values, mgmt$metric_values_hourtly, mgmt$metric_values_daily OR gc$metric_values, gc$metric_values_hourly, gc$metric_values_daily views which are compliments of the tables mentioned earlier.
You might have seen various queries that use the mgmt$ tables, but from what I seen the gc$ tables are newer versions with slightly different metric column names and labels.
Let’s take a quick look at the gc$metric_values and its contents.
desc gc$metric_values
Name                      Null     Type
------------------------- -------- -------------
ENTITY_TYPE               NOT NULL VARCHAR2(64)
ENTITY_NAME               NOT NULL VARCHAR2(256)
TYPE_META_VER             NOT NULL VARCHAR2(8)
METRIC_GROUP_NAME         NOT NULL VARCHAR2(64)
METRIC_COLUMN_NAME        NOT NULL VARCHAR2(64)
COLUMN_TYPE               NOT NULL NUMBER(1)
COLUMN_INDEX              NOT NULL NUMBER(3)
DATA_COLUMN_TYPE          NOT NULL NUMBER(2)
METRIC_GROUP_ID           NOT NULL NUMBER(38)
METRIC_GROUP_LABEL                 VARCHAR2(64)
METRIC_GROUP_LABEL_NLSID           VARCHAR2(64)
METRIC_COLUMN_ID          NOT NULL NUMBER(38)
METRIC_COLUMN_LABEL                VARCHAR2(64)
METRIC_COLUMN_LABEL_NLSID          VARCHAR2(64)
DESCRIPTION                        VARCHAR2(128)
SHORT_NAME                         VARCHAR2(40)
UNIT                               VARCHAR2(32)
IS_FOR_SUMMARY                     NUMBER
IS_STATEFUL                        NUMBER
NON_THRESHOLDED_ALERTS             NUMBER
METRIC_KEY_ID             NOT NULL NUMBER(38)
KEY_PART_1                NOT NULL VARCHAR2(256)
KEY_PART_2                NOT NULL VARCHAR2(256)
KEY_PART_3                NOT NULL VARCHAR2(256)
KEY_PART_4                NOT NULL VARCHAR2(256)
KEY_PART_5                NOT NULL VARCHAR2(256)
KEY_PART_6                NOT NULL VARCHAR2(256)
KEY_PART_7                NOT NULL VARCHAR2(256)
COLLECTION_TIME           NOT NULL DATE
COLLECTION_TIME_UTC                DATE
VALUE                              NUMBER
col entity_type format a10 heading "Entity|Type"
col entity_name format a25 heading "Entity|Name"
col metric_group_label format a7 heading "Metric|Group|Label"
col metric_group_name format a14 heading "Metric|Group|Name"
col metric_column_label format a50 heading "Metric|Column|Label"
col metric_column_name format a14 heading "Metric|Column|Name"
col short_name format a15 heading "Short|Name"
col value format 99.99 heading "Value"

select entity_type
      ,entity_name
      ,metric_group_name
      ,metric_column_name
      ,metric_group_label
      ,metric_column_label
      ,short_name
      ,collection_time
      ,value
  from gc$metric_values
 where rownum < 11; -- Only used to restrict rows returned.

                                     Metric         Metric         Metric  Metric
Entity     Entity                    Group          Column         Group   Column                                             Short
 Type       Name                     Name           Name           Label   Label                                               Name            Collection Time            Value
---------- ------------------------- -------------- -------------- ------- -------------------------------------------------- --------------- ------------------------- ------
host       server01.planet.net       Load           cpuLoad_1min   Load    Run Queue Length (1 minute average,per core)       CPU Load (1min) 13-FEB-14 12.01.56 AM       4.08
host       server01.planet.net       Load           cpuLoad_1min   Load    Run Queue Length (1 minute average,per core)       CPU Load (1min) 13-FEB-14 12.06.56 AM       4.11
host       server01.planet.net       Load           cpuLoad_1min   Load    Run Queue Length (1 minute average,per core)       CPU Load (1min) 13-FEB-14 12.11.56 AM       4.03
host       server01.planet.net       Load           cpuLoad_1min   Load    Run Queue Length (1 minute average,per core)       CPU Load (1min) 13-FEB-14 12.16.56 AM       4.03
host       server01.planet.net       Load           cpuLoad_1min   Load    Run Queue Length (1 minute average,per core)       CPU Load (1min) 13-FEB-14 12.21.56 AM       4.01
host       server01.planet.net       Load           cpuLoad_1min   Load    Run Queue Length (1 minute average,per core)       CPU Load (1min) 13-FEB-14 12.26.56 AM       4.00
host       server01.planet.net       Load           cpuLoad_1min   Load    Run Queue Length (1 minute average,per core)       CPU Load (1min) 13-FEB-14 12.31.56 AM       4.01
host       server01.planet.net       Load           cpuLoad_1min   Load    Run Queue Length (1 minute average,per core)       CPU Load (1min) 13-FEB-14 12.36.56 AM       4.11
host       server01.planet.net       Load           cpuLoad_1min   Load    Run Queue Length (1 minute average,per core)       CPU Load (1min) 13-FEB-14 12.41.56 AM       4.01
host       server01.planet.net       Load           cpuLoad_1min   Load    Run Queue Length (1 minute average,per core)       CPU Load (1min) 13-FEB-14 12.46.56 AM       4.00

 10 rows selected
I know this blog posts probably lends itself to more questions. What data, other than the one showed above, do we actually have access to in Enterprise Manager? How can we obtain the information and then create reports on resource utilization for trend analysis, and capacity planning? How does Enterprise Manager allow data visualization? Which tools could I use for custom reports? Enterprise Manager does indeed monitor, keep track of, and enables the user to gather a myriad of information from each target.
The data is there.
Stay tuned for future posts which will cover the topics I have touched on in the sections above. If you are headed to Collaborate this year, and are interested in hearing further in-person, my Session # is 102 Capacity Planning: How to Leverage OEM12c for Engineered Systems.
Cheers!
Tuesday, March 11, 2014
opatch apply online on 11.2.0.4
The credit for the patch apply in the post goes to a new friend that wishes to remain anonymous, except that her initials start with KA, and who happens to work at a company in Memphis, TN. Coincidentally, that is where I had been liv. During a recent EM12c project at her company, we were going through the steps to create a 2-node RAC environment. After registering it with Enterprise Manager, and adding the relevant targets (Oracle Homes, Databases, Listeners etc) we tested the connectivity (specifically checking the tablespace usage) to one of the databases and receive an “ORA-01000 maximum open cursors” message.
The open_cursors parameter in the respective database was set to 5000, and there were hardly any connections on it at the time which could explain it. We attempted a local login (from the respective host) as well as a listener based login, both of which were successful. After a quick search on MOS, it turns out there’s a bug which causes queries from Enterprise Manager on 11.2.0.4 Databases: “EM 12c: Querying a List of tablespaces for an 11.2 Oracle Database Results in ORA-1000 Error in Enterprise Manager 12.1.0.3 Cloud Control (Doc ID 1618684.1)”. The solution, according to the MOS note, was to apply Patch 17897511 on the RDBMS home where the 11.2.0.4 instance resides.
Since I’d never tested the online patching process, it seemed like a good time to try it out. I’d recommend reading Jason Arniel’s post here on the subtle “ism’s” of online patching - I found it to be quite useful.
Let’s begin.
d-oratest11-db01.planets.com:/u01/oracle/software/patch/17897511:oratst111> /u01/oracle/product/11.2.0/db_1/OPatch/opatch apply online -connectString oratst111:sys:password:d-oratest11-db01,oratst112:sys:password:d-oratest11-db02
Oracle Interim Patch Installer version 11.2.0.3.4
Copyright (c) 2012, Oracle Corporation.  All rights reserved.


Oracle Home       : /u01/oracle/product/11.2.0/db_1
Central Inventory : /u01/oracle/oraInventory
   from           : /u01/oracle/product/11.2.0/db_1/oraInst.loc
OPatch version    : 11.2.0.3.4
OUI version       : 11.2.0.4.0
Log file location : /u01/oracle/product/11.2.0/db_1/cfgtoollogs/opatch/17897511_Feb_14_2014_12_28_57/apply2014-02-14_12-28-56PM_1.log


The patch should be applied/rolled back in '-all_nodes' mode only.
Converting the RAC mode to '-all_nodes' mode.
Applying interim patch '17897511' to OH '/u01/oracle/product/11.2.0/db_1'
Verifying environment and performing prerequisite checks...
All checks passed.
Backing up files...

Patching component oracle.rdbms, 11.2.0.4.0...
Installing and enabling the online patch 'bug17897511.pch', on database 'oratst111'.


Verifying the update...

Patching in all-node mode.

Updating nodes 'd-oratest11-db02'
   Apply-related files are:
     FP = "/u01/oracle/product/11.2.0/db_1/.patch_storage/17897511_Jan_28_2014_07_45_26/rac/copy_files.txt"
     DP = "/u01/oracle/product/11.2.0/db_1/.patch_storage/17897511_Jan_28_2014_07_45_26/rac/copy_dirs.txt"
     MP = "/u01/oracle/product/11.2.0/db_1/.patch_storage/17897511_Jan_28_2014_07_45_26/rac/make_cmds.txt"
     RC = "/u01/oracle/product/11.2.0/db_1/.patch_storage/17897511_Jan_28_2014_07_45_26/rac/remote_cmds.txt"

Instantiating the file "/u01/oracle/product/11.2.0/db_1/.patch_storage/17897511_Jan_28_2014_07_45_26/rac/copy_files.txt.instantiated" by replacing $ORACLE_HOME in "/u01/oracle/product/11.2.0/db_1/.patch_storage/17897511_Jan_28_2014_07_45_26/rac/copy_files.txt" with actual path.
Propagating files to remote nodes...
Instantiating the file "/u01/oracle/product/11.2.0/db_1/.patch_storage/17897511_Jan_28_2014_07_45_26/rac/copy_dirs.txt.instantiated" by replacing $ORACLE_HOME in "/u01/oracle/product/11.2.0/db_1/.patch_storage/17897511_Jan_28_2014_07_45_26/rac/copy_dirs.txt" with actual path.
Propagating directories to remote nodes...
Installing and enabling the online patch 'bug17897511.pch', on database 'oratst112' on node 'd-oratest11-db02'.

Patch 17897511 successfully applied
Log file location: /u01/oracle/product/11.2.0/db_1/cfgtoollogs/opatch/17897511_Feb_14_2014_12_28_57/apply2014-02-14_12-28-56PM_1.log

OPatch succeeded.
Great! Let’s just make sure that it worked.
d-oratest11-db01.planets.com:/u01/oracle/software/patch/17897511:oratst111> /u01/oracle/product/11.2.0/db_1/OPatch/opatch lsinventory
Oracle Interim Patch Installer version 11.2.0.3.4
Copyright (c) 2012, Oracle Corporation.  All rights reserved.


Oracle Home       : /u01/oracle/product/11.2.0/db_1
Central Inventory : /u01/oracle/oraInventory
   from           : /u01/oracle/product/11.2.0/db_1/oraInst.loc
OPatch version    : 11.2.0.3.4
OUI version       : 11.2.0.4.0
Log file location : /u01/oracle/product/11.2.0/db_1/cfgtoollogs/opatch/opatch2014-02-14_12-29-37PM_1.log

Lsinventory Output file location : /u01/oracle/product/11.2.0/db_1/cfgtoollogs/opatch/lsinv/lsinventory2014-02-14_12-29-37PM.txt

--------------------------------------------------------------------------------
Installed Top-level Products (1):

Oracle Database 11g                                                  11.2.0.4.0
There are 1 products installed in this Oracle Home.


Interim patches (1) :

Patch (online) 17897511: applied on Fri Feb 14 12:29:01 CST 2014
Unique Patch ID:  17213015
   Created on 28 Jan 2014, 07:45:26 hrs PST8PDT
   Bugs fixed:
     17897511


Rac system comprising of multiple nodes
  Local node = d-oratest11-db01
  Remote node = d-oratest11-db02

--------------------------------------------------------------------------------

OPatch succeeded.
And, thats it. After the patch application, we were able to query the tablespace information for all databases running from this home successfully via Enterprise Manager.
Cheers!
Wednesday, February 26, 2014
Set oraInventory for EM12c Agents during GUI Installation
So, this is a peculiar problem that I had to dig to find a solution for; each time I deployed an agent to Add Targets to EM12c where no other Oracle Software was located, it would always created the oraInventory located under the $HOME directory. In my case, /home/oracle/oraInventory. This is quite annoying because for subsequent Oracle Software installs, this incorrect location is always chosen. Instead, I want it to go the, lets say /u01/oracle/oraInventory.
I knew there must be a way to get around this, and after digging in MOS and Oracle Docs, I found the section below. Documentation 9.4.1 section i.

To further expand on the documentation, there’s a couple of sections which describe the usage.
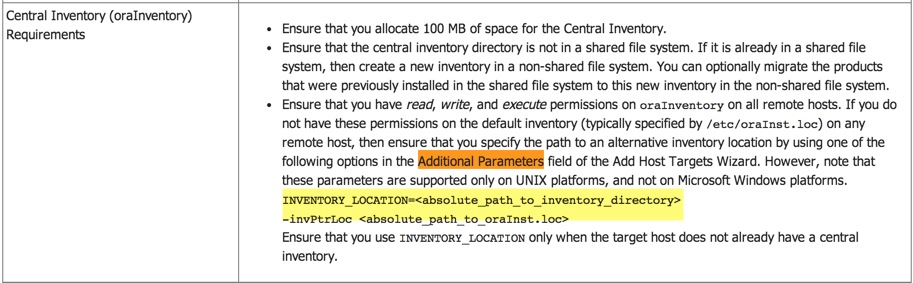
Looking at Table 9-2.

I had to give this one a try! So, after you get to the Add Targets home page, enter the Host Name(s) and find the section at the bottom for “Additional Parameters”. Simply put this section in it INVENTORY_LOCATION=/u01/oracle/oraInventory.
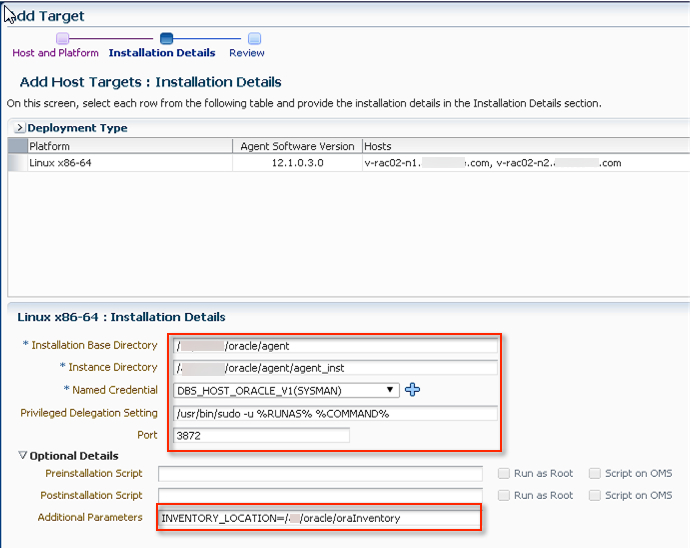
Proceed with the rest of the installation steps, and at its completion check the host(s) folders.

So, at the end of the day I have to give credit to the amazing documentation Oracle has put together for OEM. You just need to know what you want, then ask the right question.
Hope this helps!
Cheers.
Thursday, January 30, 2014
User Authentication in EM12c via Weblogic Framework Security
To quote Oracle’s Weblogic Documentation: “WebLogic Server includes numerous Authentication security providers. Most of them work in similar fashion: given a username and password credential pair, the provider attempts to find a corresponding user in the provider's data store. These Authentication providers differ primarily in what they use as a data store: one of many available LDAP servers, a SQL database, or other data store. In addition to these username/password based security providers, WebLogic Server includes identity assertion Authentication providers, which use certificates or security tokens, rather than username/password pairs, as credentials.”
In a nutshell, providers are defined within a security realm called “myrealm”. Once a new provider, in our case “ADAuthenticator - IT Oracle DBA” is added, it needs to be re-ordered and placed on top. I could describe in detail the steps to configure an LDAP provider, but after speaking with Tim Hall (@oraclebase), turns out he already blogged about it!

Enterprise Manager supports the following sources:
- Repository Based (Default)
- Oracle Access Manager (OSM) SSO
- Oracle SSO Based
- Enterprise User Security Based
- LDAP; either Oracle Internet Directory or Active Directory
When an attempt to login is made from EM12c’s console, a request is sent via the security layer to the configured providers. I’ve done my best to illustrate the routes where a possible authentication request may take - either the Admin or Managed servers can request authentication via the Security Realm, which in turn (depending on the provider order) will authenticate the relevant credentials. If the credentials are not present within the first provider, the subsequent ones will be attempted.

Once credentials are authenticated against the Active Directory source, they are then authorized within EM12c. Should the user not exist in EM12c, by default, the authentication will fail because auto-provisioning is disabled. According to the Oracle Documentation the parameter can be set from either emctl or the console UI. I have not found where to perform the latter, however my post here described how to enable it via emctl. Alternatively, you could register the external users via the emcli create_user command. For example, and this is just one of many ways of doing this:
emcli create_user
   -name=“manjum"
   -email=“maaz.anjum@iwish.com;miles.andrew@iwish.com”
   -roles=“public;em_user;<custom_role>”
   -type=“EXTERNAL_USER"
In addition to auto-provisioning, you could also enable mapping of LDAP user attributes to EM user attributes. For example, mapping of email address, department, first name, last name etc. Don Seiler (@dtseiler) alludes to this in one of his posts about authentication quirks. I haven’t had the opportunity to explore this feature yet.
If you had to troubleshoot any issues, there’s a good bit of troubleshooting help available in the Oracle Documentation here (thanks to @Seth_M_Miller for pointing it out).
I hope this brief overview was helpful to understanding the parts and pieces (assuming thats all of them) for user authentications in EM12c with Weblogic’s Security Framework. I plan to publish a few more posts related to the issues I came across during my adventures.
Cheers!
Enable Auto-Provisioning of Users in EM12c
While writing a separate article on EM12c’s Security Authentication, I felt the need to separate out the various parts and pieces which make up the discussion. Rather than have one quite long post, a few smaller ones would make for an easier read.
In this one, I’d like to show you how to enable auto-provisioning for external users in EM12c. Quoting the documentation below, the intent is self explanatory.
"Typically the external LDAP users need to be created in Enterprise Manager before they can log in to the Enterprise Manager console. Auto provisioning removes that requirement by automatically creating the Enterprise Manager user account upon successful authentication of the user the first time he logs on to Enterprise Manager.”
Basically, if the property is not enabled, during the authentication-authorization phase the attempt to log will fail with an “Authentication Failed” message. You would have to dig down quite deep in the EMGC_OMSx Server LDAP logs to find that during the authorization phase the user would not map.
When I first had to do this in version 12.1.0.2.0, I found a neat video that Oracle posted which described the process of LDAP Authentication from start to finish. With respect to my post, the relevant steps are below - these need to be run on each OMS server.
-bash-4.1$ emctl set property -name "oracle.sysman.core.security.auth.autoprovisioning" -value "true"
Oracle Enterprise Manager Cloud Control 12c Release 3
Copyright (c) 1996, 2013 Oracle Corporation. All rights reserved.
SYSMAN password:
Property oracle.sysman.core.security.auth.autoprovisioning for oms p-oem-app02.acme.com:4889_Management_Service has been set to value true
OMS restart is not required to reflect the new property value
Finally, restart all OMS servers and voila!
Hope this helps.
Cheers!
Friday, January 24, 2014
How to Change Properties of a Target in EM12c
One of my colleagues asked me a good question this morning about how to go about changing the properties of a target, specifically the “Contact” field.

The properties fields for a target are often over-looked, but are important to the prioritization algorithm for event management. For example, if a target’s Lifecycle Status is Production or Mission Critical, its events will be given a preference over one with a lower lifecycle status. That being said, in this example it was a listener type target. The same method applies for any target. You simply need to go to the menu under the targets name and follow the screenshot below. Please note, this method is only applicable in EM12c.
My colleague didn’t mention “why” he wanted it removed, however one picture was worth a handful of words.

Hope this helps.
Cheers!
Monday, December 30, 2013
Create a Simple Job for a Host Target in EM12c
Afternoon folks! I received a text from a customer of mine asking whether I had any documentation to create jobs in EM12c. To be specific, the job in question could have been setup via crontab or windows jobs but since I had recommended consolidation of newer jobs in EM12c, this was a good question. The easiest route was to refer the customer to Oracle Documentation, but I have a few hours to kill and thought it would make a good post.
The job in question, is a veridata compare job. You could just as easily, replace that job with <insert script name here>. I’d like to show you how to set it up.
First, let’s make sure that our script actually works. For those who are not familiar with Veridata, it is Oracle’s solution to data comparison when replication is in use. The Veridata suite contains a Command Line Interface (CLI) called vericom that can be used to perform minimal activities on the jobs and compare pairs configured within it. I should have probably written another post on configuring jobs, but I’ll leave that for another day.
My innocent script is located in the $VERIDATA_HOME directory.
[oracle@as-sandbox-n1 scripts]$ pwd
/u01/app/oracle/product/11.2.1.0/veridata/scripts
[oracle@as-sandbox-n1 scripts]$ ls -lhtr
total 4.0K
-rwxrwxrwx 1 oracle oinstall 68 Nov  8 12:43 vericom_run_job.sh
[oracle@as-sandbox-n1 scripts]$ cat vericom_run_job.sh
/u01/app/oracle/product/11.2.1.0/veridata/vericom.sh -j BLUE_YELLOW
A sample execution of the script looks like:
VERIDATA_HOME /u01/app/oracle/product/11.2.1.0/veridata
JRE_HOME: /u01/app/oracle/product/11.2.1.0/veridata/jre
JAVA_OPTS: -Xmx1024m -Djava.awt.headless=true
Oracle GoldenGate Veridata Command Line Interface - Version 11.2.1.0  OGGVDT_11.2.1.0.0_PLATFORMS_121108.1625
Job BLUE_YELLOW started
Run ID: (1027,0,0)
Number of Compare Pairs: 3
Number of Compare Pairs With Errors: 3
Number of Compare Pairs With OOS: 0
Number of Compare Pairs With No OOS: 0
Number of Compare Pairs Cancelled: 0
Job Report Filename: /u01/app/oracle/product/11.2.1.0/veridata/shared/data/rpt/BLUE_YELLOW/00001027/BLUE_YELLOW.rpt
Run ID: (1027,0,0)
Job Completion Status: IN SYNC
That was the easy part :)
1. Now, let’s log into EM12c and navigate to the Jobs home page.

2. Since we need to create a job and the default option under “Create Library Job” is set to “OS Command”, click on Go.

3. From here, you can give the job a name and description, and add a target where it will run.

4. In the parameters tab, enter the absolute path of the script. You have the option of embedding the script within the job itself by choosing a different “Command Type”.

5. I already have a Preferred Named Credential Set configured for this host, so the defaults as left. Alternatively, you could pick one of the other two options as well, but it all depends on your configuration.

6. The insane schedule is merely to illustrate a point. You can pick your own.

7. I generally do not make alterations to the Access tab, however, you may want to delegate ownership and access to other users. Click on “Save to Library”.

8. And that’s it!

9. I waited a few minutes before checking for the jobs activity.

10. Cool, the first one completed successfully. You can drill down to the log of the execution.

I’ve only scratched the surface of the job system in EM12c. There are several other options while creating jobs (see screenshot below). One of the most interesting for me are the multi-task jobs which I hope to write an article on eventually.

For the moment, I hope you enjoyed the article and found it useful.
Cheers!