Wednesday, September 11, 2013
Patch and Provision with EM12c: #1 Database Provisioning - Provision Me a Database!
Preface
Among the several (too many to list) useful features in Enterprise Manager 12c (specifically 12.1.0.3) is Database Provisioning. With the numerous benefits of a multi tenant architecture in newer releases Database 12c, I want to begin this series of blog posts with starting with a simple database provisioning exercise. Provisioning is, in my humble opinion, a key feature in OEM. It offers a means to cleanly deploy and provision databases, bare metal, and middleware targets.
This post assumes:
What is "Database Provisioning"
Straight from the Docs: "The Provisioning solution is an important part of Lifecycle Management solution offered by Cloud Control. As part of the database provisioning solution, Cloud Control enables you to provision Oracle Databases (also known as single-instance databases) and Oracle Real Application Clusters databases, extend or delete Oracle Real Application Clusters nodes, provision Oracle Real Application Clusters One node databases, provision pluggable databases, and also upgrade Oracle single-instance databases in a scalable and automated manner."

How Does It Work?
1. Navigate to the "Database Provisioning" Section

2. On the "Database Provisioning" screen, you'll notice several sections; Setup, Target Host Setup, Current Status, and a few others. This page is connected to several other functionalities within OEM; for example, Add Targets, Named Credentials,

3. We should proceed with the "Setup" to configure the Software Library (if not already setup), Credentials, and Notifications (if needed).
Credentials Setup
3.1 To keep the exercise simple, we'll proceed with the SYSMAN user. Ideally, a user with the correct privileges should perform the steps. I will discuss this in a later post. (EDIT).

3.1.1 Click the "Setup" link next to Credentials. This redirects to the "Security" page where Credential Sets can be easily created.

3.1.2 Create credentials by clicking on the "Create" button. Fill in the details, then click on "Test and Save"

3.1.3 Select the appropriate host for the test.

3.1.4 After creating the Oracle user credentials, for easy of usability, I created one for a privileged user.

At this point we have configured the Software Library, and Credentials.
Provisioning Wizard
4. Back on the "Database Provisioning" screen, there are several "out-of-the-box" profiles. For starters, we will simply use the "Single Instance using File System for 12.1.0.1.0 on Unix" profile. Click the "Provision" button to continue.
I do intend to expand on creating a new "Profile" in a later post.

4.1 Since we started with a Provisioning Profile, the correct one is preselected. For this example, we will not install the GI Software, only the Database Software and Create a database.
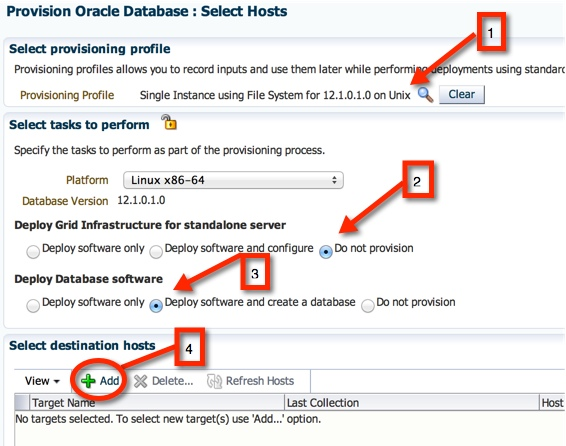
4.2 Add the target host for deployment.

Configuration
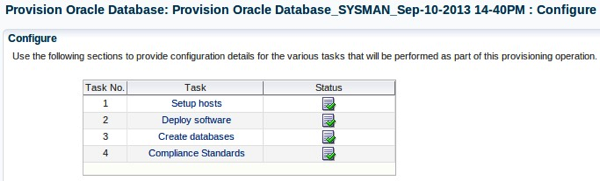
4.3 Next, configure the host.

4.3.1 Next, select the Normal and Privileged OS user. Please note, in my example, these are two different credential sets where I've chose to override the "Preferred Credentials".

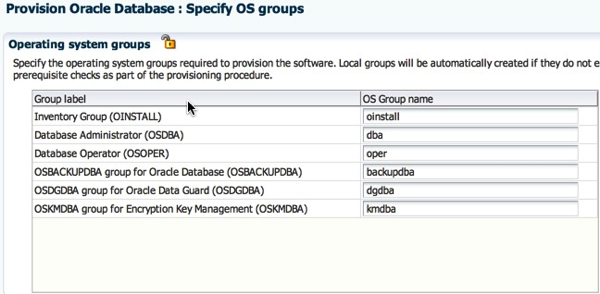
4.3.2 Next, specify the OS Groups for the software installer. I've never heard of or seen the last three groups.
4.4 Back to the Configure screen, click on the "Deploy Software" link.

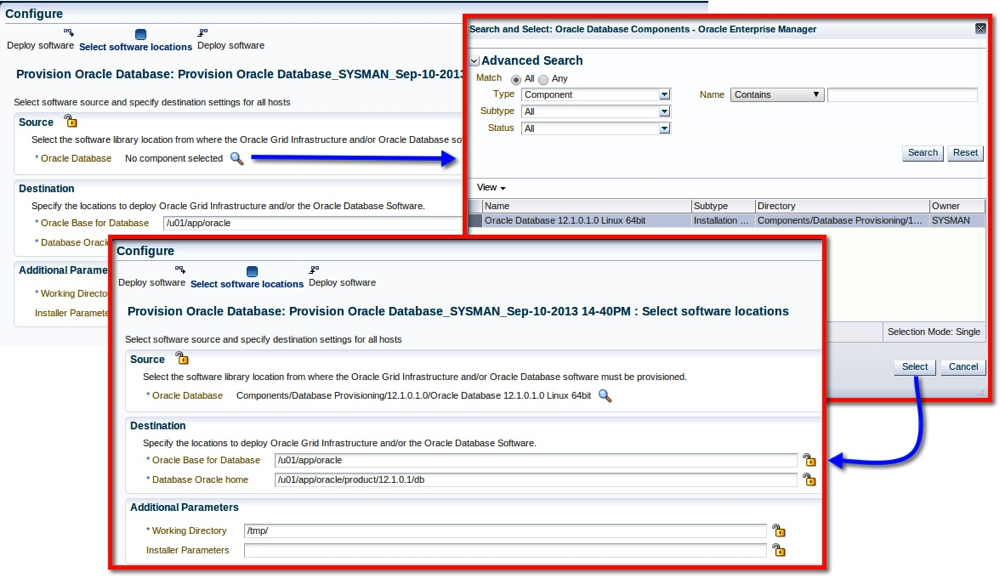
4.4.1 Select the component that will be used during the software deployment. I left the default values for Oracle Base, and Oracle Home. Click on Next.
4.5 Next, click on Create Databases.
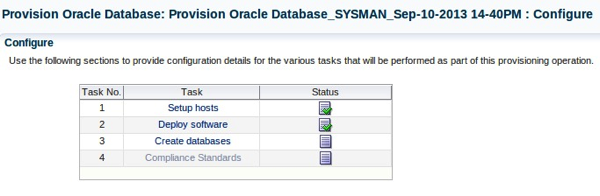
4.5.1 The next few screens will remind you of our friend the DBCA :)

4.6 Final section in the Configuration. Lets move ahead with the Compliance Standards.

4.6.1 I'm going to chose "None". This can be applied at a later date.

4.7 With all the Configuration steps completed, click Next!
Scheduling
5. We're nearly there. I want to review the prerequisite checks prior to committing the deployment, therefore I checked the option in the "Prerequisite only mode".

Blast-Off!
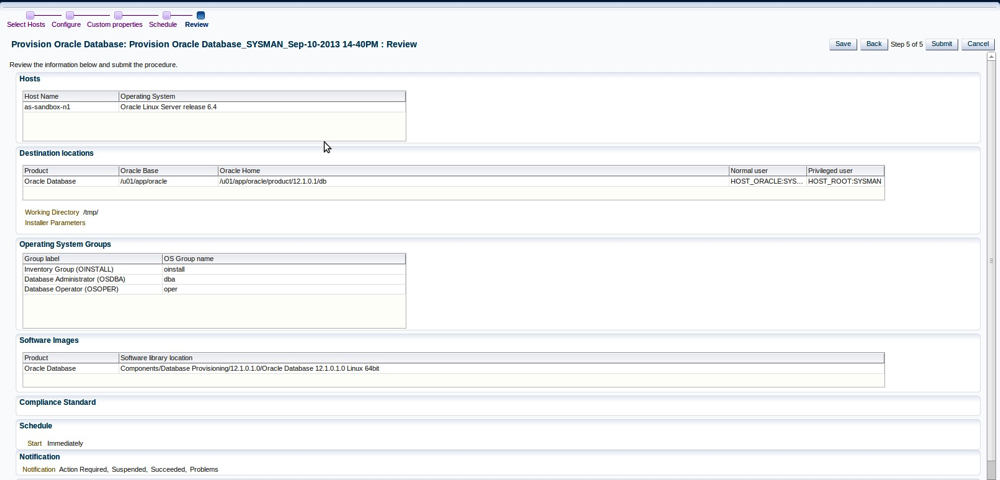
6. Finally, review the configuration and click Submit.
6.1 Progress can be tracked via the Procedure Activity screen for the provisioning task.

6.2 Some errors I encountered along the way:
During the “Deploy Oracle Database” step, the provisioning activity failed due to the error below:

It was an easy fix, but I would have thought the root fixup script was responsible for it.

Where's All My Hard Work?
7. We can view the newly created Deployment Procedure (which I kept saving along the way and eventually renamed).
7.1 Make your way back to the Database Provisioning page.

7.2 There it is!

7.3 A neat feature of the deployment procedures is, that it actually add's the targets (Database) into OEM. Navigate to the Databases page.

7.4 Since I specified a new database software home, the installer for some reason use the "11g" phrase in the Oracle Home Name variable.

Conclusion
I've only scratched the surface with all that the Provisioning and Patching feature in OEM12c has to offer. I future posts, I'd like to explore other deployment procedures which include:
Cheers!
Next in Series: Profiles
Among the several (too many to list) useful features in Enterprise Manager 12c (specifically 12.1.0.3) is Database Provisioning. With the numerous benefits of a multi tenant architecture in newer releases Database 12c, I want to begin this series of blog posts with starting with a simple database provisioning exercise. Provisioning is, in my humble opinion, a key feature in OEM. It offers a means to cleanly deploy and provision databases, bare metal, and middleware targets.
This post assumes:
- The intended host for the database provisioning is already in the OEM Inventory
- There are existing 12c Databases in the inventory to create profiles
- Configured the Software Library
- 12.1.0.1.0 Installation Media has been uploaded to the Software Library (see my post on the setup)
- Pre-requisite checks for installation of Oracle Database 12.1.0.1.0 were configured as per documentation
What is "Database Provisioning"
Straight from the Docs: "The Provisioning solution is an important part of Lifecycle Management solution offered by Cloud Control. As part of the database provisioning solution, Cloud Control enables you to provision Oracle Databases (also known as single-instance databases) and Oracle Real Application Clusters databases, extend or delete Oracle Real Application Clusters nodes, provision Oracle Real Application Clusters One node databases, provision pluggable databases, and also upgrade Oracle single-instance databases in a scalable and automated manner."
How Does It Work?
1. Navigate to the "Database Provisioning" Section
2. On the "Database Provisioning" screen, you'll notice several sections; Setup, Target Host Setup, Current Status, and a few others. This page is connected to several other functionalities within OEM; for example, Add Targets, Named Credentials,
3. We should proceed with the "Setup" to configure the Software Library (if not already setup), Credentials, and Notifications (if needed).
Credentials Setup
3.1 To keep the exercise simple, we'll proceed with the SYSMAN user. Ideally, a user with the correct privileges should perform the steps. I will discuss this in a later post. (EDIT).
3.1.1 Click the "Setup" link next to Credentials. This redirects to the "Security" page where Credential Sets can be easily created.
3.1.2 Create credentials by clicking on the "Create" button. Fill in the details, then click on "Test and Save"
3.1.3 Select the appropriate host for the test.
3.1.4 After creating the Oracle user credentials, for easy of usability, I created one for a privileged user.
At this point we have configured the Software Library, and Credentials.
Provisioning Wizard
4. Back on the "Database Provisioning" screen, there are several "out-of-the-box" profiles. For starters, we will simply use the "Single Instance using File System for 12.1.0.1.0 on Unix" profile. Click the "Provision" button to continue.
I do intend to expand on creating a new "Profile" in a later post.
4.1 Since we started with a Provisioning Profile, the correct one is preselected. For this example, we will not install the GI Software, only the Database Software and Create a database.
4.2 Add the target host for deployment.
Configuration
4.3 Next, configure the host.
4.3.1 Next, select the Normal and Privileged OS user. Please note, in my example, these are two different credential sets where I've chose to override the "Preferred Credentials".
4.3.2 Next, specify the OS Groups for the software installer. I've never heard of or seen the last three groups.
4.4 Back to the Configure screen, click on the "Deploy Software" link.
4.4.1 Select the component that will be used during the software deployment. I left the default values for Oracle Base, and Oracle Home. Click on Next.
4.5 Next, click on Create Databases.
4.5.1 The next few screens will remind you of our friend the DBCA :)
4.6 Final section in the Configuration. Lets move ahead with the Compliance Standards.
4.6.1 I'm going to chose "None". This can be applied at a later date.
4.7 With all the Configuration steps completed, click Next!
Scheduling
5. We're nearly there. I want to review the prerequisite checks prior to committing the deployment, therefore I checked the option in the "Prerequisite only mode".
Blast-Off!
6. Finally, review the configuration and click Submit.
6.1 Progress can be tracked via the Procedure Activity screen for the provisioning task.
6.2 Some errors I encountered along the way:
During the “Deploy Oracle Database” step, the provisioning activity failed due to the error below:
It was an easy fix, but I would have thought the root fixup script was responsible for it.
Where's All My Hard Work?
7. We can view the newly created Deployment Procedure (which I kept saving along the way and eventually renamed).
7.1 Make your way back to the Database Provisioning page.
7.2 There it is!
7.3 A neat feature of the deployment procedures is, that it actually add's the targets (Database) into OEM. Navigate to the Databases page.
7.4 Since I specified a new database software home, the installer for some reason use the "11g" phrase in the Oracle Home Name variable.
Conclusion
I've only scratched the surface with all that the Provisioning and Patching feature in OEM12c has to offer. I future posts, I'd like to explore other deployment procedures which include:
- Database Provisioning: Cloning of an Oracle home, Uninstallation of Software.
- Middleware Provisioning: Deploying WebLogic domains etc.
Cheers!
Next in Series: Profiles
Tuesday, September 10, 2013
Adding Entities (Component) to the Software Library in Oracle Enterprise Manager 12.1.0.3.0
As part of a blog series I'm currently working on for Provisioning and Patching in OEM12c, I needed to create a Software Library Component for the DB12c installation media. With 12.1.0.3, oracle introduced an dmcli approach (create_swlib_entity) to creating the relevant components. I'll explore the GUI method for now, and write a related blog for it later.
Before we begin, let's set some expectations :)
The blog post aims to
Before we begin, let's set some expectations :)
The blog post aims to
- Create appropriate folders within the Software Library (SWLIB)
- Create the relevant Entity (type Component) in the Software Library
- The Software Library is already setup
- Database 12.1.0.1.0 Install Media is downloaded, are compressed into a single file instead of two separate ones.
For reference, I have provided a link the Oracle Documentation as well.
Onward!
Where do I go?
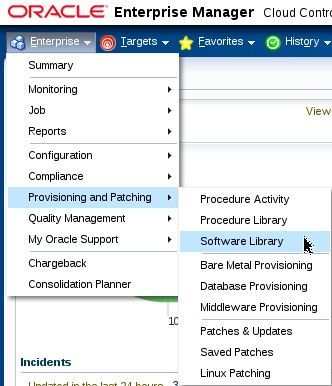
1. Find your way to the Software Library home under "Patching and Provisioning".
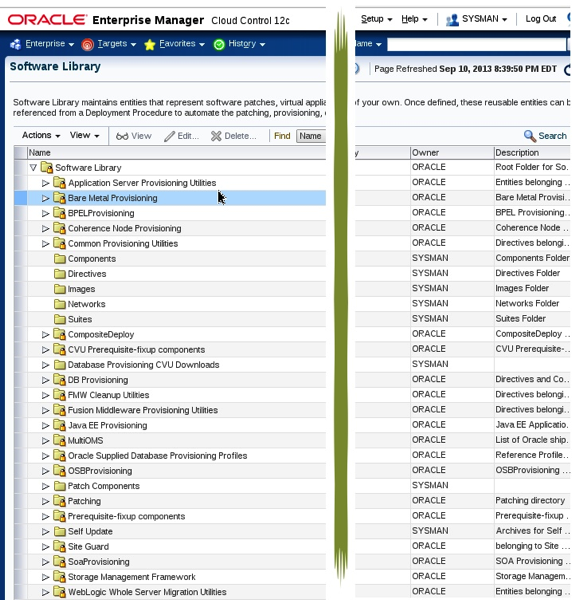
2. This page contains the Entities within our Software Library. It is important to note, that Entities with the lock icon are un-editable and are called Oracle-owned Entities. Thats by design, and in part encourages OEM administrators to create their own folder structures or, use the suggested ones. For example, Components, Directives, Images, Networks, Suites etc.
Creating Folders
3. For the purpose of this demo, I'd like to create a custom entity, i.e. "Component" within the SWLIB.
3.1 Highlight the Components Folder, click Actions -> Create Folder. Why folders? Well, I personally like to keep things neatly organized.
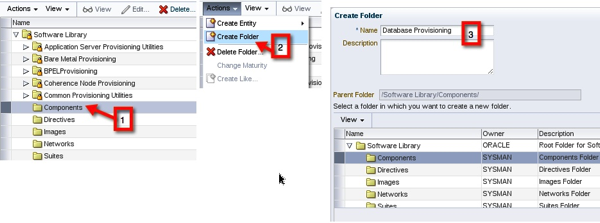
3.2 Similarlry, create a sub-folder within "Database Provisioning"

4. For the purpose of this demo, I'd like to create a custom entity, i.e. "Component" within the SWLIB. Highlight the Components Folder, click Actions -> Create Entity -> Component

5. Select "Installation Media" from the drop-down list. Click Continue.

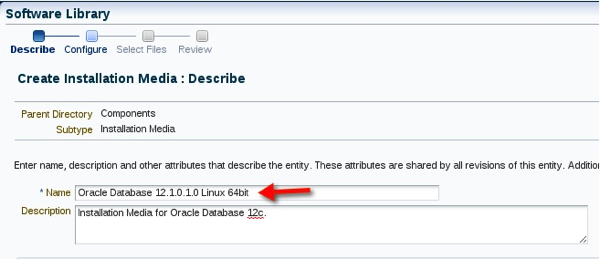
6. I try to be as specific with the names as possible. Enter an appropriate name for the entity. Click Next
7. Select the appropriate Product, Platform, and Version for the installation media.

Upload Installation Media
8. Okay, this part requires information regarding the files we need to upload, as well as, the destination location. We will upload the files to the SWLIB (as shown).
Where do I go?
1. Find your way to the Software Library home under "Patching and Provisioning".
2. This page contains the Entities within our Software Library. It is important to note, that Entities with the lock icon are un-editable and are called Oracle-owned Entities. Thats by design, and in part encourages OEM administrators to create their own folder structures or, use the suggested ones. For example, Components, Directives, Images, Networks, Suites etc.
Creating Folders
3. For the purpose of this demo, I'd like to create a custom entity, i.e. "Component" within the SWLIB.
3.1 Highlight the Components Folder, click Actions -> Create Folder. Why folders? Well, I personally like to keep things neatly organized.
3.2 Similarlry, create a sub-folder within "Database Provisioning"
4. For the purpose of this demo, I'd like to create a custom entity, i.e. "Component" within the SWLIB. Highlight the Components Folder, click Actions -> Create Entity -> Component
5. Select "Installation Media" from the drop-down list. Click Continue.
6. I try to be as specific with the names as possible. Enter an appropriate name for the entity. Click Next
7. Select the appropriate Product, Platform, and Version for the installation media.
Upload Installation Media
8. Okay, this part requires information regarding the files we need to upload, as well as, the destination location. We will upload the files to the SWLIB (as shown).
8.1 First, select the upload location. Leave the "Upload Files" radio button check. Select the SWLIB location where the files should be uploaded. You can, alternatively, chose the "Refer Files" link to upload to Reference File Location within the SWLIB. See documentation for more information.

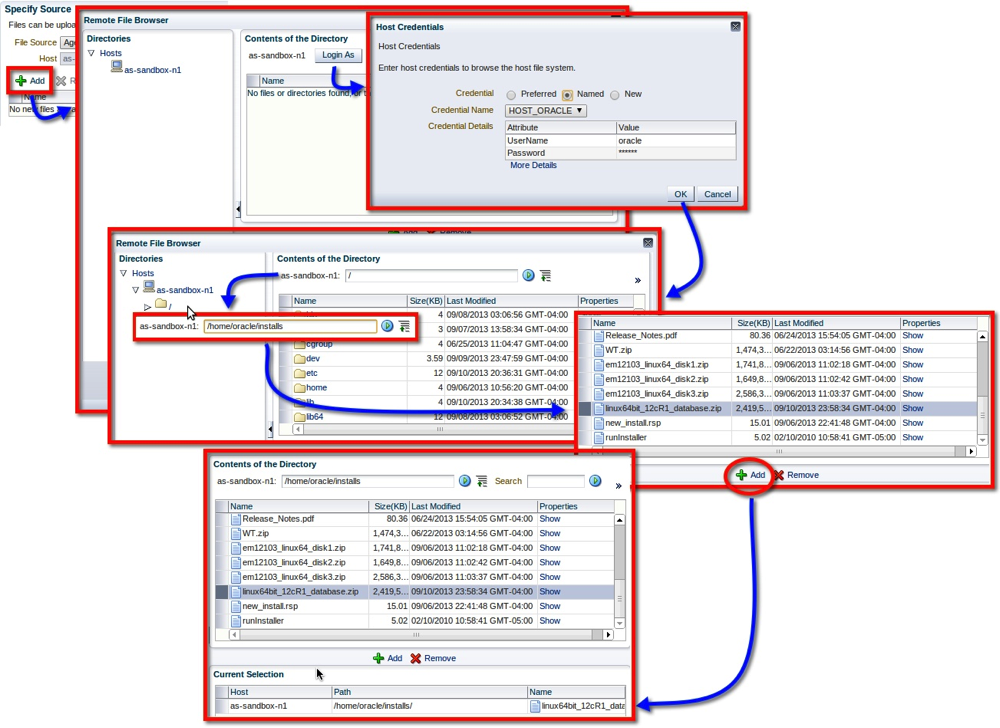
8.2 Next, add the install media. For me, using a "Local Machine" option ended in Java Errors. Either its a bug in OEM or there is an issue with my browser. Therefore, select "Agent Host" from the drop down and follow the screen shots below.

8.3 Click on "Add". Follow screen shots below. Basically, I'm logging into the Agent Host, browsing through the relevant folders and adding the two installation files to the selection list.
Save and Upload
9. Finally, click Save and Upload on the last page. A job is submitted to uploading the files.


9.1 Job Status looks good and completes successfully.

Did it work?
10. Navigate back to the SWLIB page in Patching and Provisioning.

So what did we learn (Bruce*)?
Well, for one thing, its really easy to add an entity component to the SWLIB in OEM12c. I will refer to this post in my Patching and Provisioning series which will highlight how to actually use it.
Hope you enjoyed reading and found it useful.
Cheers!
* Batman Begins reference - sorry I'm a big dork :)
8.2 Next, add the install media. For me, using a "Local Machine" option ended in Java Errors. Either its a bug in OEM or there is an issue with my browser. Therefore, select "Agent Host" from the drop down and follow the screen shots below.
8.3 Click on "Add". Follow screen shots below. Basically, I'm logging into the Agent Host, browsing through the relevant folders and adding the two installation files to the selection list.
Save and Upload
9. Finally, click Save and Upload on the last page. A job is submitted to uploading the files.
9.1 Job Status looks good and completes successfully.
Did it work?
10. Navigate back to the SWLIB page in Patching and Provisioning.
So what did we learn (Bruce*)?
Well, for one thing, its really easy to add an entity component to the SWLIB in OEM12c. I will refer to this post in my Patching and Provisioning series which will highlight how to actually use it.
Hope you enjoyed reading and found it useful.
Cheers!
* Batman Begins reference - sorry I'm a big dork :)
RMAN-08120 on Primary with Active Standby and GoldenGate
I came across this a few months ago at a client site. It was peculiar problem whose fix wasn’t quite straightforward (well, not initially anyway).
Ever seen this?
RMAN-08120: WARNING: archived log not deleted, not yet applied by standby
This one I’ve got to work twice now so, it probably works for others. Once when I encountered it with Data Guard and GoldenGate (Integrated Capture Enabled), and second when I suggested it as a solution for a Data Guard with Snap Clones.
RMAN> BACKUP ARCHIVELOG UNTIL TIME '' NOT BACKED UP 1 TIMES TO DEVICE TYPE SBT;
RMAN> DELETE ARCHIVELOG SEQUENCE 12206 BACKED UP 1 TIMES TO DEVICE TYPE DISK;
Once upon a time, there was a Primary Database with a Standby Database and GoldenGate Target Database configured where, all logs/trail files were successfully applied without a lag. To resolve an unrelated problem I’d been futzing around with GoldenGate, had enabled integrated capture, resolved my original issue and forgotten about enabling it! A few weeks later, my colleague mentioned that when deleting archived logs (post backup) he received the above RMAN error message. What was stranger still is, that the issue was identified only after a certain someone had enabled Integrated Capture.
Tube light went on, umm wait, I might have done thing to do cause it!
For reference, the piece in the backup script that failed is below:
SQL> select capture_name, queue_owner, capture_user, start_scn, status from dba_capture;

CAPTURE_NAME     QUEUE_OWNER      CAPTURE_USER     START_SCN STATUS
------------     ------------- ----------       --------- ------
OGG$CAP_E_PRD    GGATE         GGATE            525864662 ENABLED
Version information
Database: 11.2.0.3 64bit
Data Guard: Active Data Guard
GoldenGate: 11.2.1.0.7 64bit
So, after struggling with MOS unsuccessfully for a day, I gave up and came back the next day to surprisingly find a good lead.
Why is RMAN Not Purging Archive Logs After Backup Since OGG was Configured?, RMAN-08137 (Doc ID 1351352.1)
With that information in hand, I went through the following steps:
Let’s find out what is registered in the Source Database.
According to the MOS Note, we can simply drop it.
SQL> exec DBMS_CAPTURE_ADM.DROP_CAPTURE ('OGG$CAP_E_PRD');
BEGIN DBMS_CAPTURE_ADM.DROP_CAPTURE ('OGG$CAP_E_PRD'); END;

*
ERROR at line 1:
ORA-01338: Other process is attached to LogMiner session
ORA-06512: at "SYS.DBMS_CAPTURE_ADM_INTERNAL", line 726
ORA-06512: at "SYS.DBMS_CAPTURE_ADM_INTERNAL", line 697
ORA-06512: at "SYS.DBMS_CAPTURE_ADM", line 566
ORA-06512: at line 1
Or, maybe not. Let’s stop it first.
SQL> exec dbms_capture_adm.STOP_capture(CAPTURE_NAME=>'OGG$CAP_E_PRD')

PL/SQL procedure successfully completed.
Check the status again.
SQL> select capture_name, queue_owner, capture_user, start_scn, status from dba_capture;

CAPTURE_NAME     QUEUE_OWNER      CAPTURE_USER     START_SCN STATUS
------------     ------------- ----------       --------- ------
OGG$CAP_E_PRD    GGATE         GGATE            525864662 DISABLED
Attempt another drop.
SQL> exec DBMS_CAPTURE_ADM.DROP_CAPTURE ('OGG$CAP_E_PRD');

PL/SQL procedure successfully completed.
Check status again.
SQL> select capture_name, queue_owner, capture_user, start_scn, status from dba_capture;

no rows selected
Perfect!! After this, I was successfully able to issue the Archived Log backup with delete without the error message.
In the second case, the result of the query was: two disabled capture objects. When dropped, the backup script (with delete) worked as intended.
Cheers!
Friday, September 6, 2013
Adventures in Hadoop: #2 Starting from Scratch
As I had mentioned in my previous post,
I wanted to collect my experience from various sources. This post is intended
as a continuing series of posts in which I’d like to share my learning experience
in Hadoop.
Disclaimer: I have used Michael Noll’s article
as a base for my own exercise. I tend to deviate slightly from his instructions
and will expand in later posts
Add Software
Repositories
maazanjum@hadoop:~$ sudo apt-get install
python-software-properties
[sudo] password for maazanjum:
Reading package lists... Done
Building dependency tree
Reading state information... Done
The following NEW packages will be installed:
python-software-properties
0 upgraded, 1 newly installed, 0 to remove and 212 not
upgraded.
Need to get 19.1 kB of archives.
After this operation, 132 kB of additional disk space will be
used.
Get:1 http://us.archive.ubuntu.com/ubuntu/
raring-updates/universe python-software-properties all 0.92.17.1 [19.1 kB]
Fetched 19.1 kB in 0s (78.6 kB/s)
Selecting previously unselected package
python-software-properties.
(Reading database ... 155358 files and directories currently
installed.)
Unpacking python-software-properties (from
.../python-software-properties_0.92.17.1_all.deb) ...
Setting up python-software-properties (0.92.17.1) ...
maazanjum@hadoop:~$ sudo add-apt-repository
ppa:ferramroberto/java
You are about to add the following PPA to your system:
PPA esclusivo per l'ultima versione disponibile di JAVA
PPA for the latest version of JAVA
PPA für die neueste Version von JAVA
PPA para la última versión de JAVA
PPA pour la dernière version de JAVA
by LffL http://www.lffl.org
More info:
https://launchpad.net/~ferramroberto/+archive/java
Press [ENTER] to continue or ctrl-c to cancel adding it
gpg: keyring `/tmp/tmpslw4kg/secring.gpg' created
gpg: keyring `/tmp/tmpslw4kg/pubring.gpg' created
gpg: requesting key 3ACC3965 from hkp server
keyserver.ubuntu.com
gpg: /tmp/tmpslw4kg/trustdb.gpg: trustdb created
gpg: key 3ACC3965: public key "Launchpad lffl"
imported
gpg: no ultimately trusted keys found
gpg: Total number processed: 1
gpg: imported:
1 (RSA: 1)
OK
Update Source List
maazanjum@hadoop:~$ sudo apt-get update
[sudo] password for maazanjum:
Ign http://ppa.launchpad.net raring Release.gpg
Ign http://ppa.launchpad.net raring Release
…
Install Sun Java 6
JDK
maazanjum@hadoop:~$ sudo apt-get install sun-java6-jdk
Reading package lists... Done
Building dependency tree
Reading state information... Done
Package sun-java6-jdk is not available, but is referred to by
another package.
This may mean that the package is missing, has been obsoleted,
or
is only available from another source
E: Package 'sun-java6-jdk' has no installation candidate
According to Happy
Coding, Sun JDK has been removed from the partner archives; therefore I’ll
use the OpenJDK version instead.
maazanjum@hadoop:~$ sudo apt-get install openjdk-6-jdk
Reading package lists... Done
Building dependency tree
Reading state information... Done
The following extra packages will be installed:
ca-certificates-java
icedtea-6-jre-cacao icedtea-6-jre-jamvm icedtea-netx icedtea-netx-common
java-common
libatk-wrapper-java
libatk-wrapper-java-jni libgif4 libice-dev libnss3-1d libpthread-stubs0
libpthread-stubs0-dev libsm-dev
libx11-6 libx11-dev
libx11-doc libxau-dev libxcb1 libxcb1-dev libxdmcp-dev libxt-dev libxt6
openjdk-6-jre
…
Unpacking openjdk-6-jdk:amd64 (from
.../openjdk-6-jdk_6b27-1.12.6-1ubuntu0.13.04.2_amd64.deb) ...
Processing triggers for ca-certificates ...
Updating certificates in /etc/ssl/certs... 0 added, 0 removed;
done.
Running hooks in /etc/ca-certificates/update.d....done.
Processing triggers for doc-base ...
Processing 32 changed doc-base files, 2 added doc-base files...
Processing triggers for man-db ...
Processing triggers for bamfdaemon ...
…
done.
done.
maazanjum@hadoop:~$
Add a Hadoop system
user
maazanjum@hadoop:~$ sudo addgroup hadoop
Adding group `hadoop' (GID 1001) ...
Done.
maazanjum@hadoop:~$ id hadoop
id: hadoop: no such user
maazanjum@hadoop:~$ sudo adduser --ingroup hadoop hduser
Adding user `hduser' ...
Adding new user `hduser' (1001) with group `hadoop' ...
Creating home directory `/home/hduser' ...
Copying files from `/etc/skel' ...
Enter new UNIX password:
Retype new UNIX password:
passwd: password updated successfully
Changing the user information for hduser
Enter the new value, or press ENTER for the default
Full Name []: Hadoop
User
Room Number []:
Work Phone []:
Home Phone []:
Other []:
Is the information correct? [Y/n] y
Configure SSH
maazanjum@hadoop:~$ su - hduser
Password:
hduser@hadoop:~$ ssh-keygen -t rsa -P ""
Generating public/private rsa key pair.
Enter file in which to save the key (/home/hduser/.ssh/id_rsa):
Created directory '/home/hduser/.ssh'.
Your identification has been saved in /home/hduser/.ssh/id_rsa.
Your public key has been saved in /home/hduser/.ssh/id_rsa.pub.
The key fingerprint is:
c6:e3:f1:a4:43:02:21:20:96:7f:29:ce:16:8d:ef:6a hduser@hadoop
The key's randomart image is:
+--[ RSA 2048]----+
|ooo . |
|o. . . |
| . + . |
| = = . |
| o = . S . |
| + . = * |
| . . + .
|
| E . .
|
| ... |
+-----------------+
hduser@hadoop:~$ cat $HOME/.ssh/id_rsa.pub >>
$HOME/.ssh/authorized_keys
I had to install and configure SSH before the next few steps
worked.
hduser@hadoop:~$ sudo apt-get install openssh-server
I also granted hduser sudo access
maazanjum@hadoop:~$ sudo adduser hduser sudo
[sudo] password for maazanjum:
Adding user `hduser' to group `sudo' ...
Adding user hduser to group sudo
Done.
hduser@hadoop:~$ ssh localhost
The authenticity of host 'localhost (127.0.0.1)' can't be
established.
ECDSA key fingerprint is
27:8e:e7:97:72:a2:08:5e:b2:4e:95:91:61:34:72:3a.
Are you sure you want to continue connecting (yes/no)? yes
Warning: Permanently added 'localhost' (ECDSA) to the list of
known hosts.
Welcome to Ubuntu 13.04 (GNU/Linux 3.8.0-19-generic x86_64)
* Documentation: https://help.ubuntu.com/
Disable IPv6
hduser@hadoop:~$ sudo vi /etc/sysctl.conf
[sudo] password for hduser:
# disable ipv6
net.ipv6.conf.all.disable_ipv6 = 1
net.ipv6.conf.default.disable_ipv6 = 1
net.ipv6.conf.lo.disable_ipv6 = 1
Reboot the machine and check whether its actually disabled.
hduser@hadoop:~$ cat
/proc/sys/net/ipv6/conf/all/disable_ipv6
1
Install Hadoop
hduser@hadoop:~$ cd /usr/local
hduser@hadoop:/usr/local$ ls -lhtr
total 32K
drwxr-xr-x 2 root root 4.0K Apr 24 10:01 src
drwxr-xr-x 2 root root 4.0K Apr 24 10:01 sbin
drwxr-xr-x 2 root root 4.0K Apr 24 10:01 include
drwxr-xr-x 2 root root 4.0K Apr 24 10:01 games
drwxr-xr-x 2 root root 4.0K Apr 24 10:01 etc
drwxr-xr-x 2 root root 4.0K Apr 24 10:01 bin
drwxr-xr-x 4 root root 4.0K Apr 24 10:04 lib
drwxr-xr-x 7 root root 4.0K Apr 24 10:05 share
lrwxrwxrwx 1 root root
9 Sep 2 22:31 man -> share/man
I use the –C option to output tar to a specific directory
hduser@hadoop:/usr/local$ sudo tar -zxvf /tmp/hadoop-1.2.1.tar.gz
-C /usr/local
hadoop-1.2.1/
hadoop-1.2.1/.eclipse.templates/
hadoop-1.2.1/.eclipse.templates/.externalToolBuilders/
hadoop-1.2.1/.eclipse.templates/.launches/
hadoop-1.2.1/bin/
hadoop-1.2.1/c++/
hadoop-1.2.1/c++/Linux-amd64-64/
…
I personally prefer to link the binaries to a generic
“hadoop” folder.
hduser@hadoop:/usr/local$ sudo ln -s hadoop-1.2.1/ hadoop
hduser@hadoop:/usr/local$ ls -lhtr
total 36K
drwxr-xr-x 2 root
root 4.0K Apr 24 10:01 src
drwxr-xr-x 2 root
root 4.0K Apr 24 10:01 sbin
drwxr-xr-x 2 root
root 4.0K Apr 24 10:01
include
drwxr-xr-x 2 root
root 4.0K Apr 24 10:01 games
drwxr-xr-x 2 root
root 4.0K Apr 24 10:01 etc
drwxr-xr-x 2 root
root 4.0K Apr 24 10:01 bin
drwxr-xr-x 4 root
root 4.0K Apr 24 10:04 lib
drwxr-xr-x 7 root
root 4.0K Apr 24 10:05 share
drwxr-xr-x 9 maazanjum maazanjum 4.0K Aug 15 22:15 hadoop-1.2.1
lrwxrwxrwx 1 root
root 9 Sep 2 22:31 man -> share/man
lrwxrwxrwx 1 root
root 19 Sep 3 12:24 hadoop -> hadoop-1.2.1/
Change ownership to hduser.
hduser@hadoop:/usr/local$ sudo chown -R hduser:hadoop hadoop*
hduser@hadoop:/usr/local$ ls -lhtr
total 36K
drwxr-xr-x 2 root root
4.0K Apr 24 10:01 src
drwxr-xr-x 2 root root
4.0K Apr 24 10:01 sbin
drwxr-xr-x 2 root root
4.0K Apr 24 10:01 include
drwxr-xr-x 2 root root
4.0K Apr 24 10:01 games
drwxr-xr-x 2 root root
4.0K Apr 24 10:01 etc
drwxr-xr-x 2 root root
4.0K Apr 24 10:01 bin
drwxr-xr-x 4 root root
4.0K Apr 24 10:04 lib
drwxr-xr-x 7 root root
4.0K Apr 24 10:05 share
drwxr-xr-x 15 hduser hadoop 4.0K Jul 22 15:26 hadoop-1.2.1
lrwxrwxrwx 1 root root
9 Sep 2 22:31 man -> share/man
lrwxrwxrwx 1 hduser hadoop 13 Sep
3 13:14 hadoop -> hadoop-1.2.1/
Configure .bashrc
file
I appended this to my .profile file.
# Set Hadoop-related environment variables
export HADOOP_HOME=/usr/local/hadoop
# Set JAVA_HOME (we will also configure JAVA_HOME directly for
Hadoop later on)
export JAVA_HOME=/usr/lib/jvm/java-1.6.0-openjdk-amd64
# Some convenient aliases and functions for running
Hadoop-related commands
unalias fs &> /dev/null
alias fs="hadoop fs"
unalias hls &> /dev/null
alias hls="fs -ls"
# If you have LZO compression enabled in your Hadoop cluster
and
# compress job outputs with LZOP (not covered in this
tutorial):
# Conveniently inspect an LZOP compressed file from the command
# line; run via:
#
# $ lzohead /hdfs/path/to/lzop/compressed/file.lzo
#
# Requires installed 'lzop' command.
#
lzohead () {
hadoop fs -cat $1 |
lzop -dc | head -1000 | less
}
# Add Hadoop bin/ directory to PATH
export PATH=$PATH:$HADOOP_HOME/bin
Since the article I followed details a single-node setup, I
will follow with it for now. Later posts will detail a multimode setup.
Configuring Hadoop
hadoop-env.sh
Edit the string below
# The java implementation to use. Required.
# export JAVA_HOME=/usr/lib/j2sdk1.5-sun
Change it to
# The java implementation to use. Required.
export
JAVA_HOME=/usr/lib/jvm/java-1.6.0-openjdk-amd64
conf/*-site.xml
I’ll leave the defaults and create the working temporary
directory for hadoop.
hduser@hadoop:/usr/local/hadoop/conf$
sudo mkdir -p /app/hadoop/tmp
hduser@hadoop:/usr/local/hadoop/conf$
sudo chown hduser:hadoop /app/hadoop/tmp
hduser@hadoop:/usr/local/hadoop/conf$
sudo chmod 750 /app/hadoop/tmp
Follow instructions in this article
to configure the *-site.xml files.
Getting Started
Format the HDFS from
the NameNode
hduser@hadoop:~$ /usr/local/hadoop/bin/hadoop namenode -format
Warning: $HADOOP_HOME is deprecated.
13/09/03 13:36:28 INFO namenode.NameNode: STARTUP_MSG:
/************************************************************
STARTUP_MSG: Starting NameNode
STARTUP_MSG: host =
hadoop/192.168.182.133
STARTUP_MSG: args =
[-format]
STARTUP_MSG: version =
1.2.1
STARTUP_MSG: build =
https://svn.apache.org/repos/asf/hadoop/common/branches/branch-1.2 -r 1503152;
compiled by 'mattf' on Mon Jul 22 15:23:09 PDT 2013
STARTUP_MSG: java =
1.6.0_27
************************************************************/
Re-format filesystem in /app/hadoop/tmp/dfs/name ? (Y or N) y
Format aborted in /app/hadoop/tmp/dfs/name
13/09/03 13:36:29 INFO namenode.NameNode: SHUTDOWN_MSG:
/************************************************************
SHUTDOWN_MSG: Shutting down NameNode at hadoop/192.168.182.133
************************************************************/
Startup
hduser@hadoop:~$ /usr/local/hadoop/bin/start-all.sh
Warning: $HADOOP_HOME is deprecated.
starting namenode, logging to
/usr/local/hadoop-1.2.1/libexec/../logs/hadoop-hduser-namenode-hadoop.out
localhost: starting datanode, logging to
/usr/local/hadoop-1.2.1/libexec/../logs/hadoop-hduser-datanode-hadoop.out
localhost: starting secondarynamenode, logging to
/usr/local/hadoop-1.2.1/libexec/../logs/hadoop-hduser-secondarynamenode-hadoop.out
starting jobtracker, logging to
/usr/local/hadoop-1.2.1/libexec/../logs/hadoop-hduser-jobtracker-hadoop.out
localhost: starting tasktracker, logging to
/usr/local/hadoop-1.2.1/libexec/../logs/hadoop-hduser-tasktracker-hadoop.out
Check whether Hadoop is up and running.
hduser@hadoop:~$ jps
2565 DataNode
3218 Jps
2311 NameNode
2797 SecondaryNameNode
3102 TaskTracker
2873 JobTracker
Shutdown
hduser@hadoop:/usr/local/hadoop$
bin/stop-all.sh
Warning: $HADOOP_HOME is deprecated.
stopping jobtracker
localhost: stopping tasktracker
stopping namenode
localhost: stopping datanode
localhost: stopping
secondarynamenode
In the next article, I will go over some of the examples I’ve
found that are useful to understand questions Hadoop can help answer.
Cheers!
Subscribe to:
Posts
(
Atom
)