Wednesday, February 12, 2014
GoldenGate 12.1.2.0 MBeansContainerImpl - Runtime exception starting jAgent Server
During the EM 12.1.0.3.0 configuration to monitor GoldenGate, I stepped through the documentation (as I have numerous times in the past) but this time I kept getting the error message in the jagent.log.
2014-02-12 00:58:54 [main] INFO  JAgentWSMain - About to call initialize on the WebService
2014-02-12 00:58:54 [main] INFO  JAgentWSMain - Loading agent-spring-ws.xml ###############
2014-02-12 00:58:56 [main] INFO  AgentInfoImpl - OEM Enabled ######
2014-02-12 00:58:56 [main] INFO  ManagerFacadeImpl - Metadata initialized
2014-02-12 00:58:56 [main] ERROR MBeansContainerImpl - Runtime exception starting jAgent Server. Jagent Host=localhost, Jagent JMX Port=5559, Jagent Config Dir=./cfg, Monitor Host=localhost, Monitor Port=15000
java.lang.NullPointerException
From my previous experience with the JAgent, I’d had to make many quirky changes in the managers parameter file. For example:
- Rename the parameter file from MGR.prm to mgr.prm
- Remove any comments from the managers parameter file that contain the word “port”
- Remove all comments from the parameter file!
None of those tricks worked because I kept getting the same error message. After the correct search on MOS yielded “OGG 12c JAGENT Fails To Initialize MBeansContainerImpl - Runtime Exception Starting JAgent Server (Doc ID 1598597.1)” suggesting that I add the line below in the Config.properties.
jagent.ssl=false
Due to the default behavior change in GoldenGate 12c (which is not stated), it is recommended that we add the line above for EM12c monitor configuration. Sure enough, once it was added the JAgent started successfully.
2014-02-12 01:04:31 [main] INFO  JAgentWSMain - About to call initialize on the WebService
2014-02-12 01:04:31 [main] INFO  JAgentWSMain - Loading agent-spring-ws.xml ###############
2014-02-12 01:04:33 [main] INFO  AgentInfoImpl - OEM Enabled ######
2014-02-12 01:04:33 [main] INFO  ManagerFacadeImpl - Metadata initialized
2014-02-12 01:04:34 [main] INFO  JAgentRmiJmxFactory - Starting JMX connector server on port 5559
2014-02-12 01:04:34 [main] INFO  JAgentWSMain - JAgent finished initialization.
2014-02-12 01:04:34 [ManagerConnectionKeeper] INFO  ManagerWSApi - Created WSAPI
2014-02-12 01:04:34 [ManagerConnectionKeeper] INFO  MBeansContainerImpl - Start Message Polling Thread...
2014-02-12 01:04:34 [ManagerConnectionKeeper] INFO  MBeansContainerImpl - Start Status Polling Thread...
2014-02-12 01:04:34 [StatusCollector] INFO  ManagerWSApi - Object Id: capture:E_SMAN
2014-02-12 01:04:34 [StatusCollector] INFO  ManagerWSApi - Object Id: agent:MGR
2014-02-12 01:04:34 [StatusCollector] INFO  ManagerWSApi - loadManagerMonitoringPoints Getting Monitoring Points for MGR
2014-02-12 01:04:39 [getInstanceList] INFO  ManagerWSApi - Object Id: capture:E_SMAN
2014-02-12 01:04:39 [getInstanceList] INFO  ManagerWSApi - Object Id: agent:MGR
2014-02-12 01:04:39 [getInstanceList] INFO  ManagerWSApi - loadManagerMonitoringPoints Getting Monitoring Points for MGR
2014-02-12 01:16:51 [MessageCollector] INFO  MessageCollector - Processing message for GGSCI Sequence 218
2014-02-12 01:16:51 [MessageCollector] INFO  MessageCollector - Processing message for GGSCI Sequence 219
2014-02-12 01:16:51 [MessageCollector] INFO  MessageCollector - Flushing messages for MGR
Hope this was helpful.
Cheers!
Saturday, February 8, 2014
wget Patch from My Oracle Support
This will be a quick and dirty post. I’m in a plane right now and needed to download the latest release of GoldenGate 12c onto my office server. Not wanting to transfer any files from my laptop over, nor going through a VNC setup I thought I’d try the wget approach.
This is documented here in Oracle Documentation.
1. You will need to first find the correct patch via the MOS site. Navigate to the “Patches & Updates” tab, search for the desired patch set.

2. On the search results page, highlight the relevant patch set and click the “Download” button. Pretty straightforward so far. Instead of clicking on the “p17660968_121200_Linux-x86-64.zip” file name, click the “WGET Options” link at the very bottom of the pop up window. From there, you simply need to download the .sh file.

3. Once downloaded, edit it and simply add your MOS credentials to the top. Alternatively you can chose where to download the file by entering a location in the OUTPUT parameter. This file already has the exact patch set to download.
theStone:Downloads maazanjum$ cat wget.sh
#!/bin/sh

#
# Generated 2/8/14 10:06 AM
# Start of user configurable variables
#
LANG=C
export LANG

# SSO username and password
SSO_USERNAME=MAAZ.ANJUM@PLANETS.COM
SSO_PASSWORD=passwordhere


# Path to wget command
WGET=/usr/bin/wget

# Location of cookie file
COOKIE_FILE=/tmp/$$.cookies

# Log directory and file
LOGDIR=.
LOGFILE=$LOGDIR/wgetlog-`date +%m-%d-%y-%H:%M`.log

# Output directory and file
OUTPUT_DIR=.

#
# End of user configurable variable
#

if [ "$SSO_PASSWORD " = " " ]
then
 echo "Please edit script and set SSO_PASSWORD"
 exit
fi

# Contact updates site so that we can get SSO Params for logging in
SSO_RESPONSE=`$WGET --user-agent="Mozilla/5.0" https://updates.oracle.com/Orion/Services/download 2>&1|grep Location`

# Extract request parameters for SSO
SSO_TOKEN=`echo $SSO_RESPONSE| cut -d '=' -f 2|cut -d ' ' -f 1`
SSO_SERVER=`echo $SSO_RESPONSE| cut -d ' ' -f 2|cut -d 'p' -f 1,2`
SSO_AUTH_URL=sso/auth
AUTH_DATA="ssousername=$SSO_USERNAME&password=$SSO_PASSWORD&site2pstoretoken=$SSO_TOKEN"

# The following command to authenticate uses HTTPS. This will work only if the wget in the environment
# where this script will be executed was compiled with OpenSSL. Remove the --secure-protocol option
# if wget was not compiled with OpenSSL
# Depending on the preference, the other options are --secure-protocol= auto|SSLv2|SSLv3|TLSv1
$WGET --user-agent="Mozilla/5.0" --secure-protocol=auto --post-data $AUTH_DATA --save-cookies=$COOKIE_FILE --keep-session-cookies $SSO_SERVER$SSO_AUTH_URL -O sso.out >> $LOGFILE 2>&1

rm -f sso.out

$WGET  --user-agent="Mozilla/5.0"  --load-cookies=$COOKIE_FILE --save-cookies=$COOKIE_FILE --keep-session-cookies "https://updates.oracle.com/Orion/Services/download/p17660968_121200_Linux-x86-64.zip?aru=16983360&patch_file=p17660968_121200_Linux-x86-64.zip" -O $OUTPUT_DIR/p17660968_121200_Linux-x86-64.zip   >> $LOGFILE 2>&1


# Cleanup
rm -f $COOKIE_FILE
4. SCP the file to your server, or even do it locally if you wanted.
theStone:Downloads maazanjum$ scp wget.sh oracle@sandbox:/home/oracle
oracle@sandbox's password:
wget.sh                                                                                                                           100% 1915     1.9KB/s   00:00
5. Change the permissions on the file and execute! Please note, you will not see any output from this script. It will however, generate a log file.
[oracle@as-sandbox-n1 ~]$ chmod 775 wget.sh
[oracle@as-sandbox-n1 ~]$ sh wget.sh
[oracle@as-sandbox-n1 ~]$ ls -lhtr
total 116M
-rwxrwxr-x  1 oracle oinstall 1.9K Feb  8 11:07 wget.sh
-rw-r--r--  1 oracle oinstall 183K Feb  8 11:08 wgetlog-02-08-14-11:07.log
6. A quick look at the log file tells me the progress.
[oracle@as-sandbox-n1 ~]$ cat wgetlog-02-08-14-11\:07.log
--2014-02-08 11:07:42-- https://login.oracle.com/sso/auth
Resolving login.oracle.com... 209.17.4.8
Connecting to login.oracle.com|209.17.4.8|:443... connected.
HTTP request sent, awaiting response... 302 Moved Temporarily
Syntax error in Set-Cookie: ORA_WWW_PERSONALIZE=v:1~i:27~r:33~g:NA~l:en~cs:NOT_FOUND~cn:Planet.; path=/; ; domain=.oracle.com; expires=Sun, 08-Feb-2015 16:07:42 GMT at position 86.
Syntax error in Set-Cookie: ORASSO_AUTH_HINT=v1.0~20140209000742; path=/; ; domain=.oracle.com; expires=Sun, 08-Feb-2015 16:07:42 GMT at position 45.
Syntax error in Set-Cookie: ORA_UCM_INFO=3~B8D455B0AE5CAD8DE0401490B2AA3AF7~Maaz~Anjum~maaz.anjum@planets.com; path=/; ; domain=.oracle.com; expires=Sun, 08-Feb-2015 16:07:42 GMT at position 91.
Location: https://updates.oracle.com/osso_login_success?urlc=v1.2%7E9204E44EE8188DCD3F1AC9312D1A02E7BE6BA13C4063AAED0D7D918D3EFABAEBE457BED97334F14C7BDD1390C67A376B8652DC1C1C87BB1D30DB7F364D6CA456703BFCBB95D33D1A933320454853E85D7630CEC30E45F07EC0B858F6FFBF635206AE06BE35BA6C270FA342D5F43B5E5D42229FB197B712007FF18A1C43E7A22AE6274FC94D5578CEF853E7618DDD4C3DEE4E066D707E71B779D7859EABD3D33E0928C777625D82BD91BF20785B92D0CCA141C53813B55C6FDF5F7920B7670084A18932698544D7FD7B20421D7D129E3DE34C31F7F46AB2758292C570C1FF84944C9C9023912BDD15D9471082B6C9BF1903B184EC739E5CA6B587261121C98BC5D2313E56755632DE0AB7C8A5EF584752E5AE61771BAABD60A1DCA79A39DB40168948B8574A8DF688BB29637721CD106D7FFFC00AA1DFC4D2 [following]
--2014-02-08 11:07:42-- https://updates.oracle.com/osso_login_success?urlc=v1.2%7E9204E44EE8188DCD3F1AC9312D1A02E7BE6BA13C4063AAED0D7D918D3EFABAEBE457BED97334F14C7BDD1390C67A376B8652DC1C1C87BB1D30DB7F364D6CA456703BFCBB95D33D1A933320454853E85D7630CEC30E45F07EC0B858F6FFBF635206AE06BE35BA6C270FA342D5F43B5E5D42229FB197B712007FF18A1C43E7A22AE6274FC94D5578CEF853E7618DDD4C3DEE4E066D707E71B779D7859EABD3D33E0928C777625D82BD91BF20785B92D0CCA141C53813B55C6FDF5F7920B7670084A18932698544D7FD7B20421D7D129E3DE34C31F7F46AB2758292C570C1FF84944C9C9023912BDD15D9471082B6C9BF1903B184EC739E5CA6B587261121C98BC5D2313E56755632DE0AB7C8A5EF584752E5AE61771BAABD60A1DCA79A39DB40168948B8574A8DF688BB29637721CD106D7FFFC00AA1DFC4D2
Resolving updates.oracle.com... 141.146.44.51
Connecting to updates.oracle.com|141.146.44.51|:443... connected.
HTTP request sent, awaiting response... 302 Found
Location: https://updates.oracle.com/Orion/Services/download [following]
--2014-02-08 11:07:43-- https://updates.oracle.com/Orion/Services/download
Connecting to updates.oracle.com|141.146.44.51|:443... connected.
HTTP request sent, awaiting response... 200 OK
Length: unspecified [text/plain]
Saving to: `sso.out'
0K 30.9M=0s
2014-02-08 11:07:43 (30.9 MB/s) - `sso.out' saved [118]
--2014-02-08 11:07:43-- https://updates.oracle.com/Orion/Services/download/p17660968_121200_Linux-x86-64.zip?aru=16983360&patch_file=p17660968_121200_Linux-x86-64.zip
Resolving updates.oracle.com... 141.146.44.51
Connecting to updates.oracle.com|141.146.44.51|:443... connected.
HTTP request sent, awaiting response... 302 Found
Location: http://aru-akam.oracle.com/adcarurepos/vol/patch44/PLATFORM/Linux-x86-64/R600000000006393/p17660968_121200_Linux-x86-64.zip?FilePath=/adcarurepos/vol/patch44/PLATFORM/Linux-x86-64/R600000000006393/p17660968_121200_Linux-x86-64.zip&File=p17660968_121200_Linux-x86-64.zip¶ms=OHNLQzhueGtIS0VaUEZXVDVWWW1vQTphcnU9MTY5ODMzNjAmZW1haWw9bWFhei5hbmp1bUBiaWFzY29ycC5jb20mZmlsZV9pZD02NjIwNzE0NCZwYXRjaF9maWxlPXAxNzY2MDk2OF8xMjEyMDBfTGludXgteDg2LTY0LnppcCZ1c2VyaWQ9by1tYWF6LmFuanVtQGJpYXNjb3JwLmNvbSZzaXplPTEyMTAwODQ2OCZjb250ZXh0PUFAMTArSEBhYXJ1dm10cDAxLm9yYWNsZS5jb20rUEAmZG93bmxvYWRfaWQ9MTAzMTAwMjEw&AuthParam=1391875782_4a43f86f65d6acb5d0727c8d5a52b318 [following]
--2014-02-08 11:07:43-- http://aru-akam.oracle.com/adcarurepos/vol/patch44/PLATFORM/Linux-x86-64/R600000000006393/p17660968_121200_Linux-x86-64.zip?FilePath=/adcarurepos/vol/patch44/PLATFORM/Linux-x86-64/R600000000006393/p17660968_121200_Linux-x86-64.zip&File=p17660968_121200_Linux-x86-64.zip¶ms=OHNLQzhueGtIS0VaUEZXVDVWWW1vQTphcnU9MTY5ODMzNjAmZW1haWw9bWFhei5hbmp1bUBiaWFzY29ycC5jb20mZmlsZV9pZD02NjIwNzE0NCZwYXRjaF9maWxlPXAxNzY2MDk2OF8xMjEyMDBfTGludXgteDg2LTY0LnppcCZ1c2VyaWQ9by1tYWF6LmFuanVtQGJpYXNjb3JwLmNvbSZzaXplPTEyMTAwODQ2OCZjb250ZXh0PUFAMTArSEBhYXJ1dm10cDAxLm9yYWNsZS5jb20rUEAmZG93bmxvYWRfaWQ9MTAzMTAwMjEw&AuthParam=1391875782_4a43f86f65d6acb5d0727c8d5a52b318
Resolving aru-akam.oracle.com... 23.62.111.35, 23.62.111.10
Connecting to aru-akam.oracle.com|23.62.111.35|:80... connected.
HTTP request sent, awaiting response... 200 OK
Length: 121008468 (115M) [application/zip]
Saving to: `./p17660968_121200_Linux-x86-64.zip'
0K .......... .......... .......... .......... .......... 0% 466K 4m14s
50K .......... .......... .......... .......... .......... 0% 892K 3m13s
100K .......... .......... .......... .......... .......... 0% 163K 6m10s
150K .......... .......... .......... .......... .......... 0% 993K 5m7s
...
35200K .......... .......... .......... .......... .......... 29% 11.2M 35s
35250K .......... .......... .......... .......... .......... 29% 11.2M 35s
35300K .......... .......... .......... .......... .......... 29% 11.0M 35s
35350K .......... .......... .......... .......... .......... 29% 1.10M 35s
...
118000K .......... .......... .......... .......... .......... 99% 6.03M 0s
118050K .......... .......... .......... .......... .......... 99% 2.37M 0s
118100K .......... .......... .......... .......... .......... 99% 2.63M 0s
118150K .......... .......... .. 100% 4.10M=46s
2014-02-08 11:08:30 (2.51 MB/s) - `./p17660968_121200_Linux-x86-64.zip' saved [121008468/121008468]
7. And that is it! I have the patch file I needed!
According to the documentation, the wget option does not support Sun patches. There is an option outside of the wget one, check the documentation I mentioned above on the steps.
Hopefully, you found this post helpful!
Cheers.
Friday, February 7, 2014
Grid Infrastructure 12.1.0.1.0 Cluster Health Monitor - A Deconstruction
While digging around Grid Infrastructure logs, I came across this new feature with 12c called Cluster Health Monitor (CHM) - I knew the MGMTDB database was good for something when I opted to install it even though it is not required.
From Oracle’s Documentation
“The Cluster Health Monitor (CHM) detects and analyzes operating system and cluster resource-related degradation and failures. CHM stores real-time operating system metrics in the Oracle Grid Infrastructure Management Repository that you can use for later triage with the help of My Oracle Support should you have cluster issues."
Consisting of three components (see below), the CHM collects and stores data for later review on the cluster’s over-all health.
System Services Monitor (osysmond)
Where every node in the cluster contains this process, it is responsible for up-to-date monitoring and metric collection service at the Operating System level.
Cluster Logger Service (ologgerd)
This process is what actually retrieves data from the osysmond and writes it to the repository
Grid Infrastructure Management Respository
An Oracle instance which stores the collected data from osysmond. This will only run on a single (hub) node in a cluster, and by design will fail-over to another node should the one its on be unavailable. Interestingly enough, the data files for the instance are located on the same disk group as the OCR and Voting files. Oracle Docs do not talk about any specific sizing, but the onclumon utility is responsible for retention of the stored data.
Let’s take a look at all processes associated with a Grid Infrastructure setup.

[root@flex1 ~]# ps -ef | grep root | grep grid
root 2210 1 1 21:07 ? 00:00:57 /u01/app/12.1.0.1/grid/bin/ohasd.bin reboot
root 2516 1 0 21:07 ? 00:00:06 /u01/app/12.1.0.1/grid/bin/orarootagent.bin
root 2729 1 0 21:07 ? 00:00:02 /u01/app/12.1.0.1/grid/bin/cssdmonitor
root 2743 1 0 21:07 ? 00:00:02 /u01/app/12.1.0.1/grid/bin/cssdagent
root 4809 1 0 21:08 ? 00:00:20 /u01/app/12.1.0.1/grid/bin/octssd.bin reboot
root 5699 1 1 21:08 ? 00:01:04 /u01/app/12.1.0.1/grid/bin/osysmond.bin
root 5705 1 0 21:08 ? 00:00:39 /u01/app/12.1.0.1/grid/bin/crsd.bin reboot
root 5969 1 0 21:08 ? 00:00:22 /u01/app/12.1.0.1/grid/bin/orarootagent.bin
root 19405 1 0 22:10 ? 00:00:01 /u01/app/12.1.0.1/grid/bin/gnsd.bin -trace-level 1 -ip-address 192.168.78.244 -startup-endpoint ipc://GNS_flex1.muscle_5969_a598858b344350d1
root 20713 1 0 22:13 ? 00:00:01 /u01/app/12.1.0.1/grid/bin/ologgerd -M -d /u01/app/12.1.0.1/grid/crf/db/flex1
Diagnostics Collection
The most convenient method to query the data in the CHM Repository, is by executing the oclumon utility.
To collect diagnostic information, preferably all nodes in a cluster, you can run the diagcollection.pl script located in the $GRID_HOME/bin. There are options with this script to collected either all, or specific CRS daemon process logs.
[root@flex1 tmp]# /u01/app/12.1.0.1/grid/bin/diagcollection.pl --help
Production Copyright 2004, 2010, Oracle.  All rights reserved

Cluster Ready Services (CRS) diagnostic collection tool

diagcollection
    --collect
             [--crs] For collecting crs diagnostic information
             [--adr] For collecting diagnostic information for ADR; specify ADR location
             [--chmos] For collecting Cluster Health Monitor (OS) data
             [--acfs] Unix only. For collecting ACFS diagnostic information
             [--all] Default.For collecting all diagnostic information.
             [--core] UNIX only. Package core files with CRS data
             [--afterdate] UNIX only. Collects archives from the specified date. Specify in mm/dd/yyyy format
             [--aftertime] Supported with -adr option. Collects archives after the specified time. Specify in YYYYMMDDHHMISS24 format
             [--beforetime] Supported with -adr option. Collects archives before the specified date. Specify in YYYYMMDDHHMISS24 format
             [--crshome] Argument that specifies the CRS Home location
             [--incidenttime] Collects Cluster Health Monitor (OS) data from the specified time.  Specify in MM/DD/YYYYHH24:MM:SS format
                  If not specified, Cluster Health Monitor (OS) data generated in the past 24 hours are collected
             [--incidentduration] Collects Cluster Health Monitor (OS) data for the duration after the specified time.  Specify in HH:MM format.
                 If not specified, all Cluster Health Monitor (OS) data after incidenttime are collected
             NOTE:
             1. You can also do the following
                diagcollection.pl --collect --crs --crshome
     --clean        cleans up the diagnosability
                    information gathered by this script
     --coreanalyze  UNIX only. Extracts information from core files
                    and stores it in a text file
1. First off, we need to find out which node the OLOGGERD service is currently running.
[root@flex1 bin]# /u01/app/12.1.0.1/grid/bin/oclumon manage -get master

Master = flex1
2. Good, it happens to run on the same node I am currently on. Next, we can invoke the diagcollection.pl script to collect the data in the repository.
[root@flex1 tmp]# /u01/app/12.1.0.1/grid/bin/diagcollection.pl --collect
Production Copyright 2004, 2010, Oracle. All rights reserved
Cluster Ready Services (CRS) diagnostic collection tool
The following CRS diagnostic archives will be created in the local directory.
crsData_flex1_20140206_2335.tar.gz -> logs,traces and cores from CRS home. Note: core files will be packaged only with the --core option.
ocrData_flex1_20140206_2335.tar.gz -> ocrdump, ocrcheck etc
coreData_flex1_20140206_2335.tar.gz -> contents of CRS core files in text format

osData_flex1_20140206_2335.tar.gz -> logs from Operating System
Collecting crs data
/bin/tar: log/flex1/cssd/ocssd.log: file changed as we read it
Collecting OCR data
Collecting information from core files
No corefiles found
The following diagnostic archives will be created in the local directory.
acfsData_flex1_20140206_2335.tar.gz -> logs from acfs log.
Collecting acfs data
Collecting OS logs
Collecting sysconfig data
3. It generates a few tar balls, and a text file.
[root@flex1 tmp]# ls -lhtr
total 25M
-rw-r--r-- 1 root   root      25M Feb  6 23:36 crsData_flex1_20140206_2335.tar.gz
-rw-r--r-- 1 root   root      57K Feb  6 23:37 ocrData_flex1_20140206_2335.tar.gz
-rw-r--r-- 1 root   root      927 Feb  6 23:37 acfsData_flex1_20140206_2335.tar.gz
-rw-r--r-- 1 root   root     329K Feb  6 23:37 osData_flex1_20140206_2335.tar.gz
-rw-r--r-- 1 root   root      31K Feb  6 23:37 sysconfig_flex1_20140206_2335.txt
4. You could limit the data that collected by using date fields
[root@flex1 tmp]# /u01/app/12.1.0.1/grid/bin/diagcollection.pl --collect --afterdate 02/04/2014
5. I was curious, so I untar’d the crsData_flex1_20140206_2335.tar.gz file, and found that the logs from the following locations in the $GRID_HOME directory.
install/
log/flex1/
log/flex1/crfmond/
log/flex1/mdnsd/
log/flex1/gpnpd/
log/flex1/gipcd/
log/flex1/cvu/cvutrc/
log/flex1/cvu/cvulog/
log/flex1/racg/
log/flex1/crflogd/
log/flex1/cssd/
log/flex1/ohasd/
log/flex1/acfs/kernel/
log/flex1/ctssd/
log/flex1/gnsd/
log/flex1/crsd/
log/flex1/client/
log/flex1/agent/ohasd/oracssdmonitor_root/
log/flex1/agent/crsd/oraagent_oracle/
log/flex1/evmd/
cfgtoollogs/
cfgtoollogs/cfgfw/
cfgtoollogs/crsconfig/
cfgtoollogs/oui/
cfgtoollogs/mgmtca/
oc4j/j2ee/home/log/
oc4j/j2ee/home/log/wsmgmt/auditing/
oc4j/j2ee/home/log/wsmgmt/logging/
oc4j/j2ee/home/log/oc4j/
oc4j/j2ee/home/log/dbwlm/auditing/
oc4j/j2ee/home/log/dbwlm/logging/
OCLUMON
Now that we have dispensed with the logs, let’s see what this fancy OCLUMON can do.
1. First off, we need to set the logging level for the daemon we’d like to monitor.
[root@flex1 tmp]# /u01/app/12.1.0.1/grid/bin/oclumon debug log osysmond CRFMOND:3
2. Next, start the process with the dumpnodeview
[root@flex1 tmp]# /u01/app/12.1.0.1/grid/bin/oclumon dumpnodeview -n flex1

----------------------------------------

Node: flex1 Clock: '14-02-07 00.02.08' SerialNo:2081

----------------------------------------

SYSTEM:

#pcpus: 1 #vcpus: 1 cpuht: N chipname: Intel(R) cpu: 26.27 cpuq: 2 physmemfree: 141996 physmemtotal: 4055420 mcache: 2017648 swapfree: 3751724 swaptotal: 4063228 hugepagetotal: 0 hugepagefree: 0 hugepagesize: 2048 ior: 105 iow: 248 ios: 55 swpin: 0 swpout: 0 pgin: 105 pgout: 182 netr: 47.876 netw: 24.977 procs: 302 rtprocs: 12 #fds: 24800 #sysfdlimit: 6815744 #disks: 9 #nics: 3 nicErrors: 0

TOP CONSUMERS:

topcpu: 'apx_vktm_+apx1(7240) 3.40' topprivmem: 'java(19943) 138464' topshm: 'ora_mman_sport(14493) 223920' topfd: 'ocssd.bin(2778) 341' topthread: 'console-kit-dae(1973) 64'


----------------------------------------

Node: flex1 Clock: '14-02-07 00.02.13' SerialNo:2082

----------------------------------------

SYSTEM:

#pcpus: 1 #vcpus: 1 cpuht: N chipname: Intel(R) cpu: 46.13 cpuq: 17 physmemfree: 110400 physmemtotal: 4055420 mcache: 2027560 swapfree: 3751708 swaptotal: 4063228 hugepagetotal: 0 hugepagefree: 0 hugepagesize: 2048 ior: 7714 iow: 210 ios: 399 swpin: 0 swpout: 6 pgin: 7212 pgout: 190 netr: 19.810 netw: 17.537 procs: 303 rtprocs: 12 #fds: 24960 #sysfdlimit: 6815744 #disks: 9 #nics: 3 nicErrors: 0


TOP CONSUMERS:

topcpu: 'apx_vktm_+apx1(7240) 3.00' topprivmem: 'java(19943) 138464' topshm: 'ora_mman_sport(14493) 223920' topfd: 'ocssd.bin(2778) 341' topthread: 'console-kit-dae(1973) 64'
This will regularly dump an output similar to a “top” command in linux. As with the diagcollection.pl script, there are date duration parameters for oclumon as well.
3. The data (in the MGMTDB instance) is stored in the CHM schema.
SQL> select table_name from dba_tables where owner = 'CHM';

TABLE_NAME
--------------------------------------------------------------------------------
CHMOS_SYSTEM_SAMPLE_INT_TBL
CHMOS_SYSTEM_CONFIG_INT_TBL
CHMOS_SYSTEM_PERIODIC_INT_TBL
CHMOS_SYSTEM_MGMTDB_CONFIG_TBL
CHMOS_CPU_INT_TBL
CHMOS_PROCESS_INT_TBL
CHMOS_DEVICE_INT_TBL
CHMOS_NIC_INT_TBL
CHMOS_FILESYSTEM_INT_TBL
CHMOS_ASM_CONFIG


10 rows selected.
4. As mentioned earlier, you can also manage the repository retention period from oclumon.
4.1 To find out the current settings, we can issue the -get parameter.
4.1.1 Find the repository size, in bytes.
[root@flex1 tmp]# /u01/app/12.1.0.1/grid/bin/oclumon manage -get repsize
CHM Repository Size = 136320
4.1.2 Find the repository data file location
[root@flex1 tmp]# /u01/app/12.1.0.1/grid/bin/oclumon manage -get reppath

CHM Repository Path = +DATA/_MGMTDB/DATAFILE/sysmgmtdata.260.835192031
4.1.3 Find the master and logger nodes
[root@flex1 tmp]# /u01/app/12.1.0.1/grid/bin/oclumon manage -get master

Master = flex1
[root@flex1 tmp]# /u01/app/12.1.0.1/grid/bin/oclumon manage -get alllogger

Loggers = flex1,
[root@flex1 tmp]# /u01/app/12.1.0.1/grid/bin/oclumon manage -get mylogger

Logger = flex1
4.2 To set parameters, follow some of the examples below.
4.2.1 The changeretentiontime is merely an indicator for how much longer the underlying tablespace can accommodate the collected data. The value is (I believe) in seconds.
[root@flex1 tmp]# /u01/app/12.1.0.1/grid/bin/oclumon manage -repos changeretentiontime 1000
The Cluster Health Monitor repository can support the desired retention for 2 hosts
4.2.2 Change the repository’s tablespace size (in MB). This also changes the retention period.
[root@flex1 tmp]# /u01/app/12.1.0.1/grid/bin/oclumon manage -repos changerepossize 6000
The Cluster Health Monitor repository was successfully resized.The new retention is 399240 seconds.
The alert.log for -MGMTDB shows a simple ALTER TABLESPACE command.
Fri Feb 07 00:28:11 2014
ALTER TABLESPACE SYSMGMTDATA RESIZE 6000 M
Completed: ALTER TABLESPACE SYSMGMTDATA RESIZE 6000 M
The size of the instance has obviously increased as well.
[root@flex1 tmp]# /u01/app/12.1.0.1/grid/bin/oclumon manage -get repsize
CHM Repository Size = 399240
5. And last, but not least, the version check!
[root@flex1 tmp]# /u01/app/12.1.0.1/grid/bin/oclumon version

Cluster Health Monitor (OS), Version 12.1.0.1.0 - Production Copyright 2007, 2013 Oracle. All rights reserved.
Well, I hope this has been an insightful post on the new CHM feature in the 12c release of Grid Infrastructure. If anything, the diagcollection.pl will be a nice replacement to the RDA that Support might request. I haven’t had to troubleshoot any clusteware issues on 12c, but I plan to break this environment and use the oclumon utility to debug the processes at a later date.
Cheers!
Monday, February 3, 2014
EM12c, Weblogic, and Finding Your Way Through Active Directory
Introduction
As with any adventure, there are hurdles along the way. I started my previous post with the sections below but instead I ended up composing the linked article. What I had started with was how to query the Active Directory tree where groups with multiple subgroups from a Weblogic Server for Enterprise Manager User Authentication. In the past, I had only needed to configure Active Directory users with a simple users’ group membership. I’d like to note that I am a DBA by trade and make no claims of being either a Weblogic or LDAP whiz. This article is merely my experience written in hopes that it might help someone who is going through a similar situation.
The Goal
If you are savvy with LDAP queries, then after reading this post you could probably teach me a thing or two. However, I did want to share a unique example where the customer’s Active Directory Administrator created a security group called “IT OEM Users” which contained several users as well as sub-groups. From an organization standpoint, groups are ideal because they require less overhead of a user-to-many-groups mapping.
Organization is great, but my challenge was how do I query this information from Weblogic’s Provider setup? Since Oracle’s Documentation is quite thorough on the steps both for EM12c and Weblogic, I won’t need to go through the nitty gritty set up details. What I will discuss are the filters I used to retrieve the list of users.
Knowledge
One of my customers asked me how I knew which filters to apply and how I figured it out to begin with. The honest answer was and still is, that it was by trial and error and leveraging an Active Directory query tool. A quick search on Google provides several options. I ended up ADExplorer which is part of the SysInternals Suite - its lightweight, portable and has a GUI! Alternatively, you could also use a command line tool to find your data set. I was tempted to ask my customer to review this Knowledge Based article at Microsoft but they needed the right context. Additionally, there’s a Microsoft Exchange article on it as well. Another alternative is ldifede which is a command line utility for querying LDAP.
The Tools
To really grasp all the nonsense I’m about to explain below, I recommend that you know/have at the very least the things below
- Knowledge of LDAP: A clear understanding of the attributes, fields, filters etc that are related to this protocol. If you are interested, I have found a decent tutorial here.
- LDAP Query Tool: Key if you’re to test your LDAP filters before applying them.
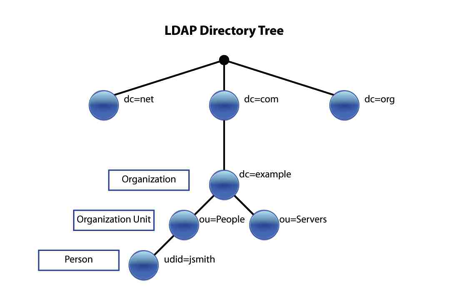


Get Your Gear and Tools Ready
Before you can even begin this adventure, three things are required.
- LDAP Server Name
- LDAP Servers Port
- LDAP Principal Credentials
You would now need to find out which users should have access to EM12c. My preferred way to do this in Active Directory is by requesting the AD Admin to create a new Security Group and add these users to it. If, for some reason they wouldn’t, then the other option is to add filters for each specific group. I would advise to stay away from query individual users.
Next what you need are the
- User Base DN
- Group Base DN
DN means Distinguished Name which is an LDAP attribute. If you are interested in all (if not most) attributes in LDAP, check out this link. The Base DN simply denotes where in the Active Directory tree the search for Users and Groups will initiate. It equates to the FROM clause in SQL query. Come to think of it, you could just query the Base DN and call it a day — but that’s just as bad as SELECTing all rows from a table when you only need a handful. The adverse affect will be longer console login, and em12c restart times. Naughty naughty.
Apart from the Base DN fields, I usually edit the “All Users Filter” and “User From Name Filter”. “All Users Filter” is what you would equate to the WHERE clause. It will contain the actual filters that limits the resulting data set. According to Seth Miller (@Seth_M_Miller), you could pretty much query anything if you have the right filters enabled and I agree with him.
“User from Name Filter” actually maps the credential set that are used for authentication to an LDAP attribute. For example, if my company uses the first initial of the first name and the last name (or part of it) format, then my username in AD that I would use for logging into a windows machine might be “manjum”. So, on an EM12c or Weblogic console I would enter the same username. In LDAP, this maps to the sAMAccountName attribute.
Understand the Required Data
Ok, so now that we have the information we need to connect, and query the Active Directory tree, lets get an understanding on the data that will be actually retrieved. For the providers, you need two sets of data which must intersect; Users and Groups. You could get quite dynamic with the filter for either and pretty much get any data set. As I mentioned earlier, the filters are akin to an SQL query wherein WHERE clauses have AND or OR operators.

Default Provider Configuration in Weblogic
The provider configuration page in Weblogic is mostly empty except for a few default values which are pre-populated.
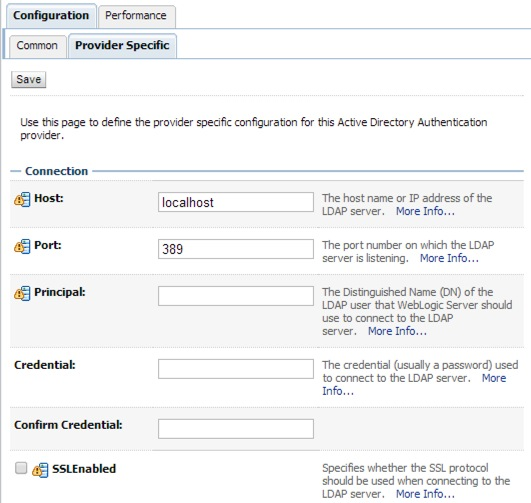


An Example
The steps outlined below only illustrate how to find the correct group memberships for a given user. I have had to blur out and domain specific information and replace it with my own examples.
Users
Let’s assume that I have the following User Base DN, OU=Users,DC=corp,DC=krypton,DC=planet,DC=com even though I have most of the DC and OU sections blurred.
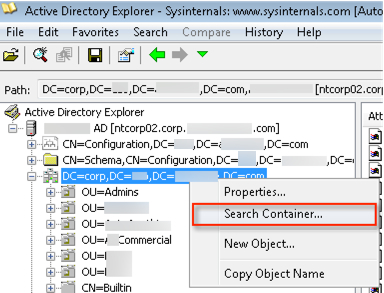
Now that we have the basic required information, let’s start with a simple query. I want to find my user within AD. I start with a search within the User Base DN, it's a right click then “Search Container”.
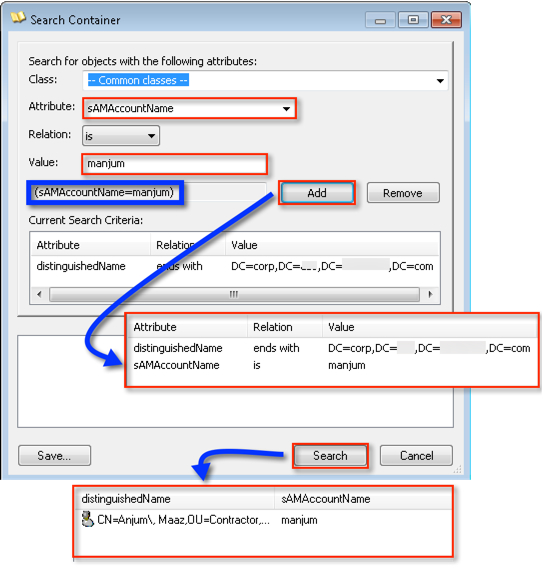
The GUI is easy if you know what you are looking for, in my case I need use the sAMAccountName which is “manjum”. It actually builds the search string for me highlight in blue:
Once I find my user, I can look at its properties (I’m copying the image from earlier :)). I then look at the “memberOf” attribute, and can use it to search for all users within a Security Group.

I simply double click on the “memberOf” attribute to show all groups for the user.
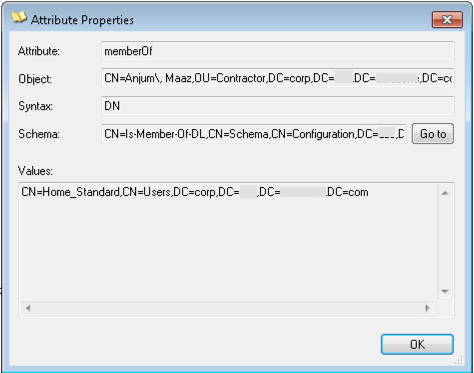
I can then use the value in the groups to perform another search. This time I will use the “memberOf” attribute. I selected the attribute from the “Attribute” drop-down list, pasted the CN=Home_Standard,CN=Users,DC=corp,DC=krypton,DC=planet,DC=com string in the “value” section and hit “Add”, and then “Search”.
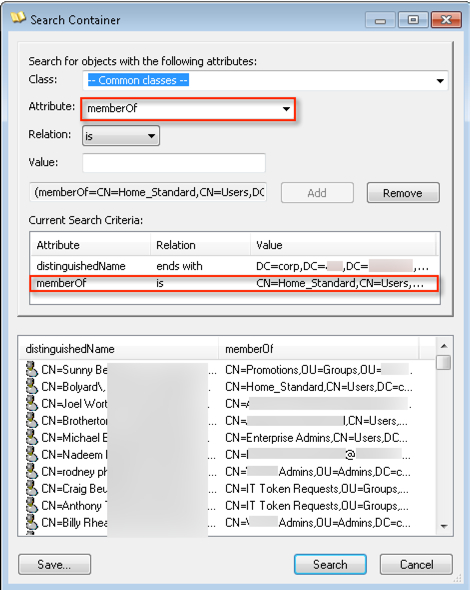
Presto, I found my users! If you should see this pop up below, then go ahead and click “Cancel” — you really shouldn’t need to retrieve more than a 1000 users anyway :)

So, my “All Users Filter” after a slight group name change, my filter looks like (&(sAMAccountName=%u)(objectClass=user)(memberOf=CN=IT OEM Users,CN=Users,DC=corp,DC=krypton,DC=planet,DC=com)).

Back to Weblogic Provider Configuration
Plug the above string in the provider configuration “User From Name Filter”. If you noticed, I also updated the “User From Name Filter” with (&(sAMAccountName=%u)(objectClass=user)) and “User Name Attribute” with “sAMAccountName”. The latter is because I want the authentication to happen with the sAMAccountName (recall the username manjum from earlier?) attribute.

Groups
I search for groups in a similar way, you will likely have the same Group Base DN as the User Base DN, or it might just be OU=Groups,DC=corp,DC=krypton,DC=planet,DC=com.
I don’t know the odds, but you will have far less groups than users. I chose to retrieve all groups within an OU to ensure my membership criteria intersects with the Users. You can apply the same filters, i.e. memberOf, member, etc to a group as well.
The string itself is (&(sAMAccountName=*)(objectclass=group)).
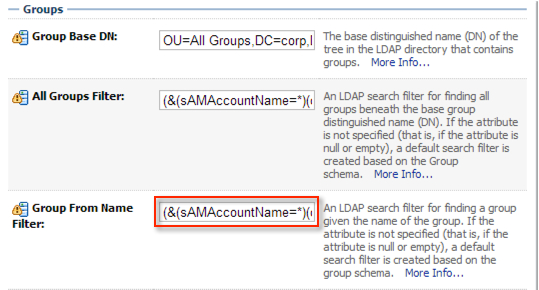
When the configuration for the providers is complete, the information is saved in the $DOMAIN_HOME/config/config.xml file. You could configure the AD Providers within the configuration file but according to Oracle Support, that should be your last resort.
<sec:authentication-provider xsi:type="wls:active-directory-authenticatorType">
<sec:name>ADAuthenticator</sec:name>
<sec:control-flag>SUFFICIENT</sec:control-flag>
<wls:propagate-cause-for-login-exception>true</wls:propagate-cause-for-login-exception>
<wls:host>corp.krypton.planet.com</wls:host>
<wls:port>389</wls:port>
<wls:user-name-attribute>sAMAccountName</wls:user-name-attribute>
<wls:principal>orasvc@corp.krypton.planet.com</wls:principal>
<wls:user-base-dn>OU=IT,DC=corp,DC=krypton,DC=planet,DC=com</wls:user-base-dn>
<wls:credential-encrypted>abcdefghijklmnopqrstuvwxyz</wls:credential-encrypted>
<wls:user-from-name-filter>(&(sAMAccountName=%u)(objectClass=user))</wls:user-from-name-filter>
<wls:all-users-filter>(&(sAMAccountName=%u)(objectClass=user)(memberOf=CN=IT OEM Users,CN=Users,DC=corp,DC=krypton,DC=planet,DC=com))</wls:all-users-filter>
<wls:group-base-dn>OU=IT,DC=corp,DC=krypton,DC=planet,DC=com</wls:group-base-dn>
<wls:group-from-name-filter>(&(sAMAccountName=*)(objectclass=group))</wls:group-from-name-filter>
<wls:all-groups-filter>(&(sAMAccountName=*)(objectclass=group))</wls:all-groups-filter>
<wls:static-group-name-attribute>sAMAccountName</wls:static-group-name-attribute>
<wls:dynamic-group-name-attribute>sAMAccountName</wls:dynamic-group-name-attribute>
</sec:authentication-provider>
Back to “The Goal”
If you’re still with me, and recall that I stated a goal up at the top, it was that I want all users within a Security Group, even those within a Sub-Group.

The “User From Name Filter” or “All Users Filter” as I described above will not retrieve the Sub-Groups users. To retrieve them, I had to tweak both filters values to the following:
From
“User From Name Filter”=(&(sAMAccountName=%u)(objectClass=user))
“All Users Filter”=(&(sAMAccountName=%u)(objectClass=user)(memberOf=CN=IT OEM Users,CN=Users,DC=corp,DC=krypton,DC=planet,DC=com))
To
“User From Name Filter”=(&(sAMAccountName=%u)(objectCategory=*)(memberOf:1.2.840.113556.1.4.1941:=CN=IT OEM Users,CN=Users,DC=corp,DC=krypton,DC=planet,DC=com))
“All Users Filter”=(&(sAMAccountName=*)(objectClass=*))
The Matching Rule OID “1.2.840.113556.1.4.1941” recursively retrieves the data from within a section of the LDAP tree. In this case, it will traverse the tree and query the subgroups as well until it finds all objects.
Summary
I walked through the LDAP tree, the tools I used to find the information (users and groups) I needed to build my search string for LDAP, explained the bits and pieces (LDAP server, port, principal account, user base dn, group base dn) you require for as a base for your provider, and as an added bonus explain how to executed a recursive LDAP query.
I hope this has proven to be a helpful post. Please feel free to send me a tweet (@maaz_anjum) or email with any questions.
Cheers.
Thursday, January 30, 2014
User Authentication in EM12c via Weblogic Framework Security
To quote Oracle’s Weblogic Documentation: “WebLogic Server includes numerous Authentication security providers. Most of them work in similar fashion: given a username and password credential pair, the provider attempts to find a corresponding user in the provider's data store. These Authentication providers differ primarily in what they use as a data store: one of many available LDAP servers, a SQL database, or other data store. In addition to these username/password based security providers, WebLogic Server includes identity assertion Authentication providers, which use certificates or security tokens, rather than username/password pairs, as credentials.”
In a nutshell, providers are defined within a security realm called “myrealm”. Once a new provider, in our case “ADAuthenticator - IT Oracle DBA” is added, it needs to be re-ordered and placed on top. I could describe in detail the steps to configure an LDAP provider, but after speaking with Tim Hall (@oraclebase), turns out he already blogged about it!

Enterprise Manager supports the following sources:
- Repository Based (Default)
- Oracle Access Manager (OSM) SSO
- Oracle SSO Based
- Enterprise User Security Based
- LDAP; either Oracle Internet Directory or Active Directory
When an attempt to login is made from EM12c’s console, a request is sent via the security layer to the configured providers. I’ve done my best to illustrate the routes where a possible authentication request may take - either the Admin or Managed servers can request authentication via the Security Realm, which in turn (depending on the provider order) will authenticate the relevant credentials. If the credentials are not present within the first provider, the subsequent ones will be attempted.

Once credentials are authenticated against the Active Directory source, they are then authorized within EM12c. Should the user not exist in EM12c, by default, the authentication will fail because auto-provisioning is disabled. According to the Oracle Documentation the parameter can be set from either emctl or the console UI. I have not found where to perform the latter, however my post here described how to enable it via emctl. Alternatively, you could register the external users via the emcli create_user command. For example, and this is just one of many ways of doing this:
emcli create_user
   -name=“manjum"
   -email=“maaz.anjum@iwish.com;miles.andrew@iwish.com”
   -roles=“public;em_user;<custom_role>”
   -type=“EXTERNAL_USER"
In addition to auto-provisioning, you could also enable mapping of LDAP user attributes to EM user attributes. For example, mapping of email address, department, first name, last name etc. Don Seiler (@dtseiler) alludes to this in one of his posts about authentication quirks. I haven’t had the opportunity to explore this feature yet.
If you had to troubleshoot any issues, there’s a good bit of troubleshooting help available in the Oracle Documentation here (thanks to @Seth_M_Miller for pointing it out).
I hope this brief overview was helpful to understanding the parts and pieces (assuming thats all of them) for user authentications in EM12c with Weblogic’s Security Framework. I plan to publish a few more posts related to the issues I came across during my adventures.
Cheers!
Enable Auto-Provisioning of Users in EM12c
While writing a separate article on EM12c’s Security Authentication, I felt the need to separate out the various parts and pieces which make up the discussion. Rather than have one quite long post, a few smaller ones would make for an easier read.
In this one, I’d like to show you how to enable auto-provisioning for external users in EM12c. Quoting the documentation below, the intent is self explanatory.
"Typically the external LDAP users need to be created in Enterprise Manager before they can log in to the Enterprise Manager console. Auto provisioning removes that requirement by automatically creating the Enterprise Manager user account upon successful authentication of the user the first time he logs on to Enterprise Manager.”
Basically, if the property is not enabled, during the authentication-authorization phase the attempt to log will fail with an “Authentication Failed” message. You would have to dig down quite deep in the EMGC_OMSx Server LDAP logs to find that during the authorization phase the user would not map.
When I first had to do this in version 12.1.0.2.0, I found a neat video that Oracle posted which described the process of LDAP Authentication from start to finish. With respect to my post, the relevant steps are below - these need to be run on each OMS server.
-bash-4.1$ emctl set property -name "oracle.sysman.core.security.auth.autoprovisioning" -value "true"
Oracle Enterprise Manager Cloud Control 12c Release 3
Copyright (c) 1996, 2013 Oracle Corporation. All rights reserved.
SYSMAN password:
Property oracle.sysman.core.security.auth.autoprovisioning for oms p-oem-app02.acme.com:4889_Management_Service has been set to value true
OMS restart is not required to reflect the new property value
Finally, restart all OMS servers and voila!
Hope this helps.
Cheers!
Friday, January 24, 2014
How to Change Properties of a Target in EM12c
One of my colleagues asked me a good question this morning about how to go about changing the properties of a target, specifically the “Contact” field.

The properties fields for a target are often over-looked, but are important to the prioritization algorithm for event management. For example, if a target’s Lifecycle Status is Production or Mission Critical, its events will be given a preference over one with a lower lifecycle status. That being said, in this example it was a listener type target. The same method applies for any target. You simply need to go to the menu under the targets name and follow the screenshot below. Please note, this method is only applicable in EM12c.
My colleague didn’t mention “why” he wanted it removed, however one picture was worth a handful of words.

Hope this helps.
Cheers!
Monday, December 30, 2013
Create a Simple Job for a Host Target in EM12c
Afternoon folks! I received a text from a customer of mine asking whether I had any documentation to create jobs in EM12c. To be specific, the job in question could have been setup via crontab or windows jobs but since I had recommended consolidation of newer jobs in EM12c, this was a good question. The easiest route was to refer the customer to Oracle Documentation, but I have a few hours to kill and thought it would make a good post.
The job in question, is a veridata compare job. You could just as easily, replace that job with <insert script name here>. I’d like to show you how to set it up.
First, let’s make sure that our script actually works. For those who are not familiar with Veridata, it is Oracle’s solution to data comparison when replication is in use. The Veridata suite contains a Command Line Interface (CLI) called vericom that can be used to perform minimal activities on the jobs and compare pairs configured within it. I should have probably written another post on configuring jobs, but I’ll leave that for another day.
My innocent script is located in the $VERIDATA_HOME directory.
[oracle@as-sandbox-n1 scripts]$ pwd
/u01/app/oracle/product/11.2.1.0/veridata/scripts
[oracle@as-sandbox-n1 scripts]$ ls -lhtr
total 4.0K
-rwxrwxrwx 1 oracle oinstall 68 Nov  8 12:43 vericom_run_job.sh
[oracle@as-sandbox-n1 scripts]$ cat vericom_run_job.sh
/u01/app/oracle/product/11.2.1.0/veridata/vericom.sh -j BLUE_YELLOW
A sample execution of the script looks like:
VERIDATA_HOME /u01/app/oracle/product/11.2.1.0/veridata
JRE_HOME: /u01/app/oracle/product/11.2.1.0/veridata/jre
JAVA_OPTS: -Xmx1024m -Djava.awt.headless=true
Oracle GoldenGate Veridata Command Line Interface - Version 11.2.1.0  OGGVDT_11.2.1.0.0_PLATFORMS_121108.1625
Job BLUE_YELLOW started
Run ID: (1027,0,0)
Number of Compare Pairs: 3
Number of Compare Pairs With Errors: 3
Number of Compare Pairs With OOS: 0
Number of Compare Pairs With No OOS: 0
Number of Compare Pairs Cancelled: 0
Job Report Filename: /u01/app/oracle/product/11.2.1.0/veridata/shared/data/rpt/BLUE_YELLOW/00001027/BLUE_YELLOW.rpt
Run ID: (1027,0,0)
Job Completion Status: IN SYNC
That was the easy part :)
1. Now, let’s log into EM12c and navigate to the Jobs home page.

2. Since we need to create a job and the default option under “Create Library Job” is set to “OS Command”, click on Go.

3. From here, you can give the job a name and description, and add a target where it will run.

4. In the parameters tab, enter the absolute path of the script. You have the option of embedding the script within the job itself by choosing a different “Command Type”.

5. I already have a Preferred Named Credential Set configured for this host, so the defaults as left. Alternatively, you could pick one of the other two options as well, but it all depends on your configuration.

6. The insane schedule is merely to illustrate a point. You can pick your own.

7. I generally do not make alterations to the Access tab, however, you may want to delegate ownership and access to other users. Click on “Save to Library”.

8. And that’s it!

9. I waited a few minutes before checking for the jobs activity.

10. Cool, the first one completed successfully. You can drill down to the log of the execution.

I’ve only scratched the surface of the job system in EM12c. There are several other options while creating jobs (see screenshot below). One of the most interesting for me are the multi-task jobs which I hope to write an article on eventually.

For the moment, I hope you enjoyed the article and found it useful.
Cheers!
Wednesday, December 18, 2013
Patch and Provision with EM12c: Index
Over the last few months, I’ve written a few posts on Provisioning Databases in EM12c. After writing them out, I’ve realized that they’re note organized in the best manner. With that in mind, I’ve created a list (see below) which I hope to keep updated, and you will find as a helpful resource.
1. Patch and Provision with EM12c: #1 Database Provisioning - Provision Me a Database!
2. Patch and Provision with EM12c: #2 Database Provisioning - Profiles
3. Patch and Provision with EM12c: #3 Database Provisioning - Using Profiles
4. Patch and Provision with EM12c: #4 Software Library - Create a Component From Oracle Home Clone
Upon further view, I found I wasn’t quite done with this list as I have written other blogs to support the above ones.
1. Adding Entities (Component) to the Software Library in Oracle Enterprise Manager 12.1.0.3.0
Cheers!
Saturday, December 14, 2013
OGG-01973 The redo record indicates data loss on object <OBJECT,ID>
Let’s walk through the setup, steps, and error message.
Configuration
A single Extract writing to trail files that are ready by a single Replicat - both on the same host but, with different source and target databases. The E_GG Extract captures transactions from 2 schemas from the SKY database and the replicat R_GG applies them on the target database (WATER).
Steps
1. Check GoldenGate process status
[oracle@blue ggate]$ ggsci

Oracle GoldenGate Command Interpreter for Oracle
Version 11.2.1.0.13 17435036 OGGCORE_11.2.1.0.0OGGBP_PLATFORMS_131002.1206_FBO
Linux, x64, 64bit (optimized), Oracle 11g on Oct 3 2013 02:39:46

Copyright (C) 1995, 2013, Oracle and/or its affiliates. All rights reserved.

GGSCI (blue.color) 1> info all

Program Status Group Lag at Chkpt Time Since Chkpt

MANAGER RUNNING
EXTRACT RUNNING E_GG 00:00:00 00:00:14
REPLICAT RUNNING R_GG 00:25:39 00:23:27
2. All looks good. Create a table on the source schema being replicated.
[oracle@blue ~]$ sqlplus day/oracle

SQL*Plus: Release 11.2.0.3.0 Production on Mon Dec 9 14:05:00 2013

Copyright (c) 1982, 2011, Oracle.  All rights reserved.

Connected to:

Oracle Database 11g Enterprise Edition Release 11.2.0.3.0 - 64bit Production

With the Partitioning, OLAP, Data Mining and Real Application Testing options

SQL> create table breakgg as select * from dba_tables;

Table created.
3. Check the Extracts status. ABENDED?
[oracle@blue ggate]$ ggsci

Oracle GoldenGate Command Interpreter for Oracle
Version 11.2.1.0.13 17435036 OGGCORE_11.2.1.0.0OGGBP_PLATFORMS_131002.1206_FBO
Linux, x64, 64bit (optimized), Oracle 11g on Oct 3 2013 02:42:32

Copyright (C) 1995, 2013, Oracle and/or its affiliates. All rights reserved.

GGSCI (blue.color) 1> info all

Program Status Group Lag at Chkpt Time Since Chkpt

MANAGER RUNNING
EXTRACT ABENDED E_GG 00:00:00 00:00:14
REPLICAT RUNNING R_GG 00:28:39 00:25:27
4. What does the report file tell us?
Source Context :
SourceModule : [er.redo.ora.sr]
SourceID : [/scratch/aime1/adestore/views/aime1_adc4150267/oggcore/OpenSys/src/app/er/redo/oracle/redoorasr.c]
SourceFunction : [get_subrec]
SourceLine : [6377]
ThreadBacktrace : [11] elements
: [/u01/app/ggate/libgglog.so(CMessageContext::AddThreadContext()+0x1e) [0x7ffdba940f3e]]
: [/u01/app/ggate/libgglog.so(CMessageFactory::CreateMessage(CSourceContext*, unsigned int, ...)+0x2cc) [0x7ffdba939c8c]]
: [/u01/app/ggate/libgglog.so(_MSG_ERR_ORACLE_REDO_DATA_LOSS(CSourceContext*, unsigned int, CMessageFactory::MessageDisposition)
+0x2f) [0x7ffdba9185f1]]
: [/u01/app/ggate/extract() [0x701d69]]
: [/u01/app/ggate/extract(REDOORASR_get_all_subrecs(int, objectpool*, unsigned char*, subrec_info_t*, redo_thread_t*, log_contex
t_t*)+0x6c) [0x701e8c]]
: [/u01/app/ggate/extract(REDO_read(char*, int*, long*, char*, short*, int, char*)+0x7e4) [0x6a4308]]
: [/u01/app/ggate/extract(READ_EXTRACT_RECORD(chkpt_context_t*, short, char*, __std_rec_hdr*, int*, int*, long*, short, short, c
har*, short*, char*, short*, long*, char*)+0x19b) [0x4f9bbb]]
: [/u01/app/ggate/extract(process_extract_loop()+0x625) [0x565975]]
: [/u01/app/ggate/extract(main+0x5e6) [0x578166]]
: [/lib64/libc.so.6(__libc_start_main+0xfd) [0x3d1e41ed1d]]
: [/u01/app/ggate/extract(__gxx_personality_v0+0x3a2) [0x4f18ba]]

2013-12-09 14:05:30 ERROR OGG-01973 The redo record indicates data loss on object 68,687.

***********************************************************************
* ** Run Time Statistics ** *
***********************************************************************


Report at 2013-12-09 14:05:30 (activity since 2013-12-09 13:41:25)

Output to ./dirdat/lt:


DDL replication statistics:

Operations: 0
Mapped operations: 0
Unmapped operations: 0
Other operations: 0
Excluded operations: 0


No records extracted.


2013-12-09 14:05:30 ERROR OGG-01668 PROCESS ABENDING.
5. OGG-01973? Well, this just raises too many questions. A quick search on MOS yields only a single note “OGG v11.2 Extract amends with “OGG-01965 The redo record indicates data loss on object <object id>” or "OGG-01973 The redo record indicates data loss on object <object id>" (Doc ID 1483431.1)". In it, there’s a note that the table can not be in NOLOGGING mode. But wait, this a new table and by default LOGGING is turned on.
6. What was I missing? I looked through the report file again, and found this message.
2013-12-09 13:41:25  WARNING OGG-01970  Database is not in archiving mode. Extract may be forced to fetch LONG columns and may miss transaction data if th

e online logs are recycled.

2013-12-09 13:41:25  WARNING OGG-01972  Extract will fetch all LONG columns because archiving mode is disabled.

2013-12-09 13:41:25  WARNING OGG-01423  No valid default archive log destination directory found for thread 1.
7. Ok, is archived logging turned on? Ouch, that is probably it!
SQL> archive log list

Database log mode      No Archive Mode

Automatic archival      Disabled

Archive destination      USE_DB_RECOVERY_FILE_DEST

Oldest online log sequence     52

Current log sequence      54
8. Okay, lets turn it on.
SQL> shutdown immediate

Database closed.

Database dismounted.

ORACLE instance shut down.

SQL> startup mount;

ORACLE instance started.


Total System Global Area  814227456 bytes

Fixed Size   2232760 bytes

Variable Size 297799240 bytes

Database Buffers 511705088 bytes

Redo Buffers   2490368 bytes

Database mounted.

SQL> alter database archivelog;

Database altered.

SQL> alter database open;

Database altered.
9. And try to create the table again. By the way, I was not able to skip the particular transaction in the Extract, and the only way around it (for the moment) was a rebuild of the extract and pump.
10. Once I did that, along with enabling archive log mode, DDL replication worked as expected!
In conclusion, follow the steps to pre-requisite checks to the letter i.e. database must have minimum supplemental logging enabled, check point table etc. Otherwise, you are simply inviting trouble! RTM my friends :) I hope you found this post helpful. I’ll have to spend more time to figure out how to skip a “bad” transaction in the Extract and blog about it at a later date.
Cheers!